Installing a new exhaust in an Alden Challenger.

TomY

Alden Forum Moderator
Jun 22, 2004
2,758
Alden 38' Challenger yawl Rockport Harbor
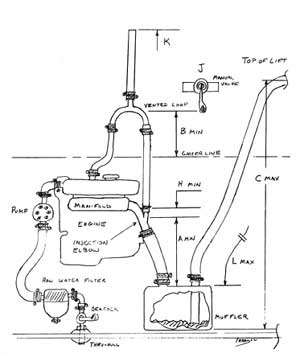
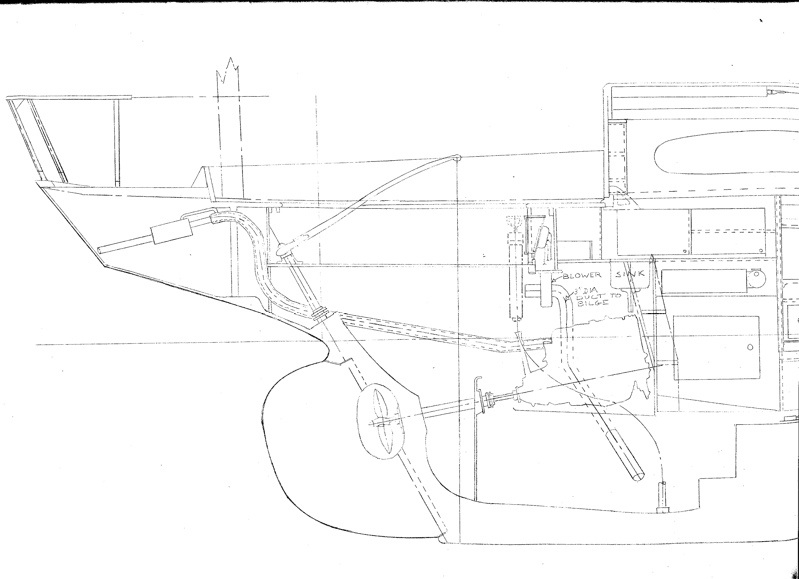
CHRISTMAS, a 1961 Challenger - on her third engine, has the original exhaust. A drawing dated 1958 shows the typical jacketed copper pipe exhaust of the day. Attached at the exhaust manifold end plate with a flexible bellows, the location worked for the original Graymarine gasoline engine, and the second and now third diesel engines.

The inner exhaust pipe is 1 1/2" diameter, the outer jacket which holds the cooling raw water is 2". The cooling water is injected aft of the bellows, flows through the jacket to the high loop aft, and then the cooling water exits via a tap fitting plumbed to a muffler.

The muffler is a Maxim Silencer, a state of the art cast iron muffler in it's day. Cooling water flows through the chambers in the muffler and out through a section of 2" rubber exhaust hose, and out the stern outlet. It all works perfectly and is very quiet. And it has proven in our use to be completely protected from back flooding or siphoning through the raw water, and flooding the engine. Good design.


Exhaust detail 2.jpg

But I've been warned by a mechanic, when the system fails (due to inevitable corrosion), it does so catastrophically; the inner exhaust pipe fails and the system floods the engine. Plus, 2 of the 3 tapped fittings (2 hose barbs and one drain), were in need of re-brazing to the cooling pipe. A difficult task as it has to be done on the boat.

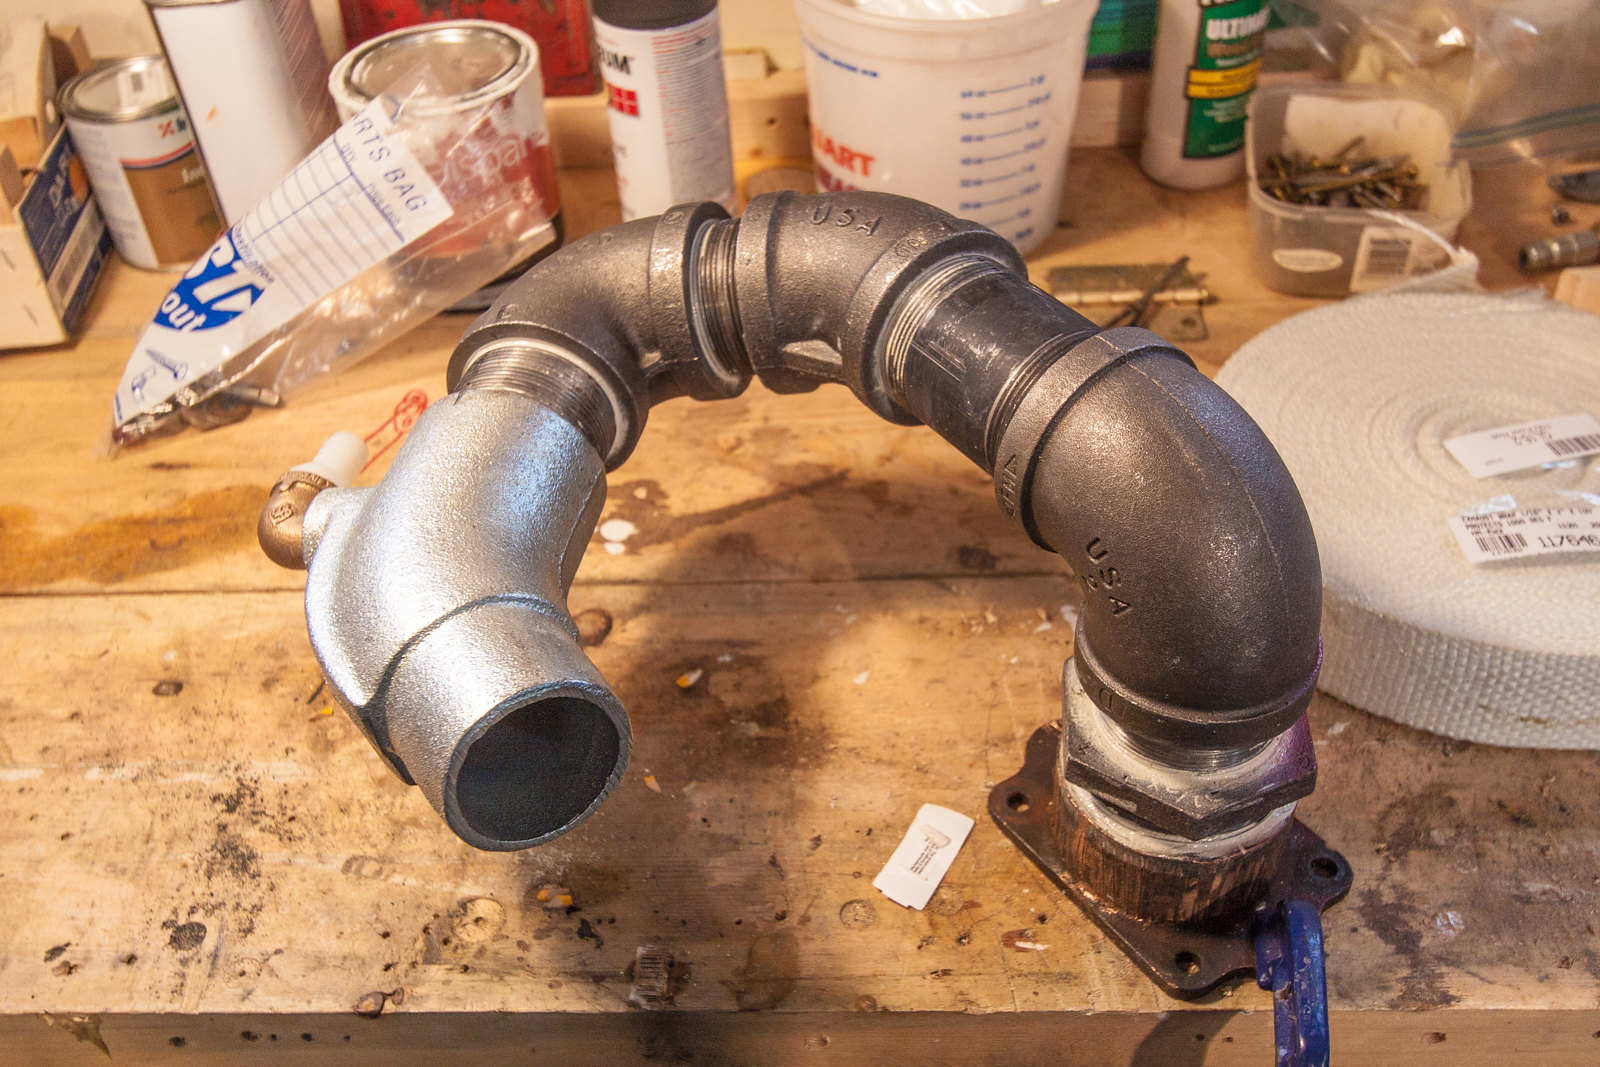
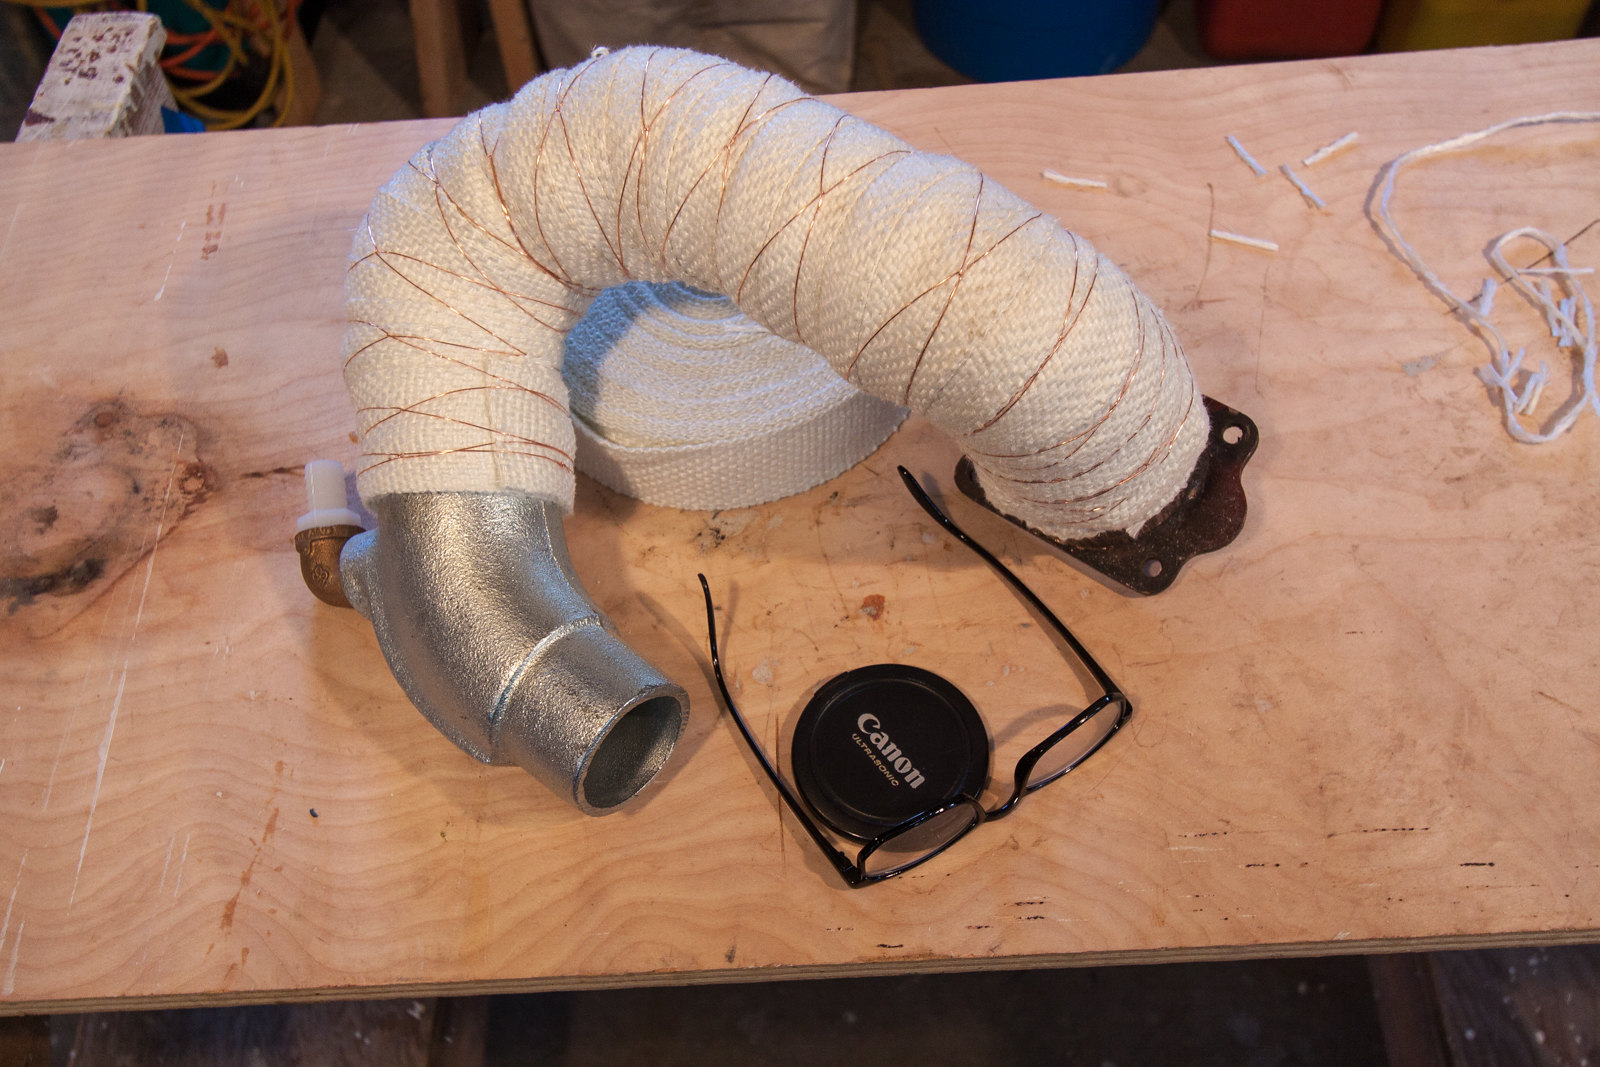
With no simple way to test it, I decided to install a water lift muffler. The decision made, with a reciprocating saw and a metal blade, I cut the system away.

FullSizeRender 23.jpg

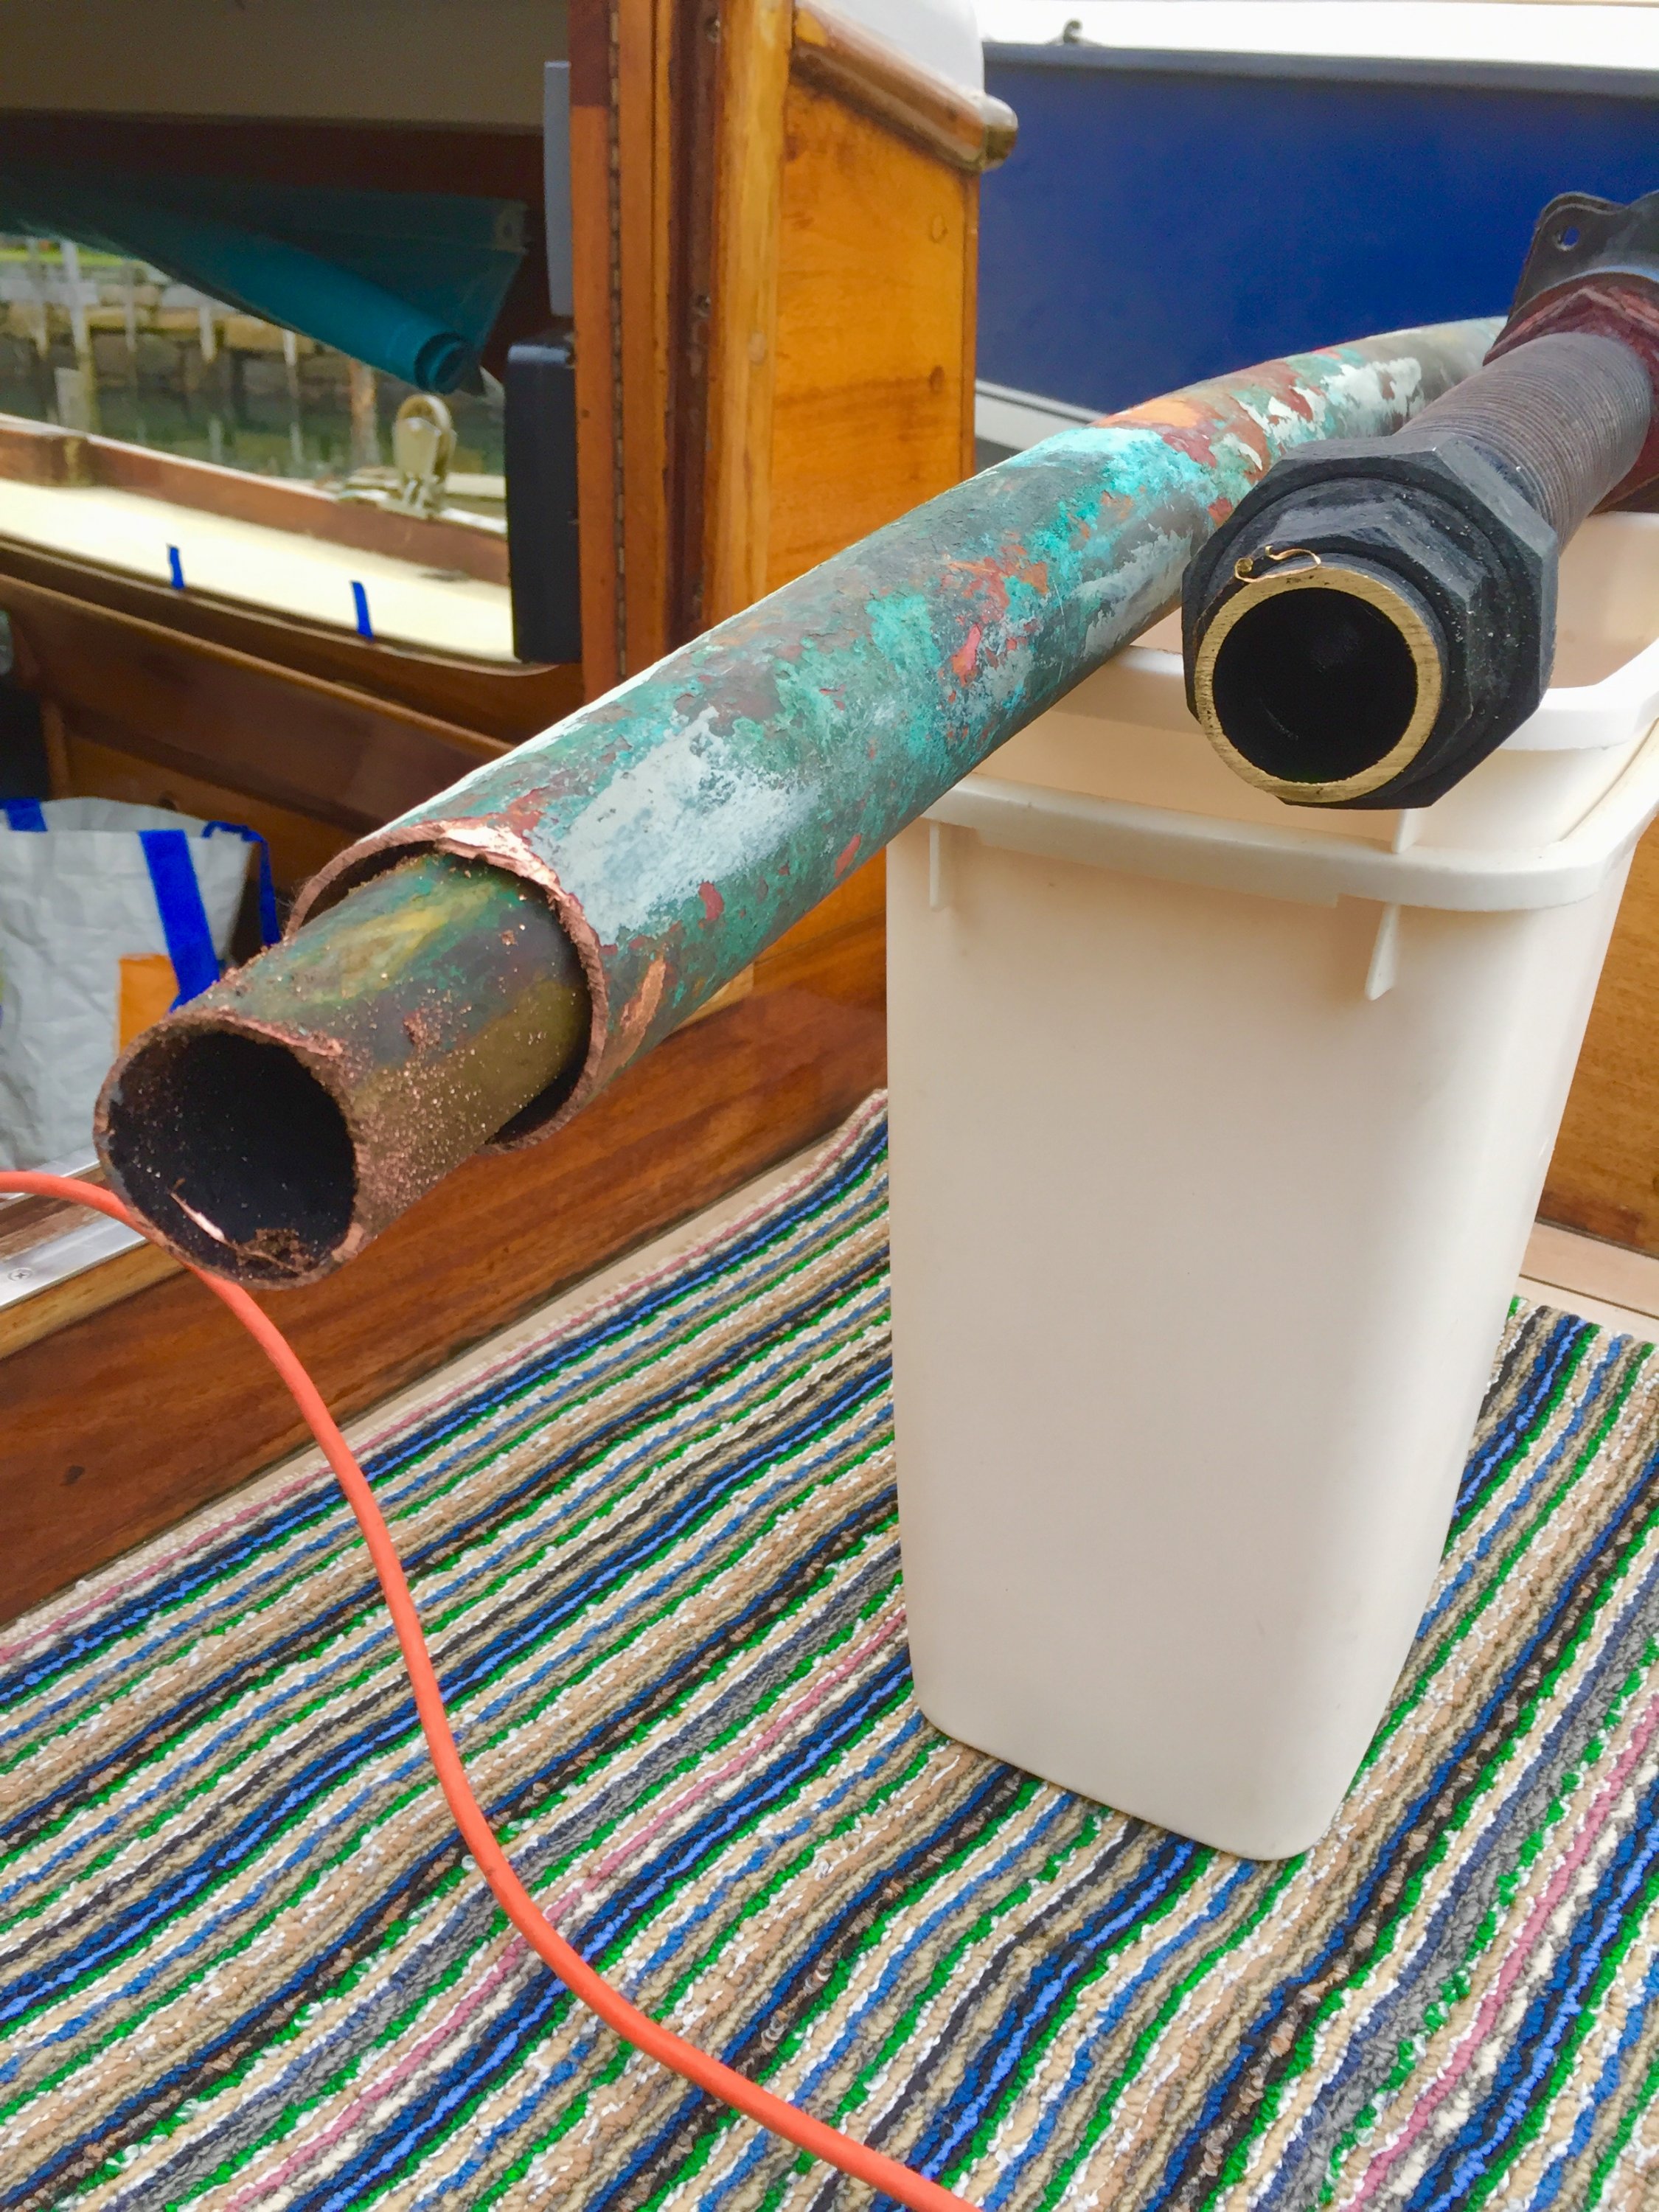
With some regret, I could see the copper (and some bronze?) pipe was perfect. Not too surprising though, Alden used the best materials.

No turning back now,...
 

TomY

Alden Forum Moderator
Jun 22, 2004
2,758
Alden 38' Challenger yawl Rockport Harbor
Designing a new water cooled exhaust system:

There is a ton of info on the web on water cooled exhaust systems. An article that I referred to often, was this one from Good Old Boat magazine.

http://www.goodoldboat.com/reader_services/articles/Marine_exhaust.php

It outlines and explains some important parameters for designing a safe system. The article also admits that it's difficult to achieve the perfect system, especially in an old boat.


I began doodling on the 1958 sketch: I'd need some sort of riser to raise the height of the cooling elbow - add and raise a vented loop for raw water cooling circuit and locate the muffler as low as possible. These options were limited by; hull, cockpit sole, galley counter, etc.

Exhaust detail 2 copy.jpg

Plus I'd need to increase the diameter of the exhaust due to back pressure added by cooling water in the line. And this suggested I'd better have enough volume in the system to contain the drain back at shut down.

I couldn't help but think, all these problems didn't exist with the old system. But the old system would be very expensive today.

Thinking in 2D on the screen is easy. In reality (3D), things were tighter. There is good access (for an old low freeboard boat like this) to the engine through a manhole in the cockpit sole of the Challengers. Having spent a lot of time down there, I refused to give even an inch of it up. I can lower myself into the space and work on the rear of the engine. The muffler looked like it would have to go here. Note: Blue horizontal line approximates the WL.

Engine compartment close - annotation.jpeg
 

TomY

Alden Forum Moderator
Jun 22, 2004
2,758
Alden 38' Challenger yawl Rockport Harbor
Winter is great for boat projects like this. Nothing seems to work, at first. Days, weeks away from the 'project', have a way of sorting things out. For instance, the threaded reducer in the end plate that connects the water cooled exhaust manifold to the exhaust pipe or (soon to be) riser, would not budge(4' wrenches + extensions).

Calls to plumbing friends were not too encouraging (forgitaboutit-take it to a fabricator). Then I found a Youtube article from some plumber in NYC who works on century old steam radiators(and removes this bushing regularly, without damaging 100 year old radiators).

A delicate cut - then another, with the saw-zall, was the trick. Thanks to the plumber in NYC.

Exhaust manifold plate bushing removal (1 of 1).jpg


Then I began collecting parts. Research in Water Lift mufflers leaned me toward the Centex fiberglass mufflers. They had a good selection of sizes, hose diameters and locations. I needed a special size, large volume and oversized hose. I was delighted to find it was available in the SBO marine parts. Plus there was a cooling elbow in a larger diameter than I could find locally. The parts were a breeze to order.

Exhaust parts accumulating (1 of 1).jpg

When things warmed up a bit, I spent some time fitting the muffler. Most are fastened down at the base but that wouldn't work in the spot I chose. I had to trim the muffler mounting flange (leaving a rim so as not to damage the joint). I was glad to see the location wouldn't impede access through the manhole: Photo thru manhole:

Muffler bracket engine compartment manhole (1 of 1).jpg

Inside engine compartment: This shows the riser about half finished. 2" steel pipe, schedule 80(I had to get it through a plumbing supply-HD had lighter gauge).

Having tried every configuration of a riser, this works well. I'm waiting on a 45 elbow which will direct the water injected elbow(safely on the downhill side), at the muffler Inlet. Once that has been located and tightened, I'll start re-locating wires, etc. and wrap the exposed riser. It's safely away from combustibles.

Muffler bracket engine compartment (1 of 1).jpg

The solution for the muffler was simple: Fabricate a bracket out of 3/4" marine plywood. Notched to fit and fasten to a structural post, the inboard side is cut to the radius of the muffler. Through bolts add strength to the bracket and give points for the band clamps to pull the muffler - snuggly - into the bracket. No way it can come adrift(it rests on the hull as well).

The muffler is easily removed when needed and can rotate for connections.
Muffler bracket (1 of 1).jpg
 
May 20, 2016
3,014
Catalina 36 MK1 94 Everett, WA
I can't tell from the picture most water lift mufflers have a drain at the bottom to release the water if you can't start the engine after 30 seconds or so of cranking. Other options are to shutoff the raw water intake until it starts. Mine dumps the water in the bilge.
 
  • Like
Likes: TomY

TomY

Alden Forum Moderator
Jun 22, 2004
2,758
Alden 38' Challenger yawl Rockport Harbor
I can't tell from the picture most water lift mufflers have a drain at the bottom to release the water if you can't start the engine after 30 seconds or so of cranking. Other options are to shutoff the raw water intake until it starts. Mine dumps the water in the bilge.
That's one of my major concerns, Leslie: How much water will drain back into the muffler, at shut down. My engine starts very quickly, so that doesn't worry me. But someone else could try to start it without using the glow plugs or the fuel shut off, or there could be a problem down the road where excess cranking could fill the system.

I'll have to wait and see the capacity and the rate at which the raw water pump moves water, before the engine is running. This is one reason I went with a larger capacity water lift muffler. Plus there are sisterships with water lift mufflers mounted similarly, that are operating fine.

There is a drain on this muffler but it's not one you could use easily. The raw water seacock is not easy to get at either, but could be used in the event of a slow start.
 
May 25, 2012
4,333
john alden caravelle 42 sturgeon bay, wis
well tom, thank you for taking one for the team. i'll assume that i'm good to go with my exhaust for many years to come up here on the fresh water sea.
 
  • Like
Likes: TomY

TomY

Alden Forum Moderator
Jun 22, 2004
2,758
Alden 38' Challenger yawl Rockport Harbor
well tom, thank you for taking one for the team. i'll assume that i'm good to go with my exhaust for many years to come up here on the fresh water sea.
well tom, thank you for taking one for the team. Haha! That's one way to look at it, Jon. :banghead:

If you have the same exhaust, then I'd say you're good until the end of this century...

Jon, I'll add one caveat to the above. If you have the same jacketed exhaust, with a cast iron muffler just aft of the gooseneck rise in the lazarette, I found a curious condition. At the muffler connection, the pipe diameter was reduced to half by a carbon build up. I'm surprised the engine didn't exhibit signs of excessive exhaust back pressure. Maybe it was and taken over time, I didn't notice. Anyway, if you have similar and get those symptoms, you know where to look.
 

TomY

Alden Forum Moderator
Jun 22, 2004
2,758
Alden 38' Challenger yawl Rockport Harbor
The complete riser. 2" threaded steel pipe is available at the big box stores like HD, but that was lighter gauge. The local plumbing supply had the parts I needed in Schedule 80 (thicker wall) material.


Heavy stuff, the riser weighs 18 pounds. I'm a little concerned about putting that much weight on the exhaust manifold flange. I may add a support hanger after install. The engine, a slow turning 4 cylinder, runs smoothly with little vibration.

The riser was easy to insulate before installation. I'd like to get this installed so I can run the hoses. It's been frigid!


TomY

Alden Forum Moderator
Jun 22, 2004
2,758
Alden 38' Challenger yawl Rockport Harbor
Installing the new exhaust riser and running the exhaust hoses, this work (executed entirely 'below decks'), is advanced boat-yoga.

From the beginning, my new exhaust design was driven by a refusal to give up an inch of the working access I have beneath the bronze manhole that Alden so brilliantly added to this design.

Final- long view (1 of 1).jpg

In fact I've improved access a bit, by removing the jacketed exhaust pipe (that pipe ran straight out of the exhaust manifold), and placing all hoses up under the cockpit sole, out of the way.

That caused some compromise: I was not able to quite get the recommended safe distance between the water injection elbow and the water lift muffler. But it's close; 12" from the injection nipple to the muffler (short exhaust hose in photo below).

I've found plenty of examples of shorter distances, online. I'll install an exhaust hose alarm. It has a sensor that is a simple band that tightens on the hose and activates the alarm at 200 degrees F. A good safety device for alerting that the raw water seacock is closed.

Final- close up (1 of 1).jpg

I cut a 'sink board' into the galley counter of the boat years ago, for mechanical access. From there, I located the new raw water vented loop behind a galley panel. Fastened just under the bridge-deck, the loop is a full 2 feet above the water line, on any heel.

Final- vented loop (1 of 1).jpg


That removable panel has a small storage door which I'll reconfigure for easy inspection and access to the vented loop. The final hose connection is the stern outlet(waiting on a new larger outlet fitting).
 
Jun 19, 2004
365
Island Packet IP 32 99 Forked River, NJ
I'm just now preparing to replace our exhaust system on our Universal M3-20. the pic shows the original unit with Barr cast iron elbow. I'm duplicating this setup with all new fittings. Looks like threads were sealed with high-temp silicone, but I'm curious as to what type of sealant you're using on the pipe fittings?
 

Attachments

TomY

Alden Forum Moderator
Jun 22, 2004
2,758
Alden 38' Challenger yawl Rockport Harbor
I'm just now preparing to replace our exhaust system on our Universal M3-20. the pic shows the original unit with Barr cast iron elbow. I'm duplicating this setup with all new fittings. Looks like threads were sealed with high-temp silicone, but I'm curious as to what type of sealant you're using on the pipe fittings?

Hi Jim, I used Oatey pipe sealant as it was what I had.

It's not super high temp, 600 F. The threads in the dry riser seal air that isn't under much pressure. I'm thinking the threads will seal even if the temps go higher than the sealants range.

I'd use a super high temp if I were you. :)
 

TomY

Alden Forum Moderator
Jun 22, 2004
2,758
Alden 38' Challenger yawl Rockport Harbor
The last details for the exhaust included installing a new outlet in the stern. There is no easy access under the aft deck in the long counter, especially on the port side of my boat (a permanent CNG compartment closes off access from the port locker).

I enlarged a small access hole (presumably cut for access to the original stern outlet), in the fiberglass bulkhead divider, that is the anchor for the backstay.

Large enough to get one hand through, the added opening doesn't compromise the strength of the bulkhead (1/2" thick solid fiberglass).

The access allowed routing the stiff exhaust hose into a high gooseneck bend - up to the deck (exhausts highest point) - and back down to the new outlet, for a double clamp connection. Tedious, but this no longer an area that can't be accessed.

High rise gooseneck before discharge  (1 of 1).jpg

I installed an Aqua Alarm on the short section of hose between the new exhaust riser and the water lock muffler. The panel - with LED lights and alarm - is now mounted conveniently in the companionway. Nothing to switch, it comes on (green indicator LED), when the ignition key in ON.


In the end, I stuck with Alden's original outlet height (I had to enlarge the old hole). With the high loop in the hose, there is no way the new system will ever back flood the engine (short of sinking,...). But this is also a high lift for the raw water to travel, which remained to be tested.
Launched 2017 (1 of 1).jpg

The other achilles heel - the raw water supply - is now safely high above the waterline on any heel. The new vented loop, is now a crucial piece to inspect regularly (so I have that loop, easily accessed).

There's no water near our storage so the first test, was at launch. In the slings, I started the engine(which starts instantly).

The raw water by-pass line immediately began streaming out of the stern. Exhaust gas spilled out of the new outlet accompanied by a distant gurgling sound... I assumed the water lock (1 1/3 gallon volume), was filling to the outlet standpipe level.

A few seconds later, a dribble, then a small burst, followed by a consistently spaced, plug of seawater. A different sound than the old exhaust, you can hear water movement in the hose. It may be a little quieter as the old metal pipe rested on the hull and may have transmitted vibration.

It's seems to work perfectly. No leaks, the injection elbow and short section of pipe (where the new alarm is mounted), are cool to the touch.
 
  • Like
Likes: jon hansen