Hunter 34 Chainplate Anchor help
- Thread starter Artey1
- Start date
I understand now. Cool, definitely an option. Most important is to get this endoscope on the plate so I can see the real shape of it. I really like this idea thoughthis is all done from the top the hole has to be drilled out to fit the rivet. just basically duplicating the tool they will sell you for 2K I have done this in the field when I did not have access to the correct tool.


Jviss,I'm following this just our of curiosity. It's tough to visualize. Can you please say what part of the boat structure the chainplate is connected to? Have you considered a re-design rather than putting it back as it was?
Thanks,
jv
That piece of angle iron is put under the hull grid liner when it and the hull are put together. Its def a design flaw specifically because it is not stainless, nor does it leave any access for inspection. I have read that others have installed outer hull chainplates but that requires new rigging and an inconvenience when trying to move around them. I cant think of any other way mount them as the deck itself can not hold and the nearest bulkhead is feet away. Beneteau uses a turnbuckle design I like but cant see the need to complicate it.
Drew
Okay everyone - Here is what I found! (click images to enlarge)
I got to the boat on Saturday morning and with the help of my lovely assistant (the Admiral) started to check a few things with my new toy from Amazon, the usb endoscope. Your device needs to be USB On-the-go capable, and luckily mine is. I bought this one and at $40, I wish I had bought one way way sooner, very basic and very good video quality. I got the USB style over the wifi or bluetooth style as I had read a few reviews
of connectivity issues over the wifi/bluetooth. The cable is semi rigid so you can bend it and hold that shape to get around corners
and such. I used the OTG View app in the Google Play store, instead of the manufacturer's app, there are more options on it and it ran smoother.

I put that camera in the original inspection hole - this has obviously been modified by someone at some point not by me. I put the scope all up and down this port side plate to check its condition as after my phone call with Captain Jerry the H31 owner who lost his rig due to these plates, I wanted to know its condition. There is surface rust and paint chipping due to that, but no major degradation, galling or pitting of the metal that I could see on top of the plate. In doing this I spotted from inside the glass a hole that a previous owner had cut under the settee and behind the water tank. I would not have been able to see this from the outside.

So... Off comes the settee top and part of the cabinet - jeez thats a pain, so many screws and talk about the boat yoga! But its off and that revealed this.

So I knew immediately this meant something bad - that a previous owner had at least needed to go through trouble to put this here in the past, but for what reasons? I had a sinking suspicion. Anyone following the thread may remember the sheared/cut bolt I talked about? Yep...
Since the plate is fairly heavy and I needed to suspend it to more easily get my camera the view it needed I went to Lowes and got a couple fender washers, a 1/2" x 3" carriage bolt and some pvc and made this plate holder.

I'm glad I did it was very helpful in saving the Admirals arm strength and allowed me both hands to operate the camera and snake it from the inspection hole behind the plate and gussets to where I wanted to really see. And what I saw was... (ignore audio - sorry for shaky cam, its hard to move the camera in small spaces)
Thats right folks, the sheared/cut bolt on top wasn't from installing the plate at the factory like some had guessed. It is an original piece of a siezed chain plate anchor. Oh and I found my welded castle nut - it hadn't fallen off from rust at least??
 This means previous owners had cut an original chain plate at some point for some unknown reasons to me ( I don't have the history of my vessel) and moved the plate over a scoche and drilled a new hole and secured it with... ? maybe nothing? Maybe something, possible dropping to the abyss between hull and liner?

So I tried with the holder in place to use my dremel tool to square the threads off on the siezed bolt from the top side and allowed PB Blaster some time to do its magic. Used a huge cheater bar for leverage and an adjustable wrench. Notta. Used a huge pair of vice grips and the cheater bar, notta. This thing is not coming out without being drilled out and then re-tapping the nut. Not something that would be easy in this small space. So I decided to not do that.
A more patient person would go with Sailor832's suggestions of using the 3/4" Blind Rivet Nut. But I'm not patient. Another trip to Lowe's.
They have these coupling nuts. 3/4"-10 and are 2 1/4" long. About the same as the original I believe. I got this, a huge 2" wide fender washer, and a 3/4"-10 nylock. I am paranoid about this nut backing off and me never knowing since I can't secure this new nut to the angle, I feel confident with the nylock. The fender washer is because the "new" hole the previous owners drilled is just slightly oversized, really barely and the washer probably isn't needed, but why not? Now how do I install it??
Thankfully Captain Jerry again had provided me valuable information. I knew from some of his other posts that the angle iron is 4" x 4" x 30". The Glass is about 5/8" Thick in the liner. So from the top of the liner I measured about 4 5/8" down and about 1" or a bit more from the big stringer built into the liner and placed a 5" hole with my hole saw. Do not go ANY LOWER THAN THIS OR YOU WILL HIT THE HULL. Stay at least half an inch and ideally more above the bottom curve of the liner. This will get covered with an access plate later.

This allowed me about 1.5" to get my reasonably sized hand smashed in the hole and under the plate. Let me tell you guys, I'm good with my hands and fairly nimble with them and I still dropped one washer into the abyss. Not ideal but not the end of the world. I used a few rags to try to block the hole to the abyss behind the big stringer after this, I don't think it did much and I tried my best not to lose anything else.
With my wife's help her using a huge adjustable wrench and me using a 8" adjustable wrench at an angle we were able to slowly put the nuts on in order tightening until the angle iron was snug up against the liner and would suspend itself so I could then remove the holder. In the future I might consider using a crow's foot or a stubby 1 1/8" wrench to hold the nut while someone from the top turns. But not for another like 8 years at least! Make sure you check the condition of the bolts that go on top of the plate at the deck. Mine were messed up so I had to go get new 1/4"-20 bolts and ran a new tap down the holes just to clean and correct any misthreading issues.
The starboard side chain plate was all perfectly normal and the chainplate was in its original welded nut. So all I can guess on the port side is that someone tried to rebed them at somepoint, found it siezed and went to drastic measures and cut their tie rod and replaced it. I checked my port tie rod furiously for any sign of a "fix" along its length and cannot find any, and its the same length as the starboard one. So I assume it was replaced in its entirety. The same inspection port was cut on starboard and camera used to inspect the plate. Its the same condition as Port side. Surface rust and minor imperfections. I used the holder made and 30 turns later on the starboard side I had it undone and 30 turns to go back on.
I'm happy I don't feel the need to replace the angle as I didn't want to do yet another fiberglass job cutting out the old plate and putting a new one in. This camera and the inspection ports will allow me to get good full inspections of both plates as often as I like top and bottom. Probably every year or two.
Hopefully this thread helps other owners in the future as you all have helped me. I'll be glad to help answer any questions if anyone has any.
I got to the boat on Saturday morning and with the help of my lovely assistant (the Admiral) started to check a few things with my new toy from Amazon, the usb endoscope. Your device needs to be USB On-the-go capable, and luckily mine is. I bought this one and at $40, I wish I had bought one way way sooner, very basic and very good video quality. I got the USB style over the wifi or bluetooth style as I had read a few reviews
of connectivity issues over the wifi/bluetooth. The cable is semi rigid so you can bend it and hold that shape to get around corners
and such. I used the OTG View app in the Google Play store, instead of the manufacturer's app, there are more options on it and it ran smoother.
I put that camera in the original inspection hole - this has obviously been modified by someone at some point not by me. I put the scope all up and down this port side plate to check its condition as after my phone call with Captain Jerry the H31 owner who lost his rig due to these plates, I wanted to know its condition. There is surface rust and paint chipping due to that, but no major degradation, galling or pitting of the metal that I could see on top of the plate. In doing this I spotted from inside the glass a hole that a previous owner had cut under the settee and behind the water tank. I would not have been able to see this from the outside.
So... Off comes the settee top and part of the cabinet - jeez thats a pain, so many screws and talk about the boat yoga! But its off and that revealed this.
So I knew immediately this meant something bad - that a previous owner had at least needed to go through trouble to put this here in the past, but for what reasons? I had a sinking suspicion. Anyone following the thread may remember the sheared/cut bolt I talked about? Yep...
Since the plate is fairly heavy and I needed to suspend it to more easily get my camera the view it needed I went to Lowes and got a couple fender washers, a 1/2" x 3" carriage bolt and some pvc and made this plate holder.
I'm glad I did it was very helpful in saving the Admirals arm strength and allowed me both hands to operate the camera and snake it from the inspection hole behind the plate and gussets to where I wanted to really see. And what I saw was... (ignore audio - sorry for shaky cam, its hard to move the camera in small spaces)
Thats right folks, the sheared/cut bolt on top wasn't from installing the plate at the factory like some had guessed. It is an original piece of a siezed chain plate anchor. Oh and I found my welded castle nut - it hadn't fallen off from rust at least??
This means previous owners had cut an original chain plate at some point for some unknown reasons to me ( I don't have the history of my vessel) and moved the plate over a scoche and drilled a new hole and secured it with... ? maybe nothing? Maybe something, possible dropping to the abyss between hull and liner?So I tried with the holder in place to use my dremel tool to square the threads off on the siezed bolt from the top side and allowed PB Blaster some time to do its magic. Used a huge cheater bar for leverage and an adjustable wrench. Notta. Used a huge pair of vice grips and the cheater bar, notta. This thing is not coming out without being drilled out and then re-tapping the nut. Not something that would be easy in this small space. So I decided to not do that.
A more patient person would go with Sailor832's suggestions of using the 3/4" Blind Rivet Nut. But I'm not patient. Another trip to Lowe's.
They have these coupling nuts. 3/4"-10 and are 2 1/4" long. About the same as the original I believe. I got this, a huge 2" wide fender washer, and a 3/4"-10 nylock. I am paranoid about this nut backing off and me never knowing since I can't secure this new nut to the angle, I feel confident with the nylock. The fender washer is because the "new" hole the previous owners drilled is just slightly oversized, really barely and the washer probably isn't needed, but why not? Now how do I install it??
Thankfully Captain Jerry again had provided me valuable information. I knew from some of his other posts that the angle iron is 4" x 4" x 30". The Glass is about 5/8" Thick in the liner. So from the top of the liner I measured about 4 5/8" down and about 1" or a bit more from the big stringer built into the liner and placed a 5" hole with my hole saw. Do not go ANY LOWER THAN THIS OR YOU WILL HIT THE HULL. Stay at least half an inch and ideally more above the bottom curve of the liner. This will get covered with an access plate later.
This allowed me about 1.5" to get my reasonably sized hand smashed in the hole and under the plate. Let me tell you guys, I'm good with my hands and fairly nimble with them and I still dropped one washer into the abyss. Not ideal but not the end of the world. I used a few rags to try to block the hole to the abyss behind the big stringer after this, I don't think it did much and I tried my best not to lose anything else.
With my wife's help her using a huge adjustable wrench and me using a 8" adjustable wrench at an angle we were able to slowly put the nuts on in order tightening until the angle iron was snug up against the liner and would suspend itself so I could then remove the holder. In the future I might consider using a crow's foot or a stubby 1 1/8" wrench to hold the nut while someone from the top turns. But not for another like 8 years at least! Make sure you check the condition of the bolts that go on top of the plate at the deck. Mine were messed up so I had to go get new 1/4"-20 bolts and ran a new tap down the holes just to clean and correct any misthreading issues.
The starboard side chain plate was all perfectly normal and the chainplate was in its original welded nut. So all I can guess on the port side is that someone tried to rebed them at somepoint, found it siezed and went to drastic measures and cut their tie rod and replaced it. I checked my port tie rod furiously for any sign of a "fix" along its length and cannot find any, and its the same length as the starboard one. So I assume it was replaced in its entirety. The same inspection port was cut on starboard and camera used to inspect the plate. Its the same condition as Port side. Surface rust and minor imperfections. I used the holder made and 30 turns later on the starboard side I had it undone and 30 turns to go back on.
I'm happy I don't feel the need to replace the angle as I didn't want to do yet another fiberglass job cutting out the old plate and putting a new one in. This camera and the inspection ports will allow me to get good full inspections of both plates as often as I like top and bottom. Probably every year or two.
Hopefully this thread helps other owners in the future as you all have helped me. I'll be glad to help answer any questions if anyone has any.
Last edited:
So, it looks like I need to replace my port chainplate. I'll scope it but it looks like it has been rusting in place for a while.
A couple of probably silly questions to begin with:
1. Is the angle iron essentially just pulled tight by the tension on the stainless rod? In other words, free floating except for that tension? That's what it sounds like from these threads but I may have missed something.
2. Did anyone do this with the mast in place? If so, what did you use to anchor the shrouds and side stays temporarily?
Hi Boz, the chainplate should not be free floating! Mine was free floating which is what kicked off this particular thread because when I went to put the tie rod back in place, the plate dropped and it was quite difficult to put back in place correctly. The chainplate angle iron should have a bolt on each side of it under a probably teak cover and you should be able to see the bolts holding it to the fiberglass pan. If you do not, it is likely you will have the same issues I had.
For #2, I did mine with the mast off on the hard. I would think this should be able to be accomplished one side at a time as long as the mast is supported correctly with a halyard or even a couple of halyards to the toe rail before loosening tension on the side you are working on. I would consult a rigger though if you have one available to ask.
For #2, I did mine with the mast off on the hard. I would think this should be able to be accomplished one side at a time as long as the mast is supported correctly with a halyard or even a couple of halyards to the toe rail before loosening tension on the side you are working on. I would consult a rigger though if you have one available to ask.
Artey/Boz
Understand the question on "free floating". What I did on the H31 was to cut an inspection port below the nut/rod area so I could hold the plate in place while someone rotated the rod from the deck into the nut from above to secure it in pl;ace. absent the inspection port below is a pic of what another H34 owner did years ago (and this also shows how he held it in place until tightened). appears he cut two additional slots and attached addl bolts to keep it in place and he also didn't cut a longer section of liner like I did.
Jerry
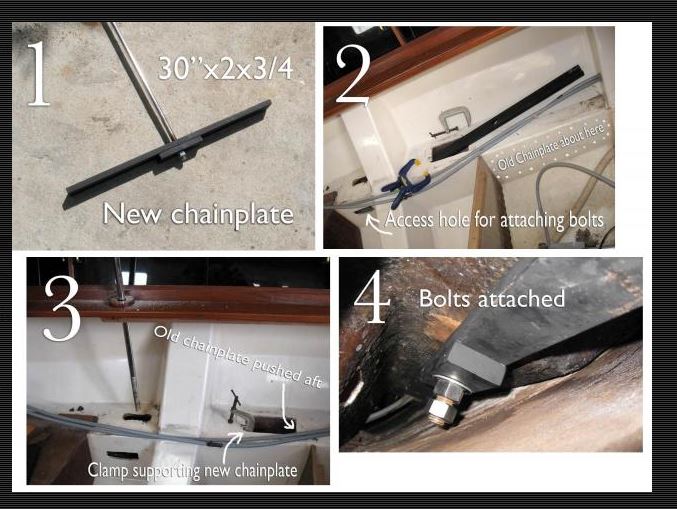
Thanks, this gives me a better idea of what's going on under the fiberglass. I've got a slot coming up at a marina where they'll step the mast and set it aside on saw horses. I decided not to risk doing this with the mast up, esp as hurricane season starts. Also force me to rebulb the anchor light, replace the wind vane, and upgrade the coax.Hi Boz, the chainplate should not be free floating! [Snip]
For #2, I did mine with the mast off on the hard. I would think this should be able to be accomplished one side at a time as long as the mast is supported correctly with a halyard or even a couple of halyards to the toe rail before loosening tension on the side you are working on.
Thanks! This all helps a lot. Not overly complicated after all, just a lot of work/planning getting to it and repairing afterwards.Artey/Boz
Understand the question on "free floating". What I did on the H31 was to cut an inspection port below the nut/rod area so I could hold the plate in place while someone rotated the rod from the deck into the nut from above to secure it in pl;ace. absent the inspection port below is a pic of what another H34 owner did years ago (and this also shows how he held it in place until tightened). appears he cut two additional slots and attached addl bolts to keep it in place and he also didn't cut a longer section of liner like I did.
Jerry
Done! $38 in materials and about $1,000 in marina and crane charges. My chainplate anchors were definitely corroded but only on the top side near the thread. I had a 4" piece of 1/4" bar stock welded on top with a hole big enough for the threaded rod but not the nut underneath. Painted it well before reinstalling. At this point the anchors will last another couple of decades.Thanks! This all helps a lot. Not overly complicated after all, just a lot of work/planning getting to it and repairing afterwards.
Took this time to replace the coax, antenna, and nav lights. The coax would be almost impossible. I did sacrifice the wind vane to a palm tree during the stepping, but I expected that and saving it was the least of my priorities.
Now time to replace the joinery since it needs it and I had to remove most of it to work on the anchors. It was hard enough holding a piece of 4x4 angle iron in place and starting the nut, nevermind contorting under the table.
Thanks for all the advice here!
Before and After you were "contorting" - did you get any pictures?It was hard enough holding a piece of 4x4 angle iron in place and starting the nut, nevermind contorting under the table.
Thanks for all the advice here!
Yep getting the castle nut I used started was a nightmare. An itchy fiberglass in my hands nightmare. You know the table can be removed right??Done! $38 in materials and about $1,000 in marina and crane charges. My chainplate anchors were definitely corroded but only on the top side near the thread. I had a 4" piece of 1/4" bar stock welded on top with a hole big enough for the threaded rod but not the nut underneath. Painted it well before reinstalling. At this point the anchors will last another couple of decades.
Took this time to replace the coax, antenna, and nav lights. The coax would be almost impossible. I did sacrifice the wind vane to a palm tree during the stepping, but I expected that and saving it was the least of my priorities.
Now time to replace the joinery since it needs it and I had to remove most of it to work on the anchors. It was hard enough holding a piece of 4x4 angle iron in place and starting the nut, nevermind contorting under the table.
Thanks for all the advice here!
Hauling my h34 out early to start repair on the chain plate(s), one of which is rusted out. Has anyone thought about using a 3(or 4) x 1.5 x 0.25 x 30 U channel beam instead of an L beam? My plan is to drill a 5-6 inch access hole on the vertical plane below the chain plate bolt, and then drill thru the old L beam to access the nut. If I can't get the new beam into that hole I'll cut another hole on the horizontal or vertical surface large enough to insert the 30 inch U channel into the cavity. I'm thinking on moving the original chain plate to an unused area in the beam avoiding making a large removal hole. The 1.5 inch tall U channel may make it easier to access the nuts/bolts thru the round access hole and still offer plenty of stiffness as a chain plate.
Its not a bad idea and I wish you luck, my only advice would be to get your u channel beam first and cut the same size hole in a scrap piece of plywood first before you go cutting into the boat. The hull rides very close to this area so its not necessarily the size of the hole either but the depth you have to work with in this area as the hull starts to meet the pan about 6-7.5 inches down from the where the top of the chain plate L bracket sits and slops up/out. Thats really hard to explain without pictures, sorry.H Has anyone thought about using a 3(or 4) x 1.5 x 0.25 x 30 U channel beam instead of an L beam? My plan is to drill a 5-6 inch access hole on the vertical plane below the chain plate bolt, and then drill thru the old L beam to access the nut.
All I know is I did try removing the old bracket through my 5 inch hole and couldn't do it. It wasn't rusted out enough to warrant replacement but I was going to do it with G10 or stainless if I could just for the peace of mind. B