Hunter 170 Rudder Mount Solution

Apr 16, 2017
841
Federation NCC-1701 Riverside
The rudder mount rebuild is progressing. The G10 backer plate is on order and i even picked up a little MMA adhesive.

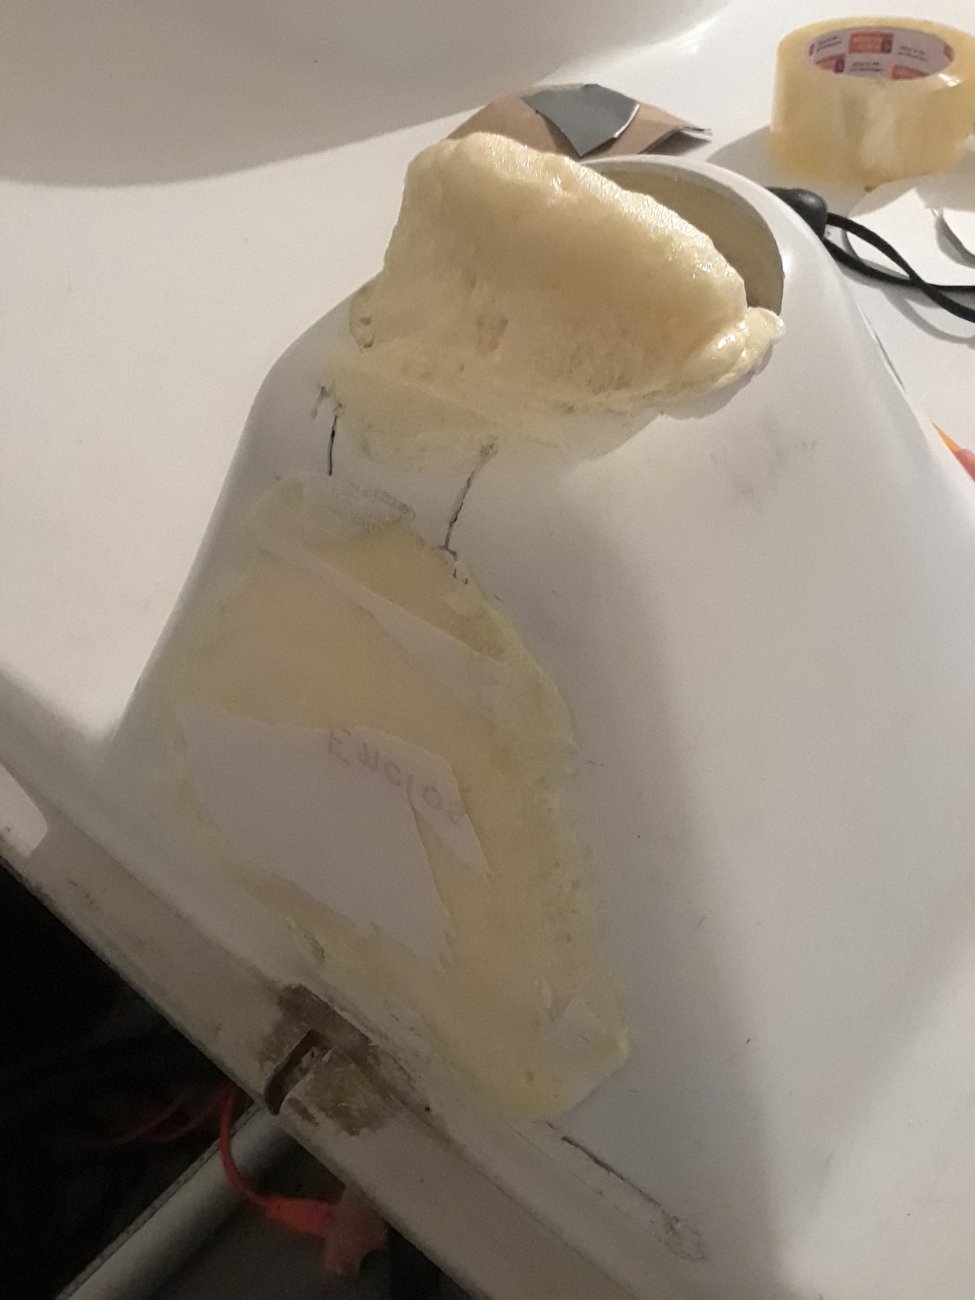
The first order of business is to replace the gap that used to be wood with replacement polyurethane foam. I still had some 4lb 2-part mix from a deck repair so used that, but if had to buy new, it would be 6lb foam. A form was created inside the rudder mount to copy the internal shape, and some cardboard was duct taped to the outside.

In case of overflow a shield was placed near the top.

The pour went well and overflowed just a little bit. The form was peeled off to expose the new core.

Tomorrow or this weekend the excess will be cut off and the section where the rudder gudgeon attaches will be cleared with a plunge router so the panel can be placed back on.

Ill glass the inside with a couple layers, then glass over the cut out panel to grab the corners. When the G10 arrives ill cut a triangle and epoxy that over the new glass. With excess G10 there should be enough for backer plates on the inside.

In theory, the two G10 layers will compress against new glass, luran, core, and more glass.

The new core is extremely solid even by itself.

Any ideas for a cap for that 4" hole on top. Ill seal it up if i have to but it would be nice to have acess.
20190606_234553.jpg
 

Attachments

  • Like
Likes: Hunter216
Sep 22, 2018
1,869
Hunter 216 Kingston
Any ideas for a cap for that 4" hole on top. Ill seal it up if i have to but it would be nice to have acess.
Maybe a 4” PVC sewer clean out, it would compensate for the curve on the top of the dome
 
Jun 8, 2004
10,024
-na -NA Anywhere USA
Hunter216, Bobbyfunn, Mark2 and Jiminpb

Give your repairs 6-8 months usage of the boat and then maybe a new chapter on repairs can be made by combining your hard work into a new repair document for others to use. Your thoughts.
 
Apr 16, 2017
841
Federation NCC-1701 Riverside
Maybe a 4” PVC sewer clean out, it would compensate for the curve on the top of the dome
Something like this? Not bad.

be interesting to know what adhesive to use on this. Pvc glue, mma. Ill stop by home depot and see what that lid looks like. Be cool to get something flush. Id need the threads and the lid, but not the bit for the wrench. I could cut that off and drill two finger recesses, if there is enough material.
IMG_20190607_124923.jpg


That access point is fantastic, its really close to the drain, looks forward, reaches the battery strap and I can feel the rotten wood under the motor mount.
 
Apr 16, 2017
841
Federation NCC-1701 Riverside
Hunter216, Bobbyfunn, Mark2 and Jiminpb

Give your repairs 6-8 months usage of the boat and then maybe a new chapter on repairs can be made by combining your hard work into a new repair document for others to use. Your thoughts.
It would give users more confidence to make repairs and guide yards to make repairs.

It could have protips like..."Before pouring runny two part foam in the new rudder form, be sure to tape over the 4 remaining holes in the factory core where the gudgeon screws were. Otherwise, 3/4 of your first batch will spill out the holes and catalze in the bilge." :)
 
Sep 22, 2018
1,869
Hunter 216 Kingston
Something like this? Not bad.

be interesting to know what adhesive to use on this. Pvc glue, mma. Ill stop by home depot and see what that lid looks like. Be cool to get something flush. Id need the threads and the lid, but not the bit for the wrench. I could cut that off and drill two finger recesses, if there is enough material.
View attachment 165747

That access point is fantastic, its really close to the drain, looks forward, reaches the battery strap and I can feel the rotten wood under the motor mount.
Anything with a 4 inch shaft would work, the pipe sort of deals with the dome cutout.

I would be careful with just finger loosen as the threads on these tend to bind. Maybe lube with petroleum jelly. The other thought I had was a access hatch like on a kayak with a little dry bag inside for phone etc.
 
Apr 16, 2017
841
Federation NCC-1701 Riverside
Anything with a 4 inch shaft would work, the pipe sort of deals with the dome cutout.

I would be careful with just finger loosen as the threads on these tend to bind. Maybe lube with petroleum jelly. The other thought I had was a access hatch like on a kayak with a little dry bag inside for phone etc.
Like the original poster, my first thought was to make a 3 inch port on the side and then buy an access cover, but i am not able to find one. A 4 inch acces port required about 6inches of flat area. The OP had a hard time with the bolt and backing plate so thought top down was better.

You are definatly one of those "Must serve more than one purpose" sailors for sure. I would have never thought to use that for anything other than to prevent water from getting in the hull.

Itd make a good cup holder if it werent for the tiller. Using that to store stuff is genius.

I almost thought about completly removing that hump and replacing it with like a three point tripod "rollover" cage transom with built in motor mount and battery holder, but then figured it would look too waterworld ish.
 
Sep 22, 2018
1,869
Hunter 216 Kingston
I almost thought about completly removing that hump and replacing it with like a three point tripod "rollover" cage transom with built in motor mount and battery holder, but then figured it would look too waterworld ish.
Well if you could pull that off you would have a bright future in “special effects”. As a trecky you must ask yourself “how would
Scotty deal with this one” :beer:

I think your go in from the top was a good call and you already had the 4 inch saw!

Could you mod up an easily removable cap to cover the sewer cap to make it cosmetically nicer?
 
Apr 16, 2017
841
Federation NCC-1701 Riverside
That will be very difficult to pull off. ;)

I should have used the 4inch hole saw for the back luran too. It would gave been harder to get the wood out, but it would be stronger afterwards.

The top two screw were less than an inch under the top of the hump. The PVC clean out will need a large slot cut into it in order to push the tube and threads down level with the top. The slot will allow the new bolts and nuts to protrude into the cleanout. Its very tight in the top now with the foam back in. I may have barely enough room for the threads now that think about it. Ill have reassemble the rudder and attach the tiller to see the clearance again.

If i have to reuse the 4 inch puck ill probably make a carboard platform about 1 inch down the hole, entomb the top two nuts in foam and just replace the puck.

First couple sails might be with just duct tape over the hump hole (doesnt that sound pleasant) so i can make adjustments.
 
Sep 22, 2018
1,869
Hunter 216 Kingston
E22501FC-9535-4D91-81B2-D903F0604369.jpeg


Maybe this would work with a piece of pipe instead of the threaded version. I guess it depends on how watertight you want the seal to be.
 
Apr 16, 2017
841
Federation NCC-1701 Riverside
Dont know why my eyes go right to the $3.32. :)

It would be sealed, and look better too. It would be more of a "x marks the spot" for future maintenance.
 
Sep 22, 2018
1,869
Hunter 216 Kingston
The Home Depot $3.32 is also in Canadian funds so even less for you!!!

Not to date myself but I’m old enough to think $3.32 is a lot of money for a plastic cap!!!! Just got home after stopping at an ATM machine, the norm for years here in the GWN has been the machine dispenses in increments of $20 bills, now it’s a mix of $50,$20 & $5 dollar bills. I guess the $50 is now the new $20

But we all know that any money spent on boating stuff is a good “investment” right????:beer::beer:
 
Sep 22, 2018
1,869
Hunter 216 Kingston
I just did a quick Google for “Loctite PL3X Canada” and it seems to give me a lot of hits for “LePage PL” products but not what specifically what you used. Can you post a photo of the tube so I know what to look for?
 
Sep 22, 2018
1,869
Hunter 216 Kingston
Sorry just found this.

• Henkel’s North American consumer adhesives brands include Loctite, LePage (for Canada only), and Pritt brands. “

Looks like Loctite PL3X in Canada is marketed as LePage PL Premium 3X
 
Apr 16, 2017
841
Federation NCC-1701 Riverside
Whew! I was gluing the rudder mount panel on when i noticed the tube said Not for sale outside the USA. Was thinking we needed to keep this product out of the hands of the Iranians or something. My apologies for not thinking globally in this forum.
IMG_20190607_200332.jpg


Another interesting one to try is loctite tub and surround. Works with acrylics.
 

Attachments

Apr 16, 2017
841
Federation NCC-1701 Riverside
Got the luran panel back on. This time I clamped it to the mount using the rudder gudeon and duct tape so it would not lift up above the true surface. My son was not impressed with my "repair".

Spread polyurethane glue all over the trimmed up foam to saturate, roughed up the luran panel, wiped it with wet cloth, then buttered that up as well.

Next ill trim out the polyglue in the luran panel gap so it can be connected properly with MMA.

I picked up some MMA adhesive for the original cracks and the gap for the panel cut out. Those were prepared and made ready for repairs. Note that the new expanding foam bonded very well under the luran cracks The broken luran wasnt moving at all while cutting the "v" grove. So the crack is actually repaired from both sides.

When repairing luran cracks it might be best practice to repair underneath first.

Next up is to somehow shape the new foam in the hull so there is a flat area for a backer board, then place a layer of epoxy and glass connecting old and new core and factory FRP.

There isnt much room in the top 4" cutout any more, so i have a feeling this will be messy.
 

Attachments

Last edited:
  • Like
Likes: Hunter216
Sep 22, 2018
1,869
Hunter 216 Kingston
I think i have an idea to rebuild the rudder mount.

View attachment 165617

There are a couple project requirements:
* Rudder should stay on :)
* Rebuild is permanent
* No decay even with water intrusion

Need to perfect the first requirement.

Im thinking of creating a G10-foam core-FRP composite "transom" with the luran panel glued back on for looks.

Ill use the existing mount for the base of the transom. Before the luran panel is glued back on ill bed the 6 gudgen 4 rivet holes with epoxy to seal the core. There will be an additional smaller G10 backer plate on the FRP in the hull. Bolts will go through the gudgeon, luran, new core and then the backer plate.

Im not sure if i need a couple layers of FRP over the foam before I bond the G10 or if i can just pour foam between the G10 and the inner FRP layer. G10 is already FRP so thinking i can save a step. The Internal G10 layer would be adhered directly to the luran that is left on the mount.

Any issues you can think of?

my concern is the rudder ripping off, a floating away, while firmly attached to the luran panel, the core and the backer plate.
So I’m a little confused that the triangle of Luran panel is back on. Please don’t interpret this as back seat driving just trying to understand.

In the post I’ve replied to here, you have a diagram of the layers and if I understand correctly from inside out you were planning on having G10 backer, FRP, Foam, G10 layer and then the Luran.

The foam is in place, the FRP and backer plate can be added from the 4 inch hole in the dome but if I understand correctly you have used the PL3X to glue the Luran to the foam and skipped the G10 layer????
 
Apr 16, 2017
841
Federation NCC-1701 Riverside
So I’m a little confused that the triangle of Luran panel is back on. Please don’t interpret this as back seat driving just trying to understand.

In the post I’ve replied to here, you have a diagram of the layers and if I understand correctly from inside out you were planning on having G10 backer, FRP, Foam, G10 layer and then the Luran.

The foam is in place, the FRP and backer plate can be added from the 4 inch hole in the dome but if I understand correctly you have used the PL3X to glue the Luran to the foam and skipped the G10 layer????
Yep, change of plans. Next will be FRP that extends to the corners, Ill build up the cloth until a huge sheet of G10 lies completly flat on the FRP. Then will clamp it down. The G10 will be same same shape as the luran panel, but big enough to overlap it and also big enough so that all rudder gudgeon holes are on the backer. This G10 will spread out the twisting forces and then counter the G10 on the inside.

The luran panel is just filler to bind the hump. The external G10 and FRP might be overkill, but i dont want to be stranded in Sarasota bay with my rudder floating away.

I think after this i need to rig my rudder to kick up so it doesnt damage the mount.
 
Sep 22, 2018
1,869
Hunter 216 Kingston
Next up is to somehow shape the new foam in the hull so there is a flat area for a backer board,
Maybe an oscillating multitool (commonly used to trim door moulding etc for flooring) or a bread knife, not sure how much room you have reaching into the hole.