WARNING: This article includes equipment sold by Electromaax in Canada and I must preface this post with some cautions. Over the last few years I have received far too many complaints of poor customer service from Electromaax to ignore. I have personally received decent service but I am an n=1 and they may be going out of their way to please me vs. an average guy off the street. I simply can not ignore the complaints I've had, so I must preface this article with this caution ragarding an Electromaax purchase.
There are other companies producing similar products & Balmar actually owns the patent for this type of pulley, E-Maax is technically in violation of this patent. Balmar and Mark Grasser DC Solutions, both have excellent customer support & considerably better track records in regards to customer service. I am not saying don't buy from Electromaax, just letting you know a good number of boaters have not been happy with their customer service, so do your research.
The Stock System
The owner of this boat keeps it on a mooring and as such his stock charging system was proving to be inadequate for his family's use. Having recently upgraded his battery bank to TPPL / AGM batteries he was in need of an alternator makeover...
This install is focusing on the serpentine pulley kit and alternator install only. The wiring, regulator and regulator set up is a whole other bag of worms that would be double this info...
The Battery Bank:
His bank of batteries is a large bank of four group 31 TPPL (thin plate pure lead) AGM batteries made by Odyssey. The bank is 400Ah in total but can also accept about 320A of charge current on the low end of acceptance, in bulk mode and over 1200A on the high end..
Contrary to popular beliefs and misconceptions about batteries and alternators it is the battery that "takes" or "accepts" current from the alternator. The alternator does not "force" current to the bank. The alternator only follows what the batteries want, up to it's limits. In this case the batteries, in bulk mode, below 80% state of charge is considered BULK, will take far more than ANY alternator that could be fit to this engine can or could deliver.
To be more specific an Odyssey PC 2150M 100Ah battery can accept anywhere from 0.8C or 80A of charge current, to 3.1C or 310A of charge current when charging in bulk mode. That is a HUGE amount of "accepted" charging current. Contrast that to most deep cycle wet cell batteries that take just 0.25C or 25A per 100Ah of capacity. Think about it like this, a 400Ah bank of deep cycle wet batteries will take about 100A of charging current and this bank of Odyssey batteries will take as much as 1240 amps of charge current. Big differences in the loads the alternator can and will see.
With a bank of four PC 2150M batteries, which this boat has, they can literally accept 1240A of charging current. Unfortunately there is no charging system available for a sailboat that can supply that kind of charging current. If there was, you could literally charge from 20% of capacity to 80%, or replace 60% of your banks capacity in TEN MINUTES. Wow....
Like any AGM battery these TPPL batteries can take massive amounts of charging current tapping out just about any stock alternator, and exceeding in acceptance, the output of just about any alternator that would fit onto this engine. This is why I feel it is important to use a serpentine kit and do a proper installation that can handle these batteries.
Over the years I have seen many stock alternators burned up by the high acceptance rates of AGM batteries, and Odyssey's are no different. They really need to be fed with a charging system than is designed for it and can handle them.
With the owners stock crank and water pump pulleys sized for a 3/8" v-belt he was really limited to about 80A of charge current at a maximum, in an alternator output, before the belt would begin to wear quickly.
We discussed the options and decided on an Electromaax 140A alternator and the Electromaax serpentine pulley kit was a good fit. We could have gone bigger but it would have meant a bigger HP bite out of his relatively small propulsion engine. 140A is a good fit..
The Problem:
When I began to examine the layout of the pulleys and engine I was concerned an E-Maax kit would not work or fit. The timing marks and stock crank pulley are very, very close to one another. The design of the Electromaax pulley kits are ingenious in that they simply fit over the main crank for an easy install. This is good and bad for some motors as they make the crank pulley slightly larger.
I shot some photos, took some measurements and I picked up the phone and Called John one of the owners of Electromaax.
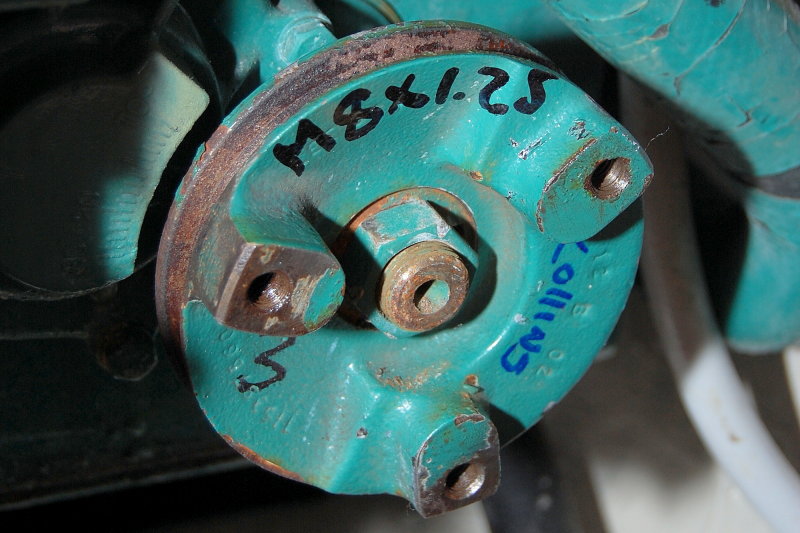
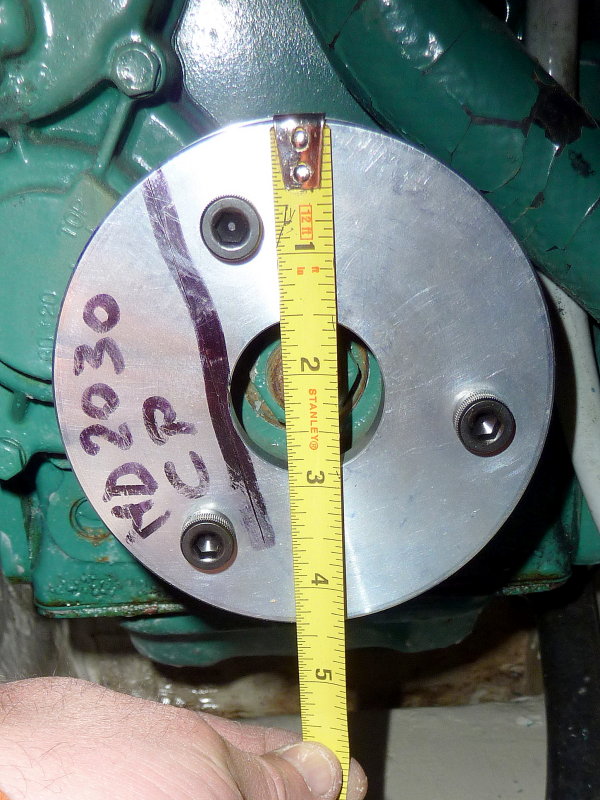
Measuring The Crank Pulley:
After emailing John the photos he assured me they had made a kit for a Volvo MD2030 before, "no worries mate".
When it came time to order the kit "No worries mate" became "worries mate". The engine E-Maax had done a kit for was similar but larger in horse power. Both Volvo engines had different crank pulleys and that kit would not fit this motor. A miscommunication internally at E-Maax gave me wrong information. Of course I have already quoted the customer so ....... Argh......Delays....

Remove Factory Pulley If Needed:
I had a long discussion with Rob and John at Electromaax and they were convinced they could pull this kit off. I removed both the water pump and crank pulleys and shipped them off to Electromaax using their Buffalo, NY shipping address to save money. Electromaax is a Canadian company but they have a US address which makes it convenient.
To remove a crank pulley you'll likely need an impact driver. I find this electric one works wonders and I don't need to tote around an air compressor.
To get the pulley off the crank you'll need a gear puller. I used my two jaw puller and it popped right off.
If Electromaax has a kit already made for your engine you will NOT need to do this step. I helped Electromaax develop this kit for the Volvo MD-2030..
A Pre-Made, Factory Ready Kit:
As I mentioned Electromaax has lots of kits already pre-made for lots of marine engines including Yanmar, Universal, Westerbeke, Nani, Beta, Volvo, Perkins and more..
This happens to be a Westerbeke kit with a 140A alternator. Notice that all three pulleys are anodized black. The kits come complete with the pulley's alternator, bolts, two belts, regulator, Loctite and Tef-Gel.
The silver colored pulley is not an Electromaax product it is an added pulley for the Sea Frost engine driven refrigeration system on this boat.
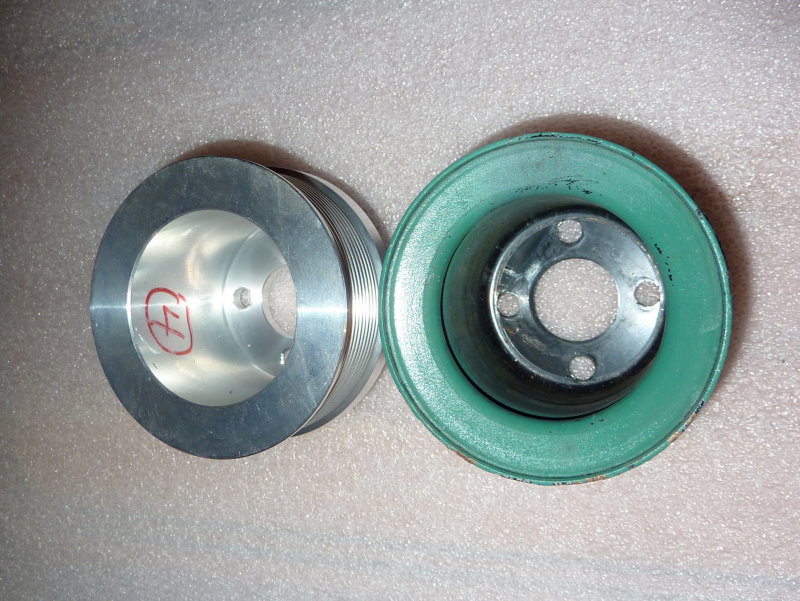
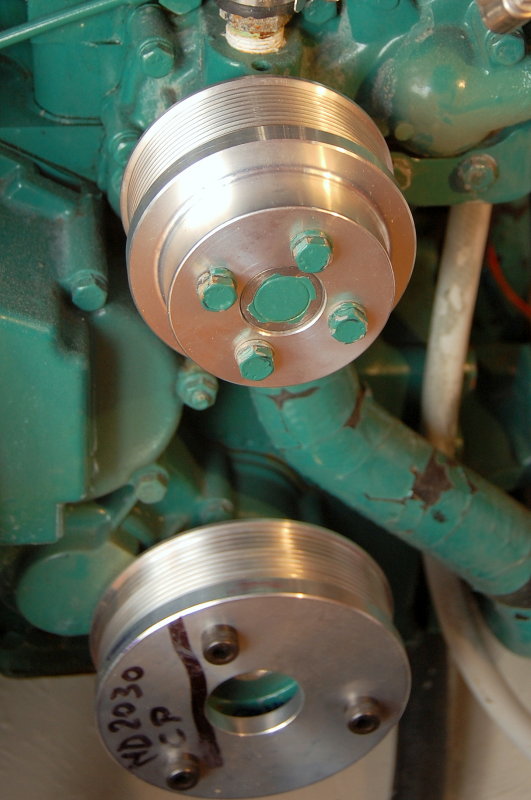
Serpentine Pulley & Factory Pulley:
If you are helping E-Maax create a kit for your engine BE PATIENT. It took me five weeks to get these. If developing a kit wait until your off seasons. There can be multiple trips back and forth to the manufacturer before everything fits just perfectly.
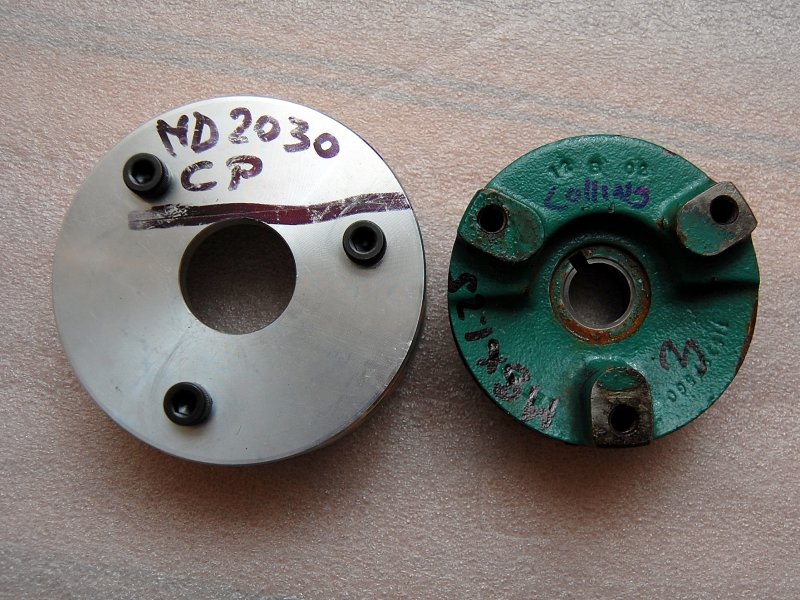
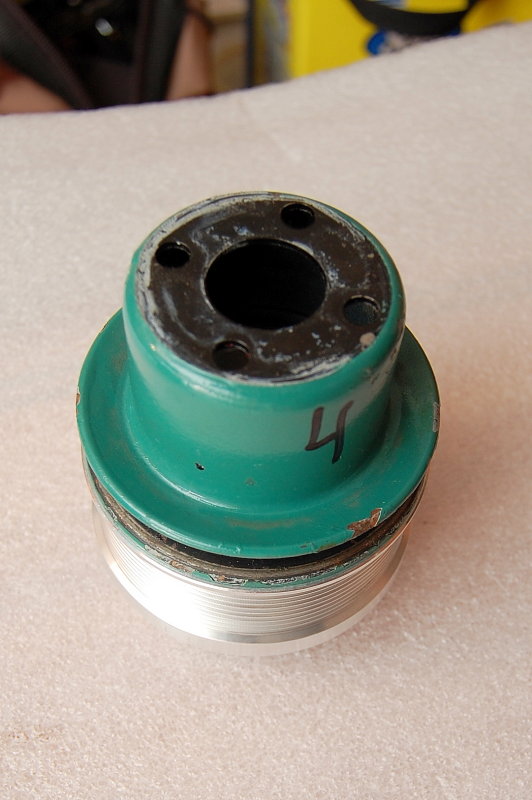
This is the factory Volvo crank pulley and the new serpentine crank pulley.
Back Side:
This is the back side and you can see how easily the serpentine pulley will slide right over the crank pulley.

The New Pulley Just Slides Over:
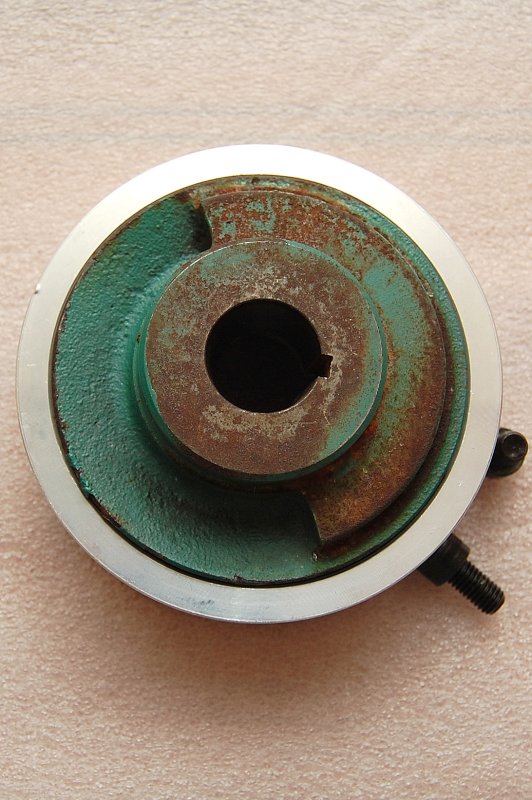
It just slides in like this. Take a look at the difference in surface area for the belts.

They Fit Like A Glove:
Here the crank pulley is in the new serpentine pulley. When you buy a pre-made stocked kit the pulleys will be anodized black. E-Maax will anodize your "developed" pulleys after the fit is "known" to be good.. We are waiting until the next off season to send the pulleys for anodizing.
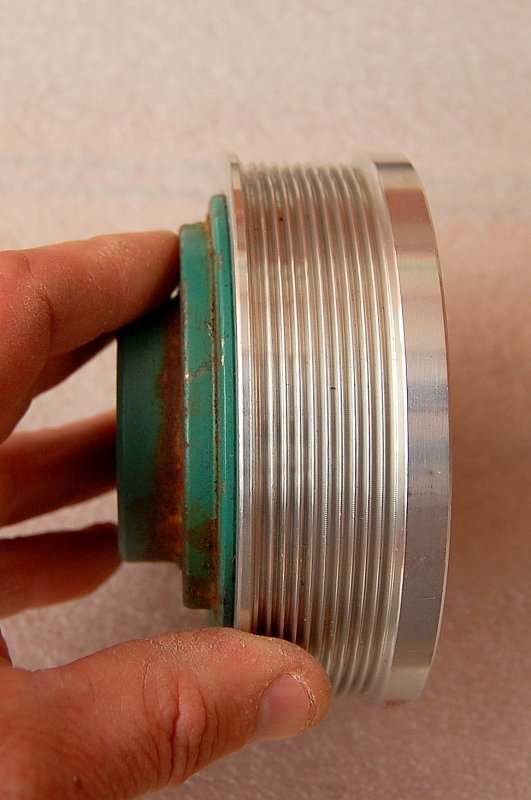
Side Profile:
Beautiful Fit!
Re-install Crank Pulley (if necessary):
To Install the kit you'll first need to re-install the crank pulley (only if you have developed the kit with them). To do this the a torque wrench is required. Torque the crank pulley to the manufacturers suggested torque which can usually be found in the engine service manual or often the owners manual.. You may need to lock the engine in reverse or use a crank bar to hold it.
Install The New Crank Pulley:
Slide the new serpentine pulley over the factory crank pulley and align the holes.
Apply some blue LocTite to the threads and tighten. You can look up torque values for any size fastener on the internet in metric or SAE. Keep in mind that torque values are lower for "lubed threads" and LocTite, when wet, counts as a lube.
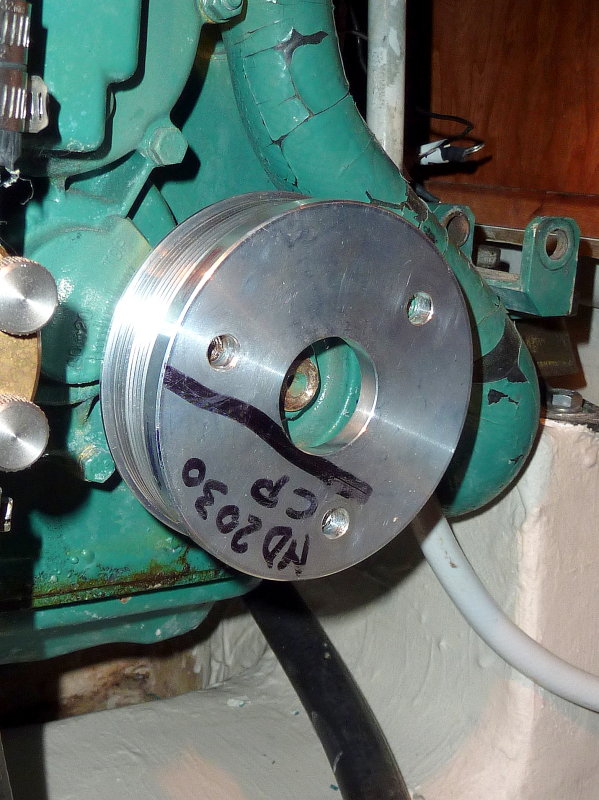
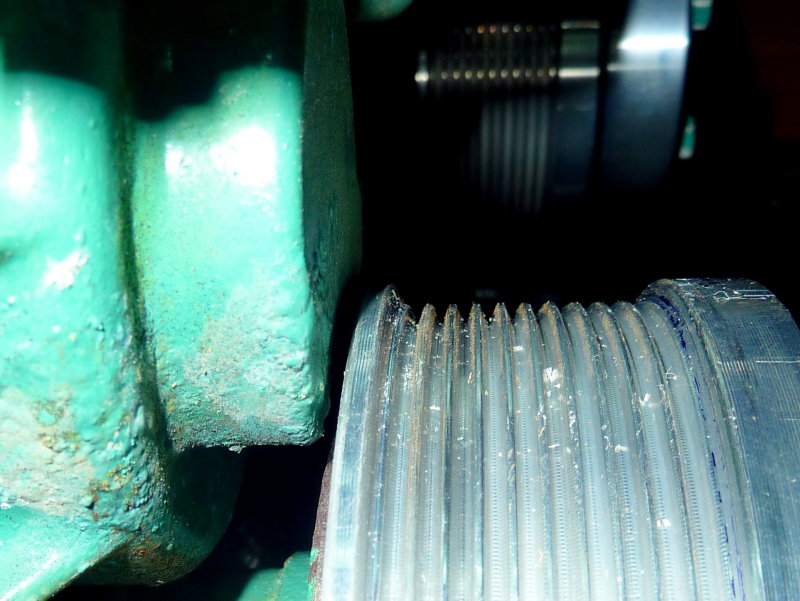
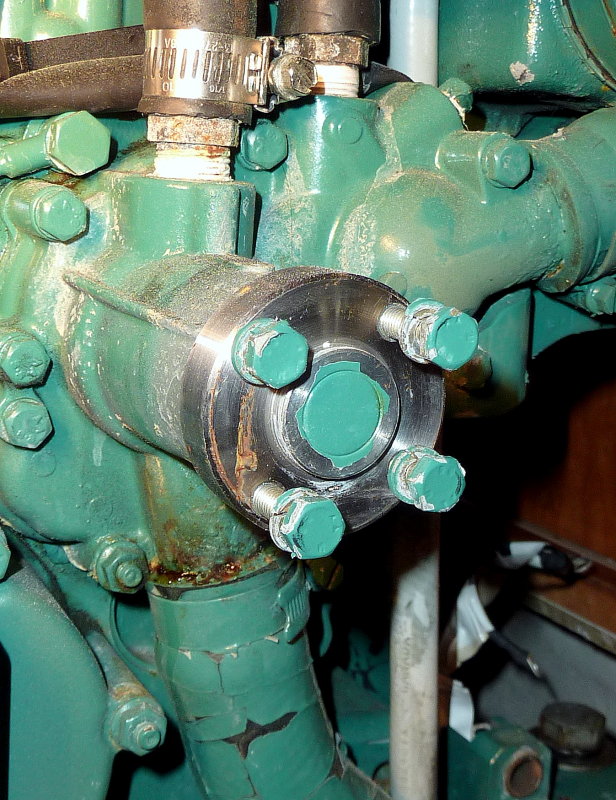
The "Problem" Solved:
This was the big challenge with this kit. The serpentine pulley needed to clear the timing marks and then all the pulleys, water pump and alternator, needed to line up with the crank pulley.
E-Maax exceeded my expectations in this department and the fit was amazing.
Water Pump Pulley:
Rather than fit a waterpump pulley over the old one, like they do with the crank pulley, they simply machine a new one. Fitting a water pump pulley over the old one could change the engines flow characteristics and they are careful to keep the pump within the manufacturers guidelines.
In the kit you order the offsets for all the pulleys will line up perfectly.
Water Pump Pulley OD Is The Same:
As you can see the OD of the pulley remains the same.
Water Pump:
If you are developing a kit and need to send the pulley's off to E-Maax simply put the bolts back into the pump so you don't misplace them. We all know how bilges prefer a diet of expensive nuts and bolts. Best just to know where they are...
Install The Water Pump Pulley:
Just like with the crank pulley install the water pump pulley by sliding it over the water pump shaft. Then insert the bolts and torque to spec. I used a strap wrench to hold the pulley while torquing the bolts. A two handed job and no third hand for the camera..
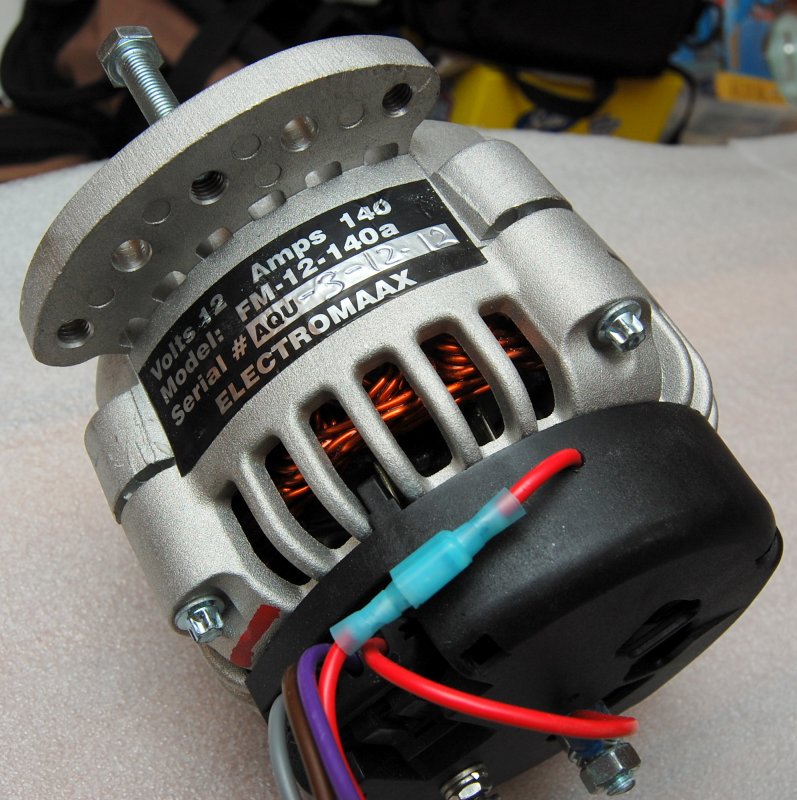
The Alternator:
This is the 140A Electromaax alternator. It is well built and hand wound. The front case is cast by Electromaax in Canada and has a universal adjusting ear for fitting it to many different engines. The bearings are over sized, it has dual internal fans, a built in regulator and the capability to be wired for external regulation as well, it also has heavy gauge hand wound windings that are 14GA. Beefy to say the least. The cases of these alternators are not painted to help them dissipate heat better.
I threw this one on the test bench at my local alternator shop before installing it and cold it exceeded 150A before the test machines belt could not handle it.
Install The Alternator:
This kit required a shim behind the alternator pulley. The front of the pulley was machined to make up for this so there is enough shaft to get the nut on. To remove the alternator pulley and impact driver works best. If you don't have one the shaft is machined to take a hex key / Allen wrench.
If you look close you can see the shim already half way down the shaft.

Crank, Pump & Alternator Installed:
With the pulleys and alternator installed it is time to install the belt.
The Belt:
The belt used in the Electromaax kits is a J or "Jason" belt in a 10 groove design. The numbering designation for these belts is inches X 10. So a 33" belt would be a J330 or 33" X 10. The J360 shown in the picture is a 36" belt.
These belts are NOT normal belts you will find at an automotive store and need to be special ordered. They are easy to find and Electromaax or another source such as Motion Industries can get them for you.
It should be noted that Electromaax sends you TWO belts in the kit. However if developing the kit the size they send you may not be correct. Best to collapse the alternator to it's shortest belt size than wrap a tape measure around it to know what you'll need. Once the pulleys were installed I did this and discovered I had 32.5" path around the pulleys. I ordered a 33" belt as opposed to the 36" belt they had sent me and all was good.
If going off cruising I might invest in a third or fourth belt as these Jason belts are NOT going to be easy to find in remote locations. No one in the entire state of Maine had one in the size I needed. It was four days to get one from Electromaax and they had sent it out the very next morning..
I know why they use this belt, and that is because it can handle a lot of HP. It would however be nice to have the option, on alts under say 140A, to have an standard automotive belt option you could grab at any auto-parts store..

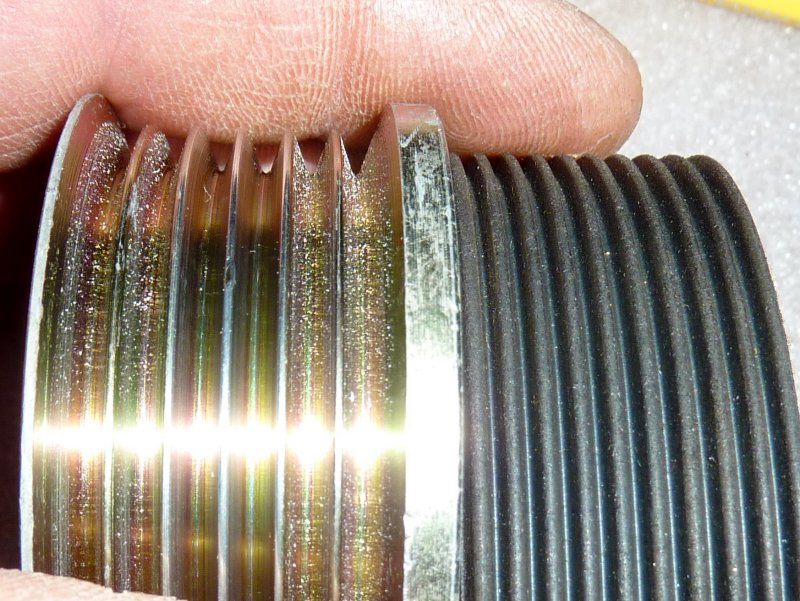
Automotive Serpentine Vs. Electromaax:
Excuse the flash blast. I wanted to show the difference between a standard automotive serpentine pulley and the 10 groove "J" belt. You can see why a standard serpentine belt won't work.
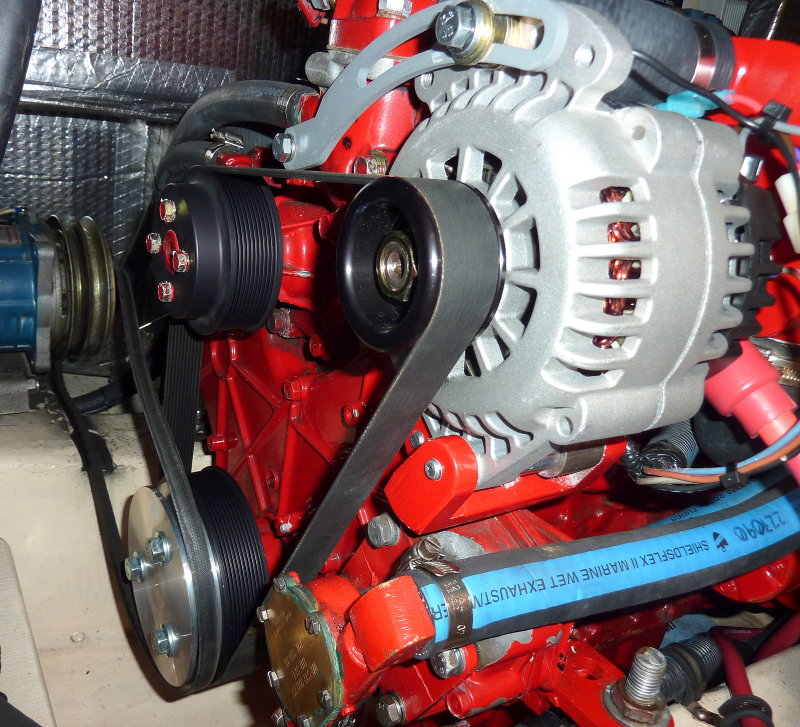
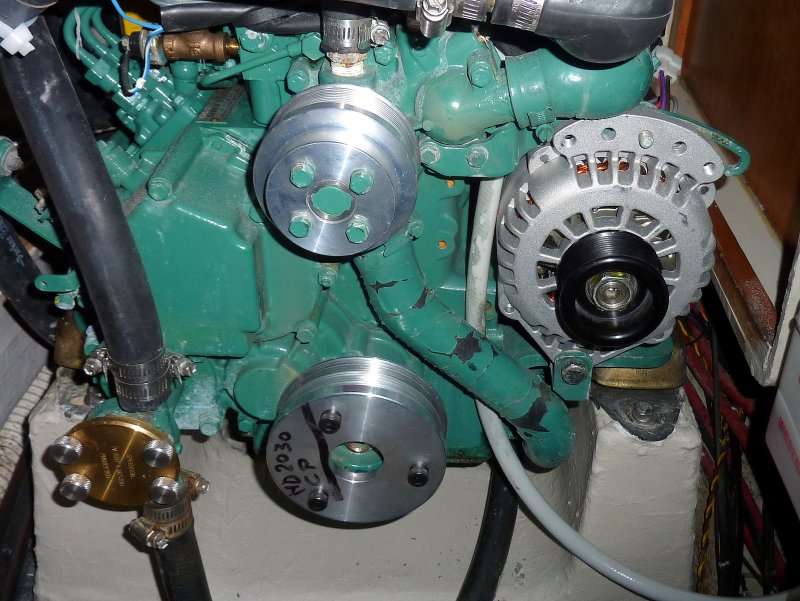
Installed:
If you are installing a serpentine kit and alternator, and Electromaax has a pre-made kit for you engine, you are looking at about 1 hour from start to finish on the install. This of course does not include the wiring just installing the pulley kit and alternator.
These kits are very, very easy to install and can drive lots of current to your bank without so much as a whimper.
Because the belts have so much more grip they don't have to be as tight as a single V belt.. This can help put less wear & tear on your water pump bearing and alternator bearings.
Other belt options for alternator upgrades would include dual v-belts but I generally dislike them. One belt invariably seems to take the load more than the other. No two belts are exactly the same length or stretch or wear the same in the pulley grooves. In a perfect world they would wear evenly and stretch evenly, unfortunately we just don't live in a perfect world.
With v-belts going out of fashion in the automotive market it is getting very difficult to find "matched pairs" of v-belts. Industrial suppliers sometimes have them or can order them but I am still not a huge fan. Serpentine pulleys just makes sense for high amperage alternators.
The decision to go serpentine was an easy one...
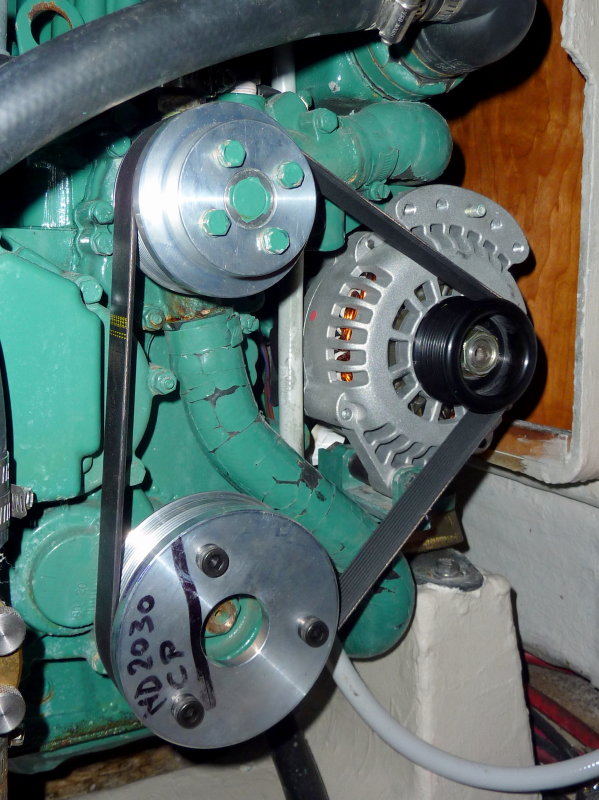
Figure Your Pulley Ratio:
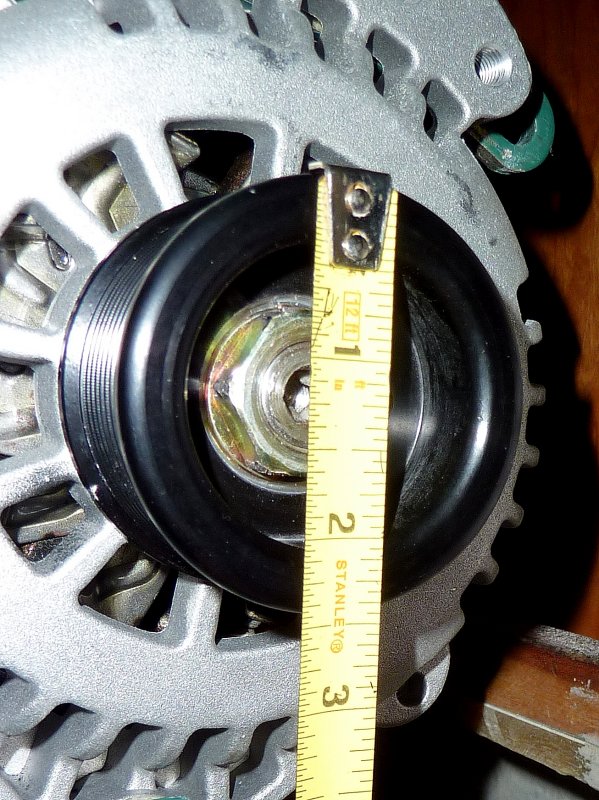
Figuring your pulley ratio is easy. Fist measure the alternator pulley overall diameter.
Measure The Crank:
Next, measure the overall diameter of the crank pulley.
The alternator has an OD of about 2.43" and the crank has an OD of about 4.43" so we simply divide 4.43" by 2.43" and we have a 1.8:1 pulley ratio.
This means that for every revolution of the engine crank the alternator makes 1.8 revolutions.
By knowing this we can determine that at 1000 engine RPM our alternator is spinning at 1800 RPM. Once you know this you can compare it to the curve for your alternator to see where you need to run your engine at to develop the current you want.
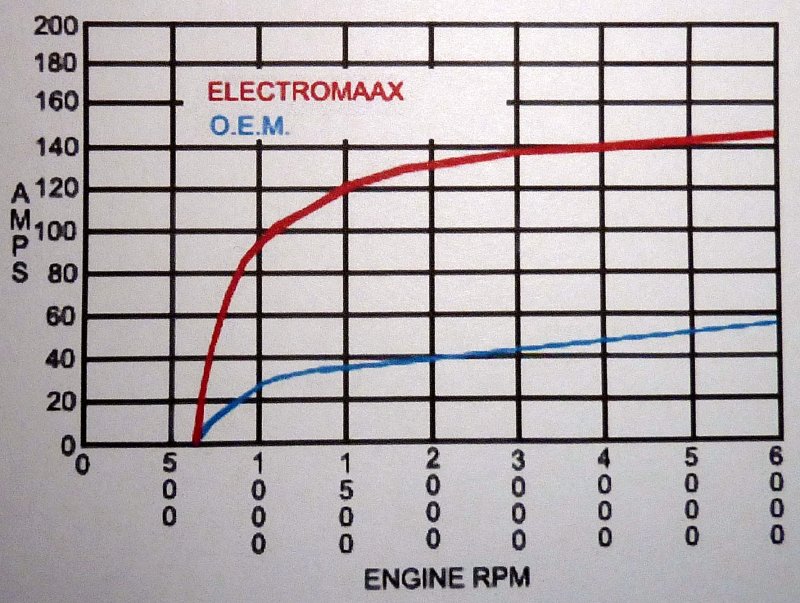
Compare It To The Output Curve:
This is the Electromaax performance curve for the 140A alternator. Electromaax uses a pulley ratio of 2.25:1 for this power curve. By knowing your ratio you can backwards engineer the performance off this chart.
Personally I would like to see Electromaax use alternator shaft RPM on their curves but they don't. Just know that their curves are based on a 2.25:1 pulley ratio.
Based on this performance curve we would need an engine RPM of 1675 to attain a 3000 alternator shaft RPM which puts us at near max performance for the alternator. So on this particular Volvo engine pushing much beyond 1675 RPM really gains you little in the way of added alternator performance.
If you run your engine at anchor for charging, or engine driven refrigeration, this is good information to know so you don't run the engine faster than is necessary and annoy everyone with unnecessary noise pollution. Sea Frost engine driven refrigeration systems attain max output by about 1500 RPM so this is a pretty close match up.
Even at an idle of just 1000 RPM this alternator can and does produce over 100A of current!
Finished Install:
One last item. Do not forget that the neg wire for the alternator is equally important in this circuit as the positive wire. They should be the same size. These are 1/0 UL1426 battery cable.
I find the best location for a heavy neg wire on these alternators is to the adjusting arm ear. What can't be seen here is the alternators temperature sensor, which is also very important, especially if feeding large banks or banks of AGM batteries.
And lets not forget our gracious hosts Sailboatowners.com who sell the Electromaax Kits")
There are other companies producing similar products & Balmar actually owns the patent for this type of pulley, E-Maax is technically in violation of this patent. Balmar and Mark Grasser DC Solutions, both have excellent customer support & considerably better track records in regards to customer service. I am not saying don't buy from Electromaax, just letting you know a good number of boaters have not been happy with their customer service, so do your research.
The Stock System
The owner of this boat keeps it on a mooring and as such his stock charging system was proving to be inadequate for his family's use. Having recently upgraded his battery bank to TPPL / AGM batteries he was in need of an alternator makeover...
This install is focusing on the serpentine pulley kit and alternator install only. The wiring, regulator and regulator set up is a whole other bag of worms that would be double this info...
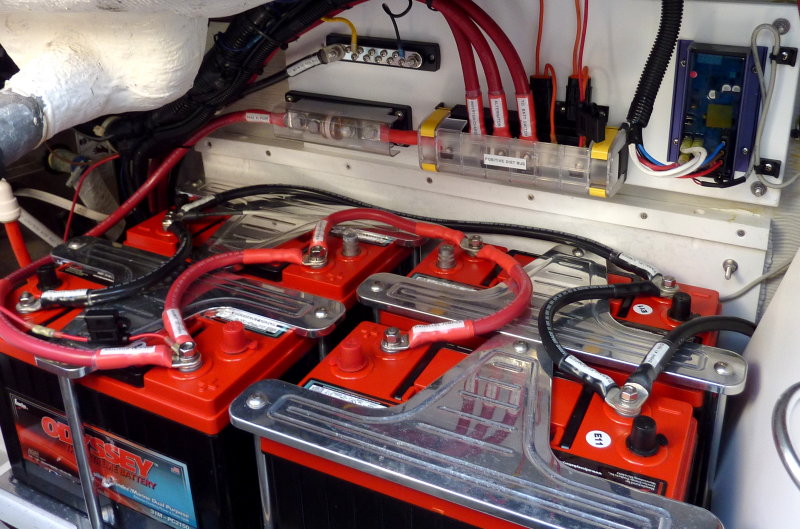
The Battery Bank:
His bank of batteries is a large bank of four group 31 TPPL (thin plate pure lead) AGM batteries made by Odyssey. The bank is 400Ah in total but can also accept about 320A of charge current on the low end of acceptance, in bulk mode and over 1200A on the high end..
Contrary to popular beliefs and misconceptions about batteries and alternators it is the battery that "takes" or "accepts" current from the alternator. The alternator does not "force" current to the bank. The alternator only follows what the batteries want, up to it's limits. In this case the batteries, in bulk mode, below 80% state of charge is considered BULK, will take far more than ANY alternator that could be fit to this engine can or could deliver.
To be more specific an Odyssey PC 2150M 100Ah battery can accept anywhere from 0.8C or 80A of charge current, to 3.1C or 310A of charge current when charging in bulk mode. That is a HUGE amount of "accepted" charging current. Contrast that to most deep cycle wet cell batteries that take just 0.25C or 25A per 100Ah of capacity. Think about it like this, a 400Ah bank of deep cycle wet batteries will take about 100A of charging current and this bank of Odyssey batteries will take as much as 1240 amps of charge current. Big differences in the loads the alternator can and will see.
With a bank of four PC 2150M batteries, which this boat has, they can literally accept 1240A of charging current. Unfortunately there is no charging system available for a sailboat that can supply that kind of charging current. If there was, you could literally charge from 20% of capacity to 80%, or replace 60% of your banks capacity in TEN MINUTES. Wow....
Like any AGM battery these TPPL batteries can take massive amounts of charging current tapping out just about any stock alternator, and exceeding in acceptance, the output of just about any alternator that would fit onto this engine. This is why I feel it is important to use a serpentine kit and do a proper installation that can handle these batteries.
Over the years I have seen many stock alternators burned up by the high acceptance rates of AGM batteries, and Odyssey's are no different. They really need to be fed with a charging system than is designed for it and can handle them.
With the owners stock crank and water pump pulleys sized for a 3/8" v-belt he was really limited to about 80A of charge current at a maximum, in an alternator output, before the belt would begin to wear quickly.
We discussed the options and decided on an Electromaax 140A alternator and the Electromaax serpentine pulley kit was a good fit. We could have gone bigger but it would have meant a bigger HP bite out of his relatively small propulsion engine. 140A is a good fit..
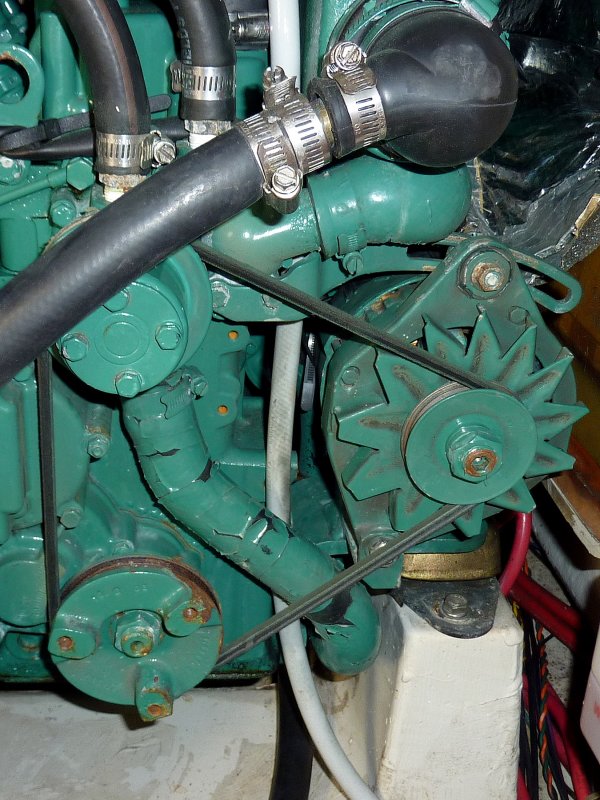
The Problem:
When I began to examine the layout of the pulleys and engine I was concerned an E-Maax kit would not work or fit. The timing marks and stock crank pulley are very, very close to one another. The design of the Electromaax pulley kits are ingenious in that they simply fit over the main crank for an easy install. This is good and bad for some motors as they make the crank pulley slightly larger.
I shot some photos, took some measurements and I picked up the phone and Called John one of the owners of Electromaax.
Measuring The Crank Pulley:
After emailing John the photos he assured me they had made a kit for a Volvo MD2030 before, "no worries mate".
When it came time to order the kit "No worries mate" became "worries mate". The engine E-Maax had done a kit for was similar but larger in horse power. Both Volvo engines had different crank pulleys and that kit would not fit this motor. A miscommunication internally at E-Maax gave me wrong information. Of course I have already quoted the customer so ....... Argh......Delays....
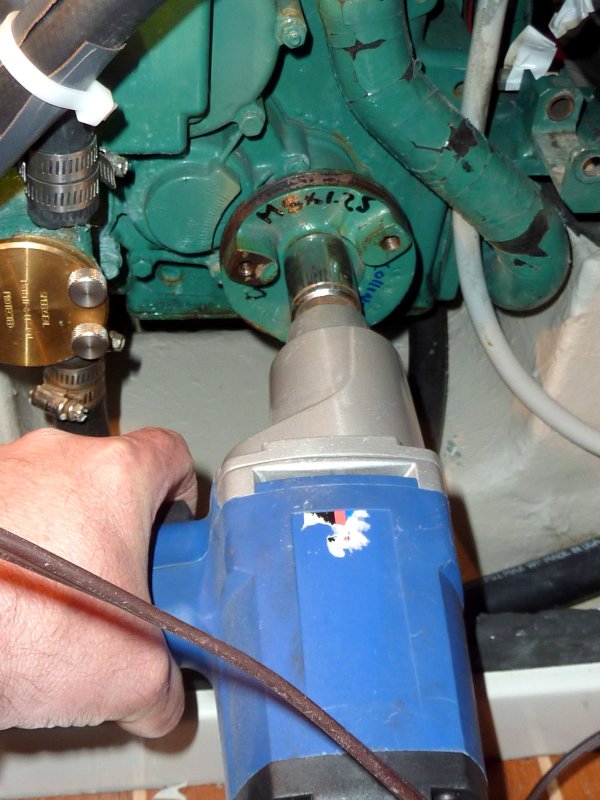
Remove Factory Pulley If Needed:
I had a long discussion with Rob and John at Electromaax and they were convinced they could pull this kit off. I removed both the water pump and crank pulleys and shipped them off to Electromaax using their Buffalo, NY shipping address to save money. Electromaax is a Canadian company but they have a US address which makes it convenient.
To remove a crank pulley you'll likely need an impact driver. I find this electric one works wonders and I don't need to tote around an air compressor.
To get the pulley off the crank you'll need a gear puller. I used my two jaw puller and it popped right off.
If Electromaax has a kit already made for your engine you will NOT need to do this step. I helped Electromaax develop this kit for the Volvo MD-2030..
A Pre-Made, Factory Ready Kit:
As I mentioned Electromaax has lots of kits already pre-made for lots of marine engines including Yanmar, Universal, Westerbeke, Nani, Beta, Volvo, Perkins and more..
This happens to be a Westerbeke kit with a 140A alternator. Notice that all three pulleys are anodized black. The kits come complete with the pulley's alternator, bolts, two belts, regulator, Loctite and Tef-Gel.
The silver colored pulley is not an Electromaax product it is an added pulley for the Sea Frost engine driven refrigeration system on this boat.
Serpentine Pulley & Factory Pulley:
If you are helping E-Maax create a kit for your engine BE PATIENT. It took me five weeks to get these. If developing a kit wait until your off seasons. There can be multiple trips back and forth to the manufacturer before everything fits just perfectly.
This is the factory Volvo crank pulley and the new serpentine crank pulley.
Back Side:
This is the back side and you can see how easily the serpentine pulley will slide right over the crank pulley.
The New Pulley Just Slides Over:
It just slides in like this. Take a look at the difference in surface area for the belts.
They Fit Like A Glove:
Here the crank pulley is in the new serpentine pulley. When you buy a pre-made stocked kit the pulleys will be anodized black. E-Maax will anodize your "developed" pulleys after the fit is "known" to be good.. We are waiting until the next off season to send the pulleys for anodizing.
Side Profile:
Beautiful Fit!
Re-install Crank Pulley (if necessary):
To Install the kit you'll first need to re-install the crank pulley (only if you have developed the kit with them). To do this the a torque wrench is required. Torque the crank pulley to the manufacturers suggested torque which can usually be found in the engine service manual or often the owners manual.. You may need to lock the engine in reverse or use a crank bar to hold it.
Install The New Crank Pulley:
Slide the new serpentine pulley over the factory crank pulley and align the holes.
Apply some blue LocTite to the threads and tighten. You can look up torque values for any size fastener on the internet in metric or SAE. Keep in mind that torque values are lower for "lubed threads" and LocTite, when wet, counts as a lube.
The "Problem" Solved:
This was the big challenge with this kit. The serpentine pulley needed to clear the timing marks and then all the pulleys, water pump and alternator, needed to line up with the crank pulley.
E-Maax exceeded my expectations in this department and the fit was amazing.
Water Pump Pulley:
Rather than fit a waterpump pulley over the old one, like they do with the crank pulley, they simply machine a new one. Fitting a water pump pulley over the old one could change the engines flow characteristics and they are careful to keep the pump within the manufacturers guidelines.
In the kit you order the offsets for all the pulleys will line up perfectly.
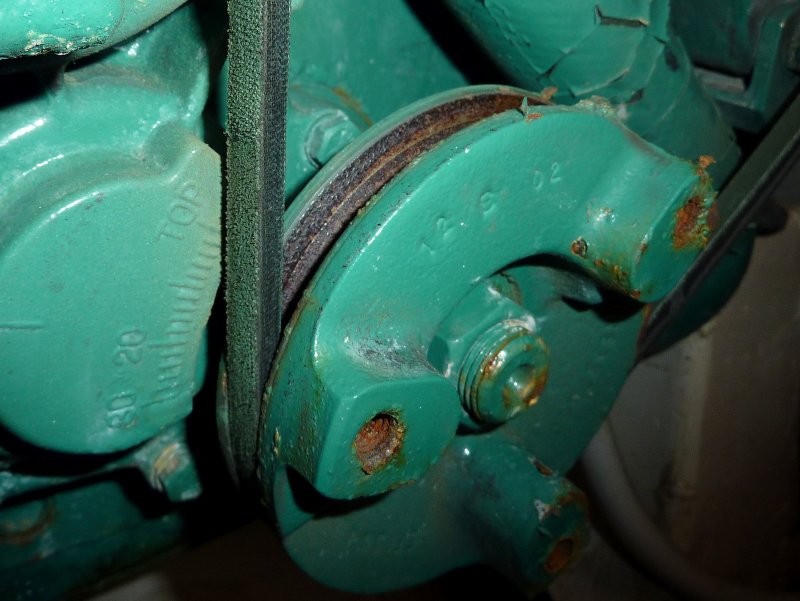
Water Pump Pulley OD Is The Same:
As you can see the OD of the pulley remains the same.
Water Pump:
If you are developing a kit and need to send the pulley's off to E-Maax simply put the bolts back into the pump so you don't misplace them. We all know how bilges prefer a diet of expensive nuts and bolts. Best just to know where they are...
Install The Water Pump Pulley:
Just like with the crank pulley install the water pump pulley by sliding it over the water pump shaft. Then insert the bolts and torque to spec. I used a strap wrench to hold the pulley while torquing the bolts. A two handed job and no third hand for the camera..
The Alternator:
This is the 140A Electromaax alternator. It is well built and hand wound. The front case is cast by Electromaax in Canada and has a universal adjusting ear for fitting it to many different engines. The bearings are over sized, it has dual internal fans, a built in regulator and the capability to be wired for external regulation as well, it also has heavy gauge hand wound windings that are 14GA. Beefy to say the least. The cases of these alternators are not painted to help them dissipate heat better.
I threw this one on the test bench at my local alternator shop before installing it and cold it exceeded 150A before the test machines belt could not handle it.
Install The Alternator:
This kit required a shim behind the alternator pulley. The front of the pulley was machined to make up for this so there is enough shaft to get the nut on. To remove the alternator pulley and impact driver works best. If you don't have one the shaft is machined to take a hex key / Allen wrench.
If you look close you can see the shim already half way down the shaft.
Crank, Pump & Alternator Installed:
With the pulleys and alternator installed it is time to install the belt.
The Belt:
The belt used in the Electromaax kits is a J or "Jason" belt in a 10 groove design. The numbering designation for these belts is inches X 10. So a 33" belt would be a J330 or 33" X 10. The J360 shown in the picture is a 36" belt.
These belts are NOT normal belts you will find at an automotive store and need to be special ordered. They are easy to find and Electromaax or another source such as Motion Industries can get them for you.
It should be noted that Electromaax sends you TWO belts in the kit. However if developing the kit the size they send you may not be correct. Best to collapse the alternator to it's shortest belt size than wrap a tape measure around it to know what you'll need. Once the pulleys were installed I did this and discovered I had 32.5" path around the pulleys. I ordered a 33" belt as opposed to the 36" belt they had sent me and all was good.
If going off cruising I might invest in a third or fourth belt as these Jason belts are NOT going to be easy to find in remote locations. No one in the entire state of Maine had one in the size I needed. It was four days to get one from Electromaax and they had sent it out the very next morning..
I know why they use this belt, and that is because it can handle a lot of HP. It would however be nice to have the option, on alts under say 140A, to have an standard automotive belt option you could grab at any auto-parts store..
Automotive Serpentine Vs. Electromaax:
Excuse the flash blast. I wanted to show the difference between a standard automotive serpentine pulley and the 10 groove "J" belt. You can see why a standard serpentine belt won't work.
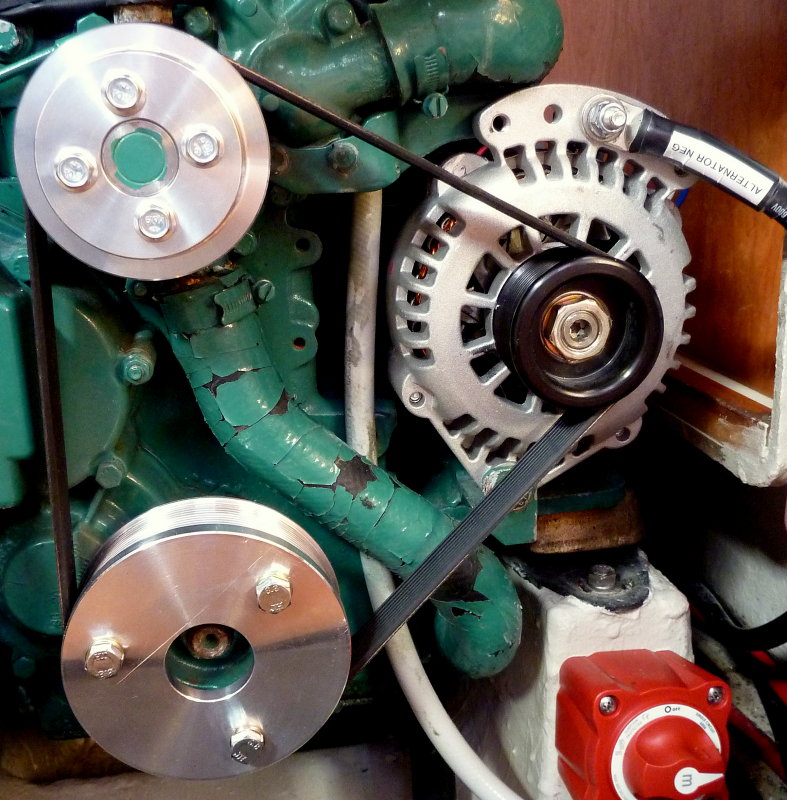
Installed:
If you are installing a serpentine kit and alternator, and Electromaax has a pre-made kit for you engine, you are looking at about 1 hour from start to finish on the install. This of course does not include the wiring just installing the pulley kit and alternator.
These kits are very, very easy to install and can drive lots of current to your bank without so much as a whimper.
Because the belts have so much more grip they don't have to be as tight as a single V belt.. This can help put less wear & tear on your water pump bearing and alternator bearings.
Other belt options for alternator upgrades would include dual v-belts but I generally dislike them. One belt invariably seems to take the load more than the other. No two belts are exactly the same length or stretch or wear the same in the pulley grooves. In a perfect world they would wear evenly and stretch evenly, unfortunately we just don't live in a perfect world.
With v-belts going out of fashion in the automotive market it is getting very difficult to find "matched pairs" of v-belts. Industrial suppliers sometimes have them or can order them but I am still not a huge fan. Serpentine pulleys just makes sense for high amperage alternators.
The decision to go serpentine was an easy one...
Figure Your Pulley Ratio:
Figuring your pulley ratio is easy. Fist measure the alternator pulley overall diameter.
Measure The Crank:
Next, measure the overall diameter of the crank pulley.
The alternator has an OD of about 2.43" and the crank has an OD of about 4.43" so we simply divide 4.43" by 2.43" and we have a 1.8:1 pulley ratio.
This means that for every revolution of the engine crank the alternator makes 1.8 revolutions.
By knowing this we can determine that at 1000 engine RPM our alternator is spinning at 1800 RPM. Once you know this you can compare it to the curve for your alternator to see where you need to run your engine at to develop the current you want.
Compare It To The Output Curve:
This is the Electromaax performance curve for the 140A alternator. Electromaax uses a pulley ratio of 2.25:1 for this power curve. By knowing your ratio you can backwards engineer the performance off this chart.
Personally I would like to see Electromaax use alternator shaft RPM on their curves but they don't. Just know that their curves are based on a 2.25:1 pulley ratio.
Based on this performance curve we would need an engine RPM of 1675 to attain a 3000 alternator shaft RPM which puts us at near max performance for the alternator. So on this particular Volvo engine pushing much beyond 1675 RPM really gains you little in the way of added alternator performance.
If you run your engine at anchor for charging, or engine driven refrigeration, this is good information to know so you don't run the engine faster than is necessary and annoy everyone with unnecessary noise pollution. Sea Frost engine driven refrigeration systems attain max output by about 1500 RPM so this is a pretty close match up.
Even at an idle of just 1000 RPM this alternator can and does produce over 100A of current!
Finished Install:
One last item. Do not forget that the neg wire for the alternator is equally important in this circuit as the positive wire. They should be the same size. These are 1/0 UL1426 battery cable.
I find the best location for a heavy neg wire on these alternators is to the adjusting arm ear. What can't be seen here is the alternators temperature sensor, which is also very important, especially if feeding large banks or banks of AGM batteries.
And lets not forget our gracious hosts Sailboatowners.com who sell the Electromaax Kits