C22 New Style "Stormwatch" Purchase and Refit

Mar 20, 2015
3,094
C&C 30 Mk1 Winnipeg
-----
Rub Rail Insert Replacement
------

Over time the plastic insert in the aluminum rub rail deteriorates and starts look pretty ugly.

Stormwatch's rub rail insert not only looked bad, but where it had repeatedly rubbed against the dock in it's old marina berth, the plastic was worn away to the point that the aluminum itself, would have rubbed against the dock.

The rub rail insert is a single piece of soft plastic, that runs from the stern of the boat, around the bow, and back to the stern.

Removing the old rub rail insert was extremely easy...
I first removed the two screws that held the insert in place, at the stern of the boat.
I then used an old screwdriver to pry the end of the insert, away from the aluminum rail.
Then I simply grabbed the insert and walked around the boat, pulling it out of the rub rail.

Once the insert was removed, I took a pressure washer and thoroughly cleaned the aluminum rail.
You may with to inspect the rail for damage, and possibly remove and re-bed the whole rail if you are experiencing leaks.
In my case I simply cleaned the rail.


It's a simple process to replace the rub rail insert.... As long as it's warm outside.

I started at the stern of the boat.
Since the boat was on the trailer, I pushed the lip of the rub rail insert up into the lip of the aluminum rail. I then used a plastic interior automotive trim panel tool to push the bottom lip of the insert into place.
Once I had a small section installed, I re-installed the screw the held the end in place.
I then proceeded to slooowly install the rest of the insert.

Why sloowly you ask ?

When I started the job it was early morning in early summer, with a temperature around 74F/23C and the plastic insert was stiff.
My fingers got really sore pretty quickly so I quit for a while, and then went back to it.
I ended up doing a little at a time over the day, and got half the boat done.

A few days later the temperature was warmer, and I completed the job in a short time.
So.. If you replace your rub rail insert.. do it when it's hot outside. The warmer the better.

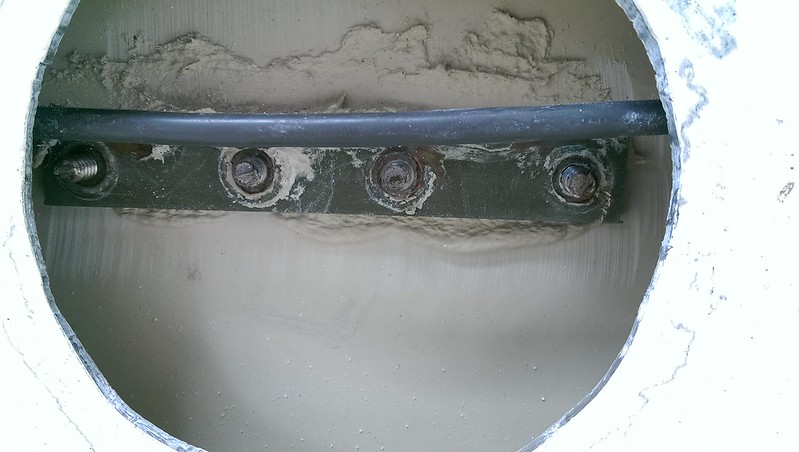
One thing to keep in mind if you replace yours..
On the new style C22, the insert has a "lip" inside the rail, that will interfere with the bolts if you try install the insert upside down.


Rub Rail Insert with Internal Lip Towards The Bottom


Rub Rail Insert Retaining Screw
 
Mar 20, 2015
3,094
C&C 30 Mk1 Winnipeg
-----
Anchor Roller
------
UPDATED: 2015-Nov-02


One thing I wanted for the boat was an anchor roller. They are not only a great way to have your anchor ready to drop at a moment's notice. They also have the advantage of protecting the hull when retrieving the anchor.

When searching for options, like most people I found the bow roller sold by CD.

----------
IMO it's too small for the job if you want a good heavy anchor for overnights and for heavier weather. Some members like "CaptDon" like it, since it works well for the size of anchor they use and the C22 version they own.

Gene has a great thread where he customizes and installs a larger roller:
<link here>
Read that for more opinions...

For now I'm going to keep the roller but in the future I'll likely replace and do something like Gene did.

--------

Here's what it was like to install the CD "custom anchor roller" on my "New Style" C22:


The stem fitting on the "New Style" C22 is bolted to the deck with 6 Bolts.
4 of them go through the top into the deck, and 2 go through the tang on the bow, into the hull.
(The tang was an stem fitting improvement over the older C22s, where the stem fitting could eventually come loose from the deck due to forestay loads)

You need to remove the stem fitting, so you can install the anchor roller under it.

Unfortunately the only access to the nuts that hold the fitting on, is through a small inspection port in the front of the anchor locker:


Inspection Port


You need fairly small hands to be able to get you hand in there to remove those bolts.
I used a small 1/4" drive ratchet and a socket to remove the nuts.
It's tricky to remove them, without dropping them inside the hull.
At one point I dropped one but was lucky enough to be able to reach where it landed.
Just take your time and do it slooowly.

The inspection port has fairly sharp plastic on the inside. After squeezing your hand in there multiple times, more than likely your hand will be bleeding.
I recommend wearing rubber gloves, to help improve grip on the hardware, and to minimize rubbing your skin raw on the plastic opening.
If your hand is bigger than average, you may have more luck by removing the inspection port and replacing it when done.


Don't say I didn't warn you !


Once the bolts are removed, you need to slowly and gently pry the stem fitting upwards.
The fitting is probably sealed to the deck, making it difficult to remove. Mine appeared to be installed with 3M 4200. If a previous owner stupidly used 3M 5200 EVIL GLUE, you are on your own...

I used a plastic wedge to get the fitting up a small amount, and then used an utility knife to cut the sealant. I then used a block of wood and a small prybar to get the fitting out the rest of the way.

Removing the Stem Fitting

Once the fitting was removed, I overdrilled and "potted" the holes with epoxy, to protect the deck coring from leaks. (see my previous chainplate post for info on how I did it, or check forum member "Maine Sail"s detailed posting on how to pot and re-bed deck fittings)


Holes Filled With Epoxy

Once the epoxy cured, I temporarily installed the anchor roller and stem fitting so I could re-drill the holes the original size.

Some people have had problems aligning the 2 holes in the hull that hold the tang in place.
This is because the anchor roller fits under the stem fitting. That raises the position of the stem fitting.
I didn't have much of a problem.. likely because I re-drilled the holes, after filling them with epoxy, anyhow.


Holes Re-drilled To The Original Size

Once the holes were re-drilled, it was simply a matter of re-bedding the fitting + roller and bolting them back in place.


Installed Anchor Roller

Next summer I'll report on how well it works with my original Danforth anchor.
 
Last edited:
Mar 20, 2015
3,094
C&C 30 Mk1 Winnipeg
-----
Custom Kickup Rudder
------

One of the major problems identified in the survey of the boat was that the rudder was de-laminated due to water getting into the wood core.
Cracks in the rudder are something that C22 owners should keep an eye out for.
it won't take long for a small crack to turn into a large one, and possibly major rudder repair or replacement. Either option isn't cheap.

Before we even brought the boat home for the first time, we decided that buying a new custom kickup rudder, made by RudderCraft, would be the better choice.
It has a quality NACA 12 foil rudder that is solid HDPE. The foil shape, reportedly greatly improves performance, and eliminates the risk of delamination.
The rudder head is stainless steel and it has a gas strut system that allows easy lifting and lowering of the rudder. The strut will also push the ruder back down when it hits an object in the water.
In my opinion, it's a no brainer choice, if you have the $900 to buy one.

I wanted to have the upgraded 1/2" gudgeons, so I ordered the rudder with 1/2" pintles.
Unfortunately, our 1987 C22 was one of the last few that had 3/8" gudgeons installed at the factory, so I also ordered a set of 3 hole 1/2" retrofit gudgeons

installing the gudgeons was the only actual "work" involved. Installing the rudder and tiller itself takes a couple minutes at the most. (20 seconds to put the rudder on, and a minute or so to bolt the tiller on)

To install the upgraded gudgeons, you have to cut a hole in the transom, at the back of the cockpit. When complete, the hole is easily covered up with an inspection cover.
I couldn't find a hole saw that matched inspection cover I used, so I simply made a cardboard template and used that to mark the hole.


First I gently cut a hole with my holesaw, MAKING SURE I ONLY CUT THROUGH THE FIBREGLASS.


I then used a hacksaw blade, wrapped in tape, to cut the rest of the hole.

It's never a good idea to cut into a place where you can't see what behind it.
In this case the space between the cockpit and hull itself is small.

I didn't want to use my jigsaw, because of the risk of accidentally cutting all the way out the other side, into the hull.. or bashing the blade into the gudgeon backing plate.. or cutting the outboard alternator wiring that a previous owner had installed.


<post not complete>
 
Last edited:
Mar 20, 2015
3,094
C&C 30 Mk1 Winnipeg
-----
Navigation Lights and Mast Wiring
------


In addition to the switch panel, and interior wiring, the navigation lights needed to be inspected, detected, new connectors selected, all because they had been neglected.

I did the bicolour and stern lights first, since they were hooked up all the time, and easy to test.
On the new style C22, Both lights were originally welded to the fore and aft Pulpits.
Both welds had broken, so the brackets and housings were hanging from their cables.
Evidently, this is a common problem.
The original welds were only on the front edge of the bracket, which over time, failed.
Had they been welded on both sides they wouldn't have failed.

Amazingly enough the cable insulation and conductors were not broken, so all I needed to do was disassemble and clean the housings, re-attach the brackets, and test the bulbs.

I planned on buying LED bulbs, and clamp on brackets from Catalina Direct.
Unfortunately, they only had the white stern LED in stock.

I was only going to buy the clamp on brackets because they would be quicker fix, but since they weren't available, I decided to ultimately have the brackets re-welded.
In the meantime, I decided to prep the brackets for future welding, and then simply screw them in place for the season.

I used my bench grinder to clean up the bracket edges and ensure the cable wasn't going to get damaged as it entered the holes in the pulpits.
I also used a hammer and a piece of solid metal bar, to curve the brackets where they would eventually be welded, making sure the sat against curved pulpit pipe. This way the welds shouldn't fail again.


Modified Bracket and Existing Holes for temporary Mounting Screws

I then temporarily clamped the brackets in place, and drilled holes in the pulpit pipe using the existing holes in the brackets. 2 short stainless screws hold the brackets in place.

Before I connected the wiring to the housings, and attached the housings to the brackets, I used some head shrink tubing to add an additional layer of protection where the cable entered the pulpit tubing.


Stern Light with Temporary Screws Holding Bracket in Place.

This worked well enough, but it's not a permanent fix. The screws will eventually come loose.
In my opinion it's good enough until I get time to have them MIG welded in place with stainless welding wire.

I then tested the Bow and Stern lights.
The stern light has a "Dr Led" Festoon Bulb specifically tested for the Aqua Signal series 25 navigation lights. So far it works great.

Eventually I'll try order one of the bicolour LED capsules for the bow light.
You can't uses just any old LED bulb in the housings.
This is especially true for the bow light which has a red/green which can actually filter out the light from a non-full spectrum LED bulb.


-----------
Mast Lights and Wiring
-----------


Once the hull lights were working I turned my attention to the mast lights and radio antenna wiring.

At one time the boat had a Signet wind indicator on the masthead, so there was an unused, Deck Cable Outlet, in addition to a Deck Cable Outlet for the antenna coax cable, and a 4 pin Plastic Deck Connector for the mast lighting.


Original Deck Connector and 2 Cable Outlets

The gaskets for the 2 cable outlets were dried out and leaking, and the Deck Connector's retaining ring was missing, so I decided to replace them with new hardware.

Upon removing the Deck Connector, I discovered that there was a large hole underneath, with exposed wood deck coring. Obviously this is isn't a good thing if the Deck Connector ever leaks. Fortunately, this C22 had been well taken care of by some of it's previous owners, and there was no water damage.

I then removed the mast step, and both cable outlets.

The next step was to use epoxy to:
a) "pot" all the the deck holes that were staying in use.
b) permanently fill the unused hole, so I can eventually cover it with gelcoat.


Original 4 Pin Deck Connector Removed Showing Mounting Hole.


Exposed Wood Deck Core in Mounting Hole

I won't go into "potting" the holes with epoxy, in detail, since I covered the idea previously.
For full details you can check out "Maine Sails" thread.

For the large hole I didn't want to have to redrill the hole, so I used epoxy with only a tiny bit of filler. That way it was thick enough to make a thick layer on the exposed surfaces inside the hole, but thin though to not plug the hole and drip out the bottom.
I let the excess drip out of the bottom of the hole, onto some paper towels that I had stuffed into the top of the compression post below deck.

For the rest of the holes, including the mast step mounting holes, I potted them normally by filling and redrilling them.

New Deck Connector and Cable Outlet.

While direct replacements are available, I wasn't a fan of the original plastic capped Perko Cable Outlet, nor the original plastic 4 pin deck connector.

Instead, I used:
a) Victory Products AA11558 4 pin 5 amp waterproof chrome plated brass deck connector that includes a waterproof screw on cap for when the plug is disconnected.
b) Shakespeare 4184 chrome plated brass cable outlet

Not only were both of these better quality, but they also were the same diameter and had mounting holes in the same location as the original hardware. :D

Note: While the Shakespeare Cable Outlet came with 3 sizes of rubber seal, and the seal on the Deck Connector Plug was ok, as an added measure I used some dual wall waterproof adhesive lined heat shrink tubing on the outside of the cables, where they went through the rubber seals.
This effectively made the cables slightly larger in outside diameter for a tighter seal.
Don't use normal heat shrink tubing for this, since it is not waterproof and water could seep down the cable into the deck hardware.

All I need to do now is re-bed the mast step with new stainless steel bolts and locknuts :)


New Male Deck Plug on Mast


New Deck Connector Socket (with cap) and Cable Outlet (for antenna)
 
Last edited:
Sep 30, 2013
3,538
1988 Catalina 22 North Florida
-----
Navigation Lights and Mast Wiring
------


Original Deck Connectors for Mast Wiring


Original 4 Pin Deck Connector Removed Showing Mounting Hole.


Exposed Wood Deck Core in Mounting Hole

I had to redo that same area not long ago. Mine was worse off, though. Took a little resin work to get it right.

Are you gonna use the "factory" CD replacement connector, or go with something else? I wasn't a fan of the plastic CD one, but I went with it anyway for expedience. I'll figure I'll revisit the issue in a couple years.
 
Mar 20, 2015
3,094
C&C 30 Mk1 Winnipeg
I had to redo that same area not long ago. Mine was worse off, though. Took a little resin work to get it right.

Are you gonna use the "factory" CD replacement connector, or go with something else? I wasn't a fan of the plastic CD one, but I went with it anyway for expedience. I'll figure I'll revisit the issue in a couple years.
I lined it with epoxy, then bedded a new connector.
I felt the same way about the original plastic one. One reason I replaced it was that the retaining ring was missing/broken.
I used a nice metal 4 pin connector in it's place.

EDIT: I'll post the full info and photos.. late today.. maybe... was getting too tired last night and been extremely busy.
 
Last edited:
Mar 20, 2015
3,094
C&C 30 Mk1 Winnipeg
Now that's a solid looking fitting!
It is heavy and well built.

The interesting part of it's design is that the female plug section slides out of the metal portion without removing the metal part from the deck. No need to re bed if you need to replace cable.
The cap keeps it watertight with a nice gasket.
Not cheap but I don't see it breaking any time soon.

They make a 4pin 3 amp and 4 pin 5 amp version. I have the 5 amp. 2 and 3 pin are also available.
 
Sep 30, 2013
3,538
1988 Catalina 22 North Florida
Do you get any odd voltages out of those terminals? I have, and I suspect it's related to the power loss I experience when I leave the "Service" switch on overnight. Sadly, "Service" includes the masthead light.
 
Mar 20, 2015
3,094
C&C 30 Mk1 Winnipeg
No, all is as expected.

The switch panel was a bit wonky before I refurbished it.
In my case -12 VDC (GND) for everything went through the small indicator light in the panel which used very small gauge wire. If someone had powered everything up, that wire would have got very hot. Just more "fun" from some past owner.

I hope to update the thread section on the switch panel soon.
I rewired the existing panel, installed a ground buss bar, and replaced all the fuses with circuit breakers.
The wiring and the breakers came from a new switch panel which was a bit too small to use in the original location, so I simply swapped the internal parts.
I also removed the indicator light beside the service switch with the intent of installing a small digital voltage and current meter, in it's place for battery monitoring.

The only thing the service switch does on my panel, is to allow the other switches to work. It doesn't power anything directly.

At this point I'm doing everything I can to get the boat in the water for next weekend.
Fedex says the new mainsail should be here on Wednesday. :)
 
Mar 20, 2015
3,094
C&C 30 Mk1 Winnipeg
Well "next weekend" is here again and the boat isn't ready.. again.
But I have made more progress.
The handrails, tiller, are varnished and ready to install.
One side of the new table is completely varnished.

The new mainsail was delivered yesterday. :D

The big project this week was to replace the truck that died when we towed the boat home from Niagara Falls.
I'm hoping that this one will tow the boat easily. It's a 1998 3/4 ton 4x4 Chev Silverado Diesel. :D
Body is clean, but it needs some mechanical work. I'll be working on it this weekend, and hope to have it running by the middle of the week.

Yay... Another project.... :p
I don't know why I get myself into these things.:doh:
 
  • Like
Likes: ShotgunSlim
Sep 30, 2013
3,538
1988 Catalina 22 North Florida
Well "next weekend" is here again and the boat isn't ready.. again.
But I have made more progress.
The handrails, tiller, are varnished and ready to install.
One side of the new table is completely varnished.

The new mainsail was delivered yesterday. :D

The big project this week was to replace the truck that died when we towed the boat home from Niagara Falls.
I'm hoping that this one will tow the boat easily. It's a 1998 3/4 ton 4x4 Chev Silverado Diesel. :D
Body is clean, but it needs some mechanical work. I'll be working on it this weekend, and hope to have it running by the middle of the week.

Yay... Another project.... :p
I don't know why I get myself into these things.:doh:
Sorry to hear that, man. If it makes you feel better, my wife screwed up her ankle at the B.E.E.R cruise back in June, and we haven't sailed since. Then again, it's been so ungodly hot you can't walk barefoot on deck, and there have been massive thunderstorms EVERY DAY. Record rainfall, flooding, blah blah blah.

What main did you go with again? One of Judy's? I think you said, but I forget ... like so many other things.
 
Mar 20, 2015
3,094
C&C 30 Mk1 Winnipeg
Sorry to hear that, man. If it makes you feel better, my wife screwed up her ankle at the B.E.E.R cruise back in June, and we haven't sailed since. Then again, it's been so ungodly hot you can't walk barefoot on deck, and there have been massive thunderstorms EVERY DAY. Record rainfall, flooding, blah blah blah.

What main did you go with again? One of Judy's? I think you said, but I forget ... like so many other things.
Ouch !
Errr....was it a beer induced injury ? :D

Goofy weather in many places, to be sure.
In our area we are finally getting a traditional (for the prairie midwest) summer of heat (around 86) during the day, cooler at night, with scattered short term thunderstorms in the evening. We had similar weather when I was a kid, but it hasn't been like this in ages.
The bad thing about the local weather, if the boat was in the water, is that their has been little wind during most days, interspersed with way too much wind.


We ordered from Precision Sails.
The order process was good.
I filled out their measurement sheet and then spent a long time on the phone going over design choices like battens, amount of roach, better slides, etc.
They promised me approximately 5 weeks delivery from the date of order completion.
Ship date was expected to be July 31st, and it shipped July 28th.
I have yet to fully open it up. I may have time this Sunday to lay it out on the lawn.
Obviously I won't know the true results until we hoist it.
Sail isn't the exact stock size. It's custom, based on the measurements they requested.
There's always a chance for error, no matter how slight.
 
Dec 5, 2011
550
Catalina Catalina 22 13632 Phenix City
Well "next weekend" is here again and the boat isn't ready.. again.
But I have made more progress.
The handrails, tiller, are varnished and ready to install.
One side of the new table is completely varnished.

The new mainsail was delivered yesterday. :D

The big project this week was to replace the truck that died when we towed the boat home from Niagara Falls.
I'm hoping that this one will tow the boat easily. It's a 1998 3/4 ton 4x4 Chev Silverado Diesel. :D
Body is clean, but it needs some mechanical work. I'll be working on it this weekend, and hope to have it running by the middle of the week.

Yay... Another project.... :p
I don't know why I get myself into these things.:doh:
Keep up the good work on your boat and her new accomplice. I can sympathize with you and Gene on the weather here in Al. as it's been the same 95+ degrees every day with random violent thunderstorms. What's worse is that it's at least 10degrees warmer than that on the operating floor at work, it's no wonder I lose weight every summer. I'm still shopping around for another tow vehicle myself and in the mean time, working on the never ending project list for the real boat and then an hour or two here and there on the scale model of her I started.
 
Mar 20, 2015
3,094
C&C 30 Mk1 Winnipeg
Keep up the good work on your boat and her new accomplice. I can sympathize with you and Gene on the weather here in Al. as it's been the same 95+ degrees every day with random violent thunderstorms. What's worse is that it's at least 10degrees warmer than that on the operating floor at work, it's no wonder I lose weight every summer. I'm still shopping around for another tow vehicle myself and in the mean time, working on the never ending project list for the real boat and then an hour or two here and there on the scale model of her I started.
Losing weight is good. :) Crazy weather not so much.

I think Luke made a comment, about how stalling during a project is frustrating. I fully agree.
As long as I keep making progress I'm good.
What's frustrating right now is that I have multiple projects on the go.
All of them have been on the back burner since we brought the boat home.

A) Frame off restoration of wife's truck. :p
B) Sailboat Refit
C) vintage motorcycle rebuild
D) pickup repair and cleanup (future tow vehicle)

I'm continually counting the days until the water gets hard, with a bit of concern.
If I can get A B and D done by then, I'll be a very happy man.
 

jmczzz

.
Mar 31, 2013
515
O'Day 26 CB New Orleans
One piece of advice I got about retirement was stay active. My solution, get a sailboat.
I sail mine several days each week. That way the things I work on pop up automatically, usually when I'm out on the water. I don't schedule them they schedule me.
James
 
Mar 20, 2015
3,094
C&C 30 Mk1 Winnipeg
James, oh so true... oh so true.
I think the rule should be... get any type of vehicle at all, to stay active. LOL

I spent all my spare time, the last 2 weeks, installing a diesel injection pump, 2 ball joints, wheel bearing, pads, shoes, rotors, drums, brake hose, tires, and rear shocks on the "new" tow vehicle. Not to mention a full fluid refresh, and cleaning all the corn husks and what I suspect was mostly manure from every nook and cranny on the bottom of the truck.
I still need to weld/patch the bottom of the box where the gooseneck hitch was mounted and check the existing trailer wiring..

Actually doing some work on the boat today.
Last coat of varnish is on the new table, going to install a volt/amp meter in the panel, and starting on brackets for the computer keyboard drawer that I'm re-purposing as a chart drawer for the bottom of the table.

Shooting for next weekend as first splash day.... Fingers crossed.
I'll get to see what the new mainsail looks like too :)

Cheers,
Roy

P.S. how's your prep timeline going for the trip ?
 

jmczzz

.
Mar 31, 2013
515
O'Day 26 CB New Orleans
I've run into a couple of snags, rudder lock bolt stripped out and i lost half of the lock disk and the handle while in a pretty good blow on my last 5 day shake down and the sea cock on the drains. I can't get the thing to shut off. It seems like a small issue but it is the type thing that gives me nightmares. I also discovered a spot on the starboard cabin top that sags when I step my 200lbs up there so i think i better do some explore holes to see whats up. At worst I may have to spend some time with a recore up there. I also don't like the looks of the bow anchor bit. It is not exactly in line and led me to investigate further. It appears the bow stem may have been puledl up at some past time. I have added a steel strap to stem hold down bolts to the bow eye bolt. But I may have to do some further rework of the rather sloppy repair up there.
All in all it I am pleased with the good old boat, but I may have to set back depart date to summer 2016. That is my limit I'll have to shove off then come hell or hurricain. I bought a 110 jib. The boat didn't have one just 135 - 150 genny. So Now I have a new storm jib and 110, a servicable genny and a main that is fair and a back up main that might do in a pinch or at lest it could be used for my burial at sea. lol
I did get a good deal on a like new walker bay 8' dingy I've rowed it lots and towed it some but I have not tried to put it on deck. It might be a tight fit. It is 71lbs so I can handle it on a good day.
regards, James