Hello all, I wanted to share a write up about my trailer build that I completed back in October. EDIT: I should probably mention that this is my first full length write up so if it is hard to follow or otherwise lengthy.....please just stay with it through to the end and give me feedback! I gathered a lot of inputs/advice/measurements from this forum, the "o'day sailboat owners" and the "o'day 25/26 sailboat owners" groups on Facebook. I said I would do a write up and cost break down when I started this build once it was completed so here it is!
To start with, I acquired the trailer from the FB marketplace for $400 and this was the condition when I bought it.
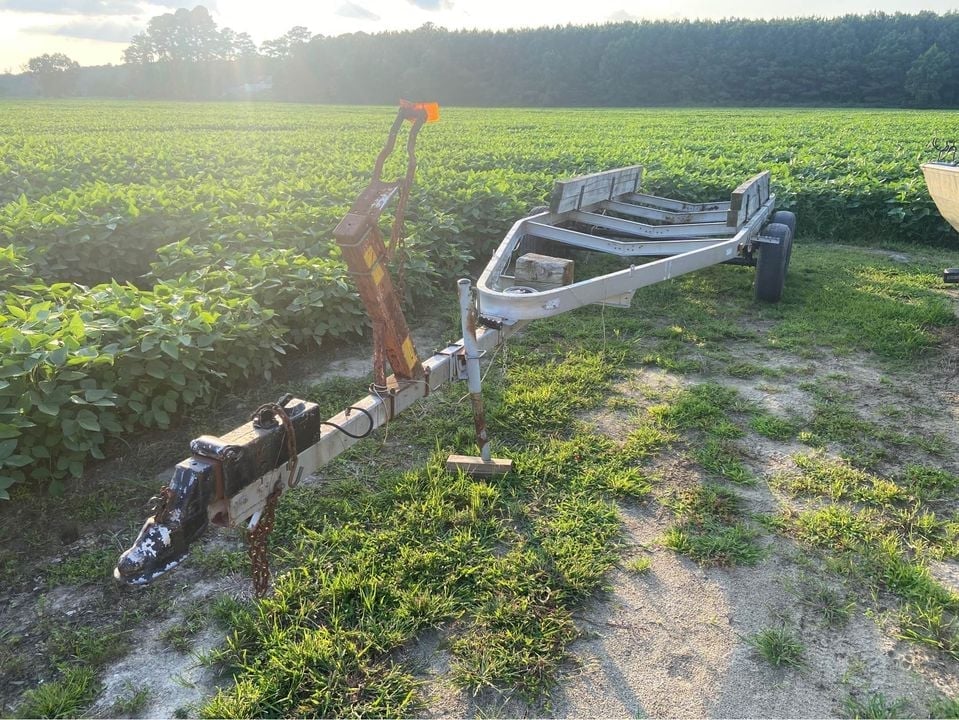
Needless to say she was rough around the edges and needed some love but I was more than willing to spend $400 for a 27 foot old iron tilt trailer with twin 5200lb dexter axles that was still very solid.
PLANNING THE BUILD
First thing I knew I had to do was clean the thing up so I got out the grinder and went to work on all the rust. Once that was done I put a coat of blue paint on it thinking I was going to want a blue trailer for a sailboat (it made sense....but it was not the right blue in my opinion...I scrapped that later on, but hey....the rust was gone so thats cool).

I also laid out some basic plans on what I wanted to do with it and what I knew it needed. The picture speaks for itself on what my basic plans were but underneath that I also had to rebuild the trailers essentials first. The wheels had a lot of play from bad bearings, all 4 tires were shot and the tongue jack was broken. For the tires I already had 2 in my shed from a very recent tire/wheel swap on our small travel trailer that were E rated so I just bought 2 more E rated tires to match.
New wheel bearings: $69.99 Amazon Amazon.com
New tongue jack: $36.11 Amazon Amazon.com
2 "E" rated trailer tires from Discount Tire Direct: Originally $211 ($81/each tire + $6 disposal fee for the old tires + $1 environmental fee + $42 install and lifetime spin/balance warranty) but with my veteran discount it came out to be $198.71 after all was said and done.
The trailer also needed a new light kit: $56.94 (NOTE! I would buy a better light kit than this if you plan to dunk the trailer or launch from it....in my case I am using a travel lift to launch/haul out....I personally would not trust these lights to be any sort of reliable once submerged) Amazon Amazon.com
NEW TRAILER TOTAL: $761.75
Now that I knew I had a safe and capable trailer, I started building it for the boat. I went round and round about how to build the side supports. I knew the keel was going to be 2x10x12 or 2x12x12 so that was easy. Ultimately for the side supports I decided that since I really only had 1 shot at this and reserving the crane for hours on end was not a cost effective option that I would just build it to be fully adjustable. I settled on the following parts from trailerpartsdepot.com (NOTE "P/N" designates the part number as found on trailerpartsdepot.com):
24" Bunk bolster brackets (8 of these) $231 P/N 1029.016
Bunk Bracket Swivel (8 of these) $39.12 P/N 1017.006
3" Channel Posi Lock (8 of these) $50.46 P/N 1622.026
1/2"x3-1/16"x4-1/4" Zinc U-Bolts (8 of these) $22.68 P/N 1527
All additional hardware came from the Lowes hardware aisle consisting of Brackets (for the keel boards)/Nuts/Lag Bolts/Washers and Lock washers. The cost here will vary depending on how many washers and what not that you want but basically I bought:
4 washers per U-Bolt (each side of the posi lock)
2 lock nuts per U-Bolt
2 lock washers per U-Bolt
1 grade 8 bolt per swivel bracket
2 washers per swivel bracket
2 lock nuts per swivel bracket
I forgot to keep my Lowes receipt for this but it was around $90 so for ease of numbers I will round up to $100
I also bought grey spray paint for the trailer to match my truck because.....the blue was just horrible. (give or take 8 cans of rustoleum @ $4.99 per can)
Keel Brackets I bought were 4 of the basic 2x2x10 90 degree angle brackets at Lowes https://www.lowes.com/pd/Simpson-St...ZMAX-174-Galvanized-Medium-L-Angle/1002624382 which were $6.10 per when I purchased them.
Total spent on the trailer including original purchase price: $926.07 (not including the 2 2x10x12 keel supports or the 2 2x6x12 side supports because lumber prices were stupid high in October and I have no idea what I paid for them....probably a few fingers and a family jewel....I forgot to keep that receipt)
I then took my earlier idea I put together and made it more feasible/adjustable with the new hardware. My biggest challenge was making the trailer adjustable enough so that it took one lift from the crane to get it done and not a lift, adjust, lift, adjust, lift adjust type of situation (that gets expensive). So.....lets get to the build finally.
At this point I had eliminated the rust, new tires, new wheel bearings, painted it grey and installed the new lights. I loosely set the new keel boards down (2x10x12s) and began to line them up on the center of the trailer cross members.
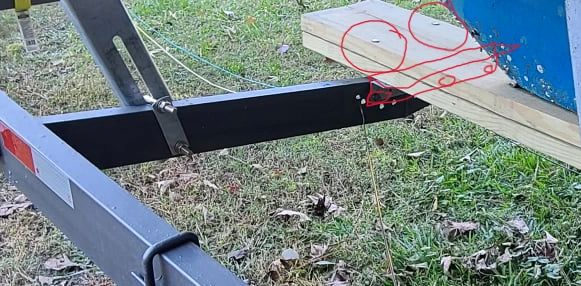
The keel boards were centered/leveled and I used the 90 degree angle brackets to attach them to each crossmember using 2 grade 8 3/4" bolts/washers/lock washers/lock nuts. I just drilled through the crossmembers and bolted on the brackets then bolted down the lower keel board (using a wood drill bit I sunk the heads of the bolts on the lower keel board so that they would allow the upper keel board to sit flush with the lower board). Once the bolts securing the lower keel board to the frame were in I secured the upper keel board to the lower keel board using lag bolts. Much the same as I sunk the lower keel board bolts, I pre drilled and sunk the upper keel board bolts so that when it was secured to the lower keel board the bolts were flush. I figured this would help prevent keel scratches in the future should I ever decide to float it on/off or if the crane made a height mistake when loading/unloading. I ended up securing the top keel board to the bottom keel board using 8 lag bolts spaced evenly with pairs side by side front to back (see below photo and my apologies that my windows paint skills are pretty bad!...I forgot to take enough detailed photos during the build itself since I was in a time crunch). The trailer had several holes already drilled in the crossmembers....I was not just guessing and drilling holes!
Once the keel boards were set it was all about the side supports and ensuring they had a balance between adjustability and strength. Long story short, I ended up drilling holes in the trailer crossmembers so that the lower portion of the u-bolt was fixed in place while the upper portion of the u-bolt had about 1/2" distance between it and the top of the crossmember when sitting straight up vertical in relation to the crossmember. This allowed for enough left/right rotation on the bolster bracket to give me angle adjustments between 47" to 56" (total separation width wise side to side) for the side bunk supports while ensuring I had strength by keeping the lower u-bolt stud snug.
I took some final measurements and realized I did not account for the forward and aft rise that the side supports would need to account for the shape of the boat. I ended up ordering some new adjustable/taller swivel brackets off Amazon to account for this and give me more adjusting options of lift day. Amazon.com
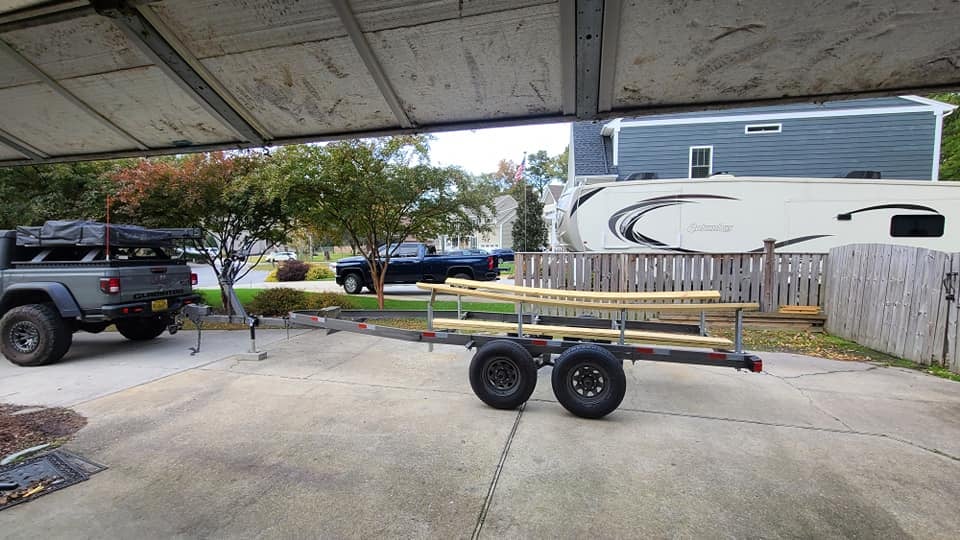
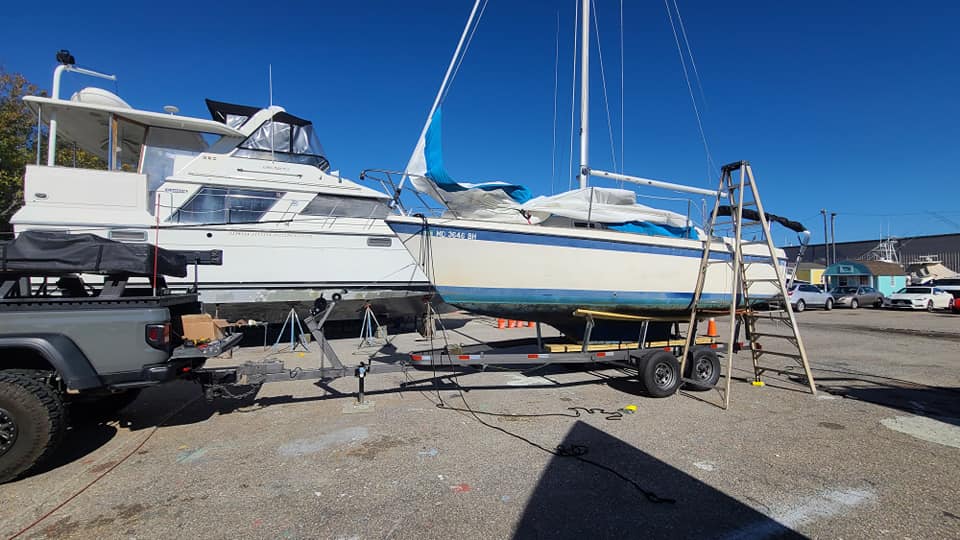
This was my final picture prior to the boat being put on. Note how the bow and stern most bolster brackets are higher than the 2 middle bolsters....that is important to keep in mind if you are building a trailer from scratch for a sailboat. The curves are not exactly weight bearing given that 90% of the weight will be resting on the keel support beams but it is still important to ensure your bow and stern bolsters are curved upwards to help cradle the boat and prevent any movement while trailering. Now obviously this does not apply to roller bunk trailers.....you roller trailer guys are crazy anyways")
 .
.
I should also mention that the curve shape is not intentional. I just used a floor jack and jacked up the fore/aft trailer bolsters to give it that shape. My thought was get the wood shaped ahead of time prior to the boat being sit down on it. I also added some reflective tape on the sides of the trailer for safety sake....probably unnecessary but I do not trust Virginia drivers so everything helps to ensure they can see stuff at night!
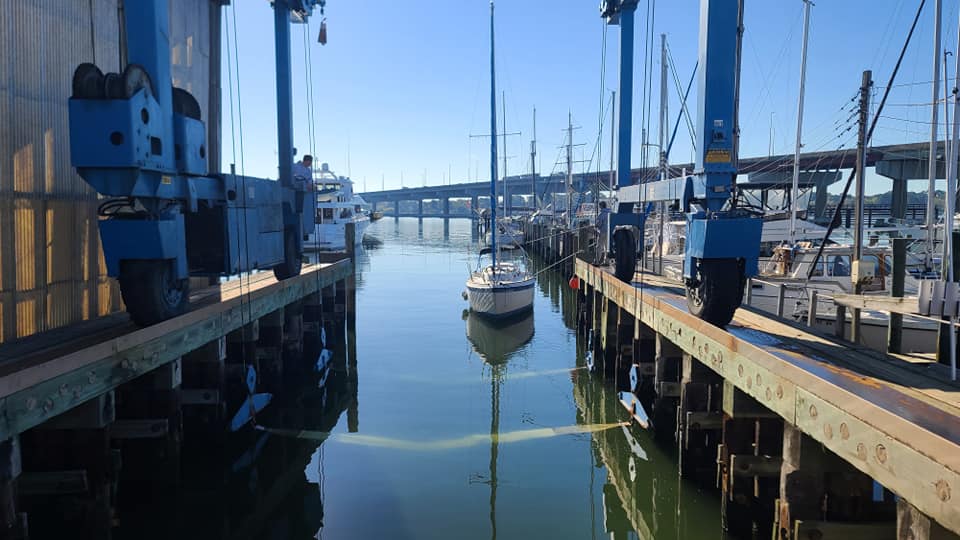
So now that the trailer was as ready as I could make it for the boat to be plucked out of the water....lets get to the fun stuff. I had give or take a 2.5 hour sail to get from my dock to the yard where I was being pulled (Newport News, VA to South Norfolk, VA). I left after work on a Tuesday around 3pm and about 5 miles from the yard I ran out of wind....then about 1/2 mile from the yard I ran out of gas....bad planning lol. Luckily since my forward sail was on a roller furling I had left it attached (main sail I had already taken down). What little wind and current I had was in my favor so I very luckily managed to sail her in on the forward sail alone at a blistering fraction of a knot. The next morning I returned to the yard to get her picked.
This is my first sailboat so this entire process was pretty amazing to me. Not the trailer building part because working with wood and metal is easy; just watching the boat get lifted was pretty awesome to see. Seeing the underside of my boat for the first time (and the boats first time out of the water in a while from what I was told by the previous owner) was fantastic. You can see in the photo below that my swing keel was hanging down regardless of how tight the rope in the cockpit was pulled. Salt water growth was preventing it from seating flush so I had the travel lift hold her while I cleared the growth/barnacles and it seated flush.....on with the story.
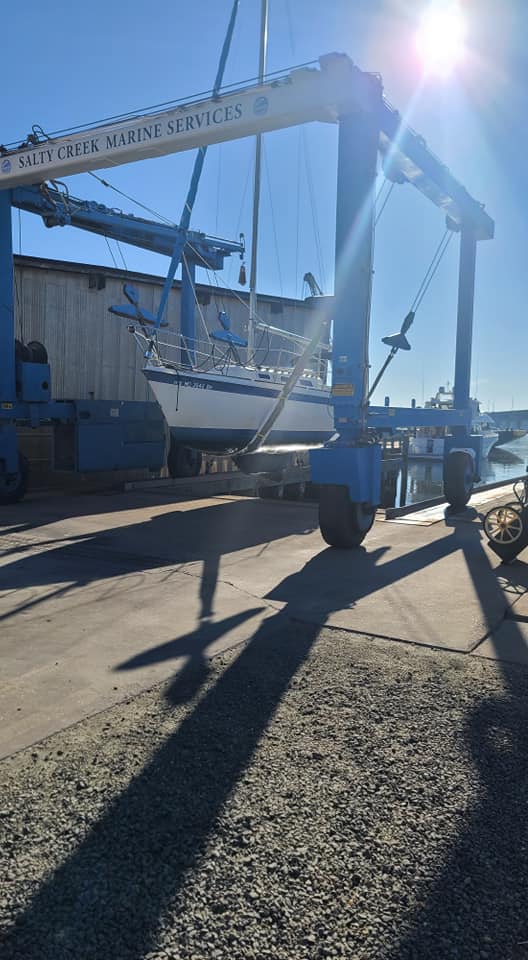
Time was tight once the boat was on the lift so I had to work fast. That said I do not have photos of the process of setting the new trailer to the boat but I will do my best to explain what I did in detail. (By the way the lift cost was $190 for a single short haul and an additional $75 per adjustment after the initial placement on the trailer if necessary...so we are up to a total of $1116.07 so far without travel lift adjustments). Here is the process:
I had a tongue weight hitch on my truck so I could monitor the tongue weight being placed on my truck. I told the travel lift fella ahead of time about it and to watch my hand signals. We ended up settling the boat with 550-600lbs of tongue weight on my truck (it is hard to tell with the hitch scale that is built in my hitch but I knew I wanted it somewhere between 500-600 since O'day says that a 78 O'25 has 4500~ish worth of dry weight). Once the boat was sat down and the estimated 550 magic tongue weight number was hit the travel lift just held the weight of the boat and I pulled out my floor jack from the bed of the truck. I jacked up each individual bunk bolster from the ground. My method here was lightly jack each bolster up until the 2x6 barely touched the hull, then give it another 1/2 pump (basically just enough to visually see the boat move up ever so slightly but not enough to be any minor load bearing weight). My thought process here was attempting to keep 90% weight on the keel boards and only 10% or less going to the side supports. I repeated this process another 7 times for each bolster bracket and tightened all the side support bolster brackets and side support bolts down once I was satisfied. The travel lift time was maybe 30 minutes and he was able to pull the lift out from under the boat safely. I then pulled the boat forward on the trailer under its own weight (dont get me wrong I was nervous but I had faith in my build!) and the mast stepping process was started!
I wont go into mast stepping procedures here because that is a whole other topic....but I will say this. If you have the ability to put a winch on your truck....do it. I discovered that using a winch on the truck in tandem with the forward halyard makes for quite possibly the easiest way to lower a mast by yourself without having to do any heavy lifting. NOTE!!! ensure you have some method to prevent the mast from moving side to side if using the winch lowering method. Once the mast gets to about the 30 degrees lowered mark....it will want to move side to side. So either have a wireless winch remote and climb up on the boat and manually direct it as it comes down the final bit or build a wooden mast support to catch it around that 30 degree lowered mark before it can move side to side. The winch basically can take the weight of the forestay/roller furling and allow you to safely detach the forestay/furling without any mast movement then begin to lower towards aft safely with mechanical assist....just keep in mind if you have a 25 or similar that the boom vang might contact the cabin hatch....this WILL happen on a 25 when lowering the mast to the aft of the boat so ensure your mast support or brute strength will hold the mast once it reaches that almost horizontal position while lowering. (truck winch with the tandem forward halyard photo below. I have a synthetic winch line with tree protector laying against the hood to prevent winch line scratches on the hood/grill)
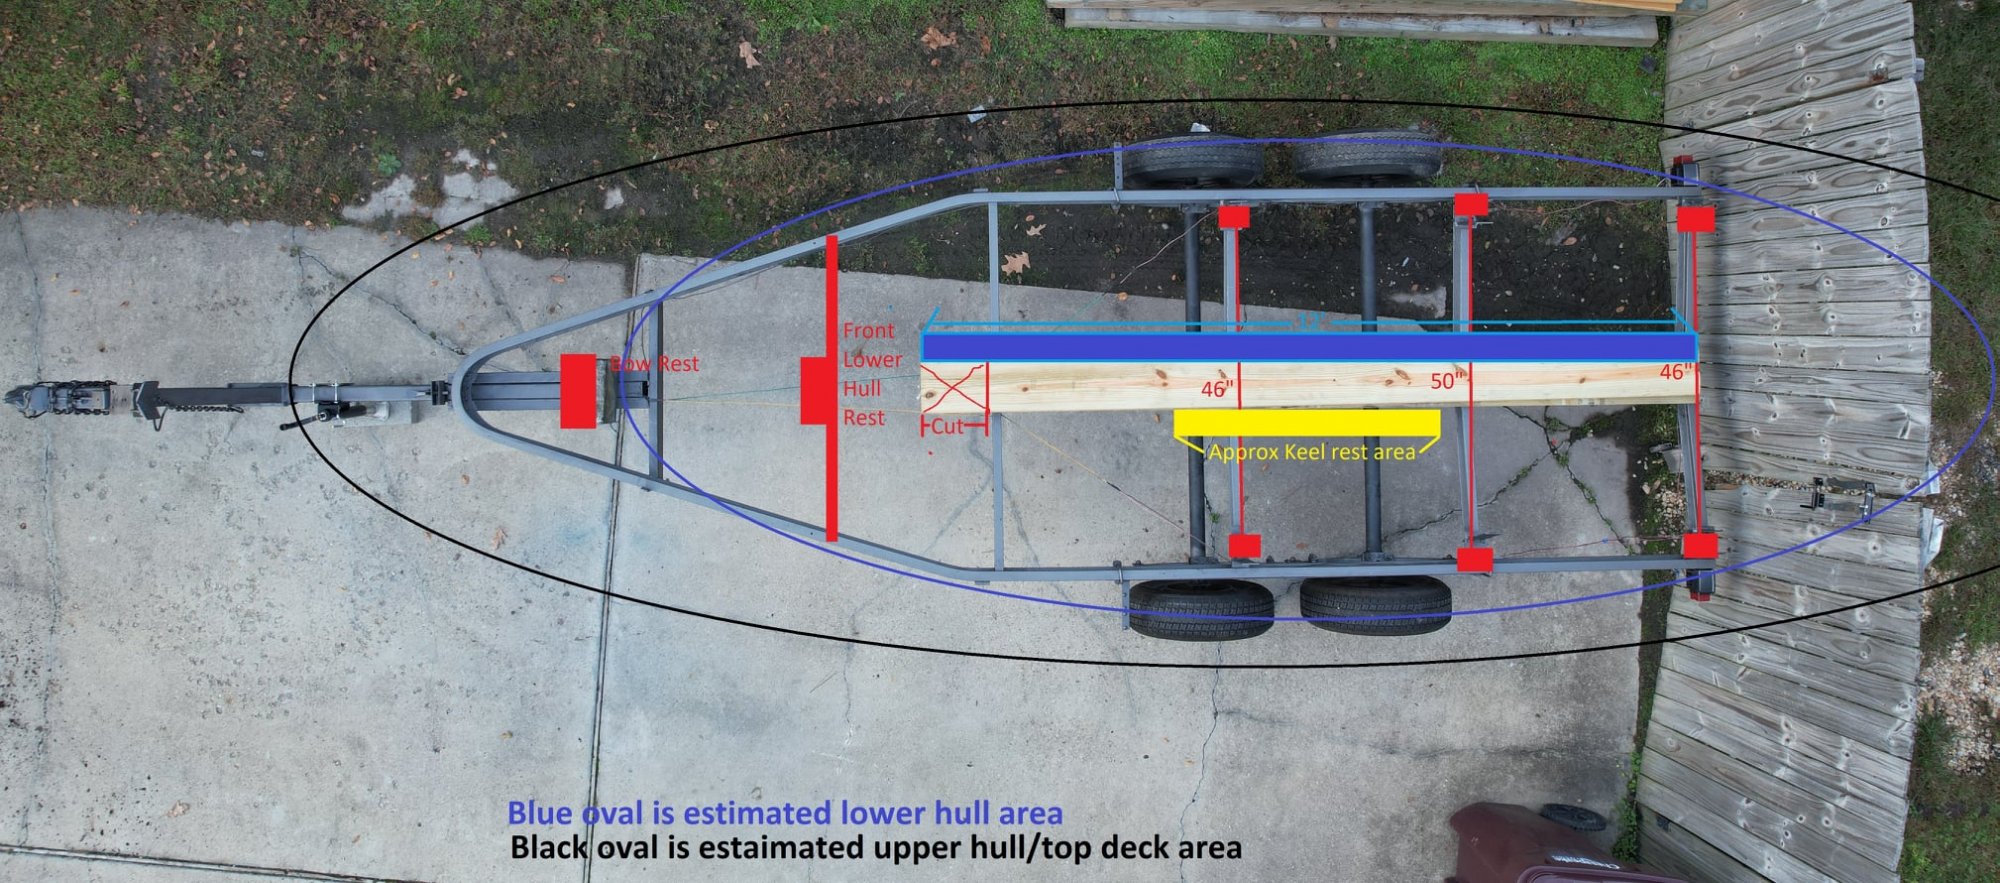
So at this point I covered mostly everything I think....from build to story. Now it is time to cover the important details of measurements. I will let the marked photos speak for themselves. I hope this helps other folks in a similar situation. DIY is the way! Happy sailing to everyone and thank you to everyone here on the forum, and the 2 Facebook groups I mentioned in the beginning for all of your assistance in my many questions prior to beginning this build!
ANOTHER EDIT: I forgot to mention I did have to buy a new winch for the trailer and I also had to reposition the bow support. I simply moved it back on the trailer (towards the bow) and drilled new holes to mount it AFTER the boat was on the trailer. I am in the process of building a keel guide so that the bow stops at the same point every time. Idea here is to keep the tongue weight the same for future crane on (or maybe a sail on at some point).
Trailer winch was $60 even (https://www.amazon.com/gp/product/B08LCJ3HVG/ref=ppx_yo_dt_b_search_asin_title?ie=UTF8&psc=1)
TRAILER TOTAL NOW: $1176.07
This total is before any keel guides are built. This does not include cost of the lumber used (forgot to keep that receipt). This also does not include the brake system that I still have to rebuild. I imagine once its all said and done I will likely have around $1700-$1900 total in the trailer because an entire new brake kit for twin axles can be pricey.
Here are all the measurements (EDIT: the forum only allows 10 images so I will post all measurements as the first comment on this post.
To start with, I acquired the trailer from the FB marketplace for $400 and this was the condition when I bought it.
Needless to say she was rough around the edges and needed some love but I was more than willing to spend $400 for a 27 foot old iron tilt trailer with twin 5200lb dexter axles that was still very solid.
PLANNING THE BUILD
First thing I knew I had to do was clean the thing up so I got out the grinder and went to work on all the rust. Once that was done I put a coat of blue paint on it thinking I was going to want a blue trailer for a sailboat (it made sense....but it was not the right blue in my opinion...I scrapped that later on, but hey....the rust was gone so thats cool).
I also laid out some basic plans on what I wanted to do with it and what I knew it needed. The picture speaks for itself on what my basic plans were but underneath that I also had to rebuild the trailers essentials first. The wheels had a lot of play from bad bearings, all 4 tires were shot and the tongue jack was broken. For the tires I already had 2 in my shed from a very recent tire/wheel swap on our small travel trailer that were E rated so I just bought 2 more E rated tires to match.
New wheel bearings: $69.99 Amazon Amazon.com
New tongue jack: $36.11 Amazon Amazon.com
2 "E" rated trailer tires from Discount Tire Direct: Originally $211 ($81/each tire + $6 disposal fee for the old tires + $1 environmental fee + $42 install and lifetime spin/balance warranty) but with my veteran discount it came out to be $198.71 after all was said and done.
The trailer also needed a new light kit: $56.94 (NOTE! I would buy a better light kit than this if you plan to dunk the trailer or launch from it....in my case I am using a travel lift to launch/haul out....I personally would not trust these lights to be any sort of reliable once submerged) Amazon Amazon.com
NEW TRAILER TOTAL: $761.75
Now that I knew I had a safe and capable trailer, I started building it for the boat. I went round and round about how to build the side supports. I knew the keel was going to be 2x10x12 or 2x12x12 so that was easy. Ultimately for the side supports I decided that since I really only had 1 shot at this and reserving the crane for hours on end was not a cost effective option that I would just build it to be fully adjustable. I settled on the following parts from trailerpartsdepot.com (NOTE "P/N" designates the part number as found on trailerpartsdepot.com):
24" Bunk bolster brackets (8 of these) $231 P/N 1029.016
Bunk Bracket Swivel (8 of these) $39.12 P/N 1017.006
3" Channel Posi Lock (8 of these) $50.46 P/N 1622.026
1/2"x3-1/16"x4-1/4" Zinc U-Bolts (8 of these) $22.68 P/N 1527
All additional hardware came from the Lowes hardware aisle consisting of Brackets (for the keel boards)/Nuts/Lag Bolts/Washers and Lock washers. The cost here will vary depending on how many washers and what not that you want but basically I bought:
4 washers per U-Bolt (each side of the posi lock)
2 lock nuts per U-Bolt
2 lock washers per U-Bolt
1 grade 8 bolt per swivel bracket
2 washers per swivel bracket
2 lock nuts per swivel bracket
I forgot to keep my Lowes receipt for this but it was around $90 so for ease of numbers I will round up to $100
I also bought grey spray paint for the trailer to match my truck because.....the blue was just horrible. (give or take 8 cans of rustoleum @ $4.99 per can)
Keel Brackets I bought were 4 of the basic 2x2x10 90 degree angle brackets at Lowes https://www.lowes.com/pd/Simpson-St...ZMAX-174-Galvanized-Medium-L-Angle/1002624382 which were $6.10 per when I purchased them.
Total spent on the trailer including original purchase price: $926.07 (not including the 2 2x10x12 keel supports or the 2 2x6x12 side supports because lumber prices were stupid high in October and I have no idea what I paid for them....probably a few fingers and a family jewel....I forgot to keep that receipt)
I then took my earlier idea I put together and made it more feasible/adjustable with the new hardware. My biggest challenge was making the trailer adjustable enough so that it took one lift from the crane to get it done and not a lift, adjust, lift, adjust, lift adjust type of situation (that gets expensive). So.....lets get to the build finally.
At this point I had eliminated the rust, new tires, new wheel bearings, painted it grey and installed the new lights. I loosely set the new keel boards down (2x10x12s) and began to line them up on the center of the trailer cross members.
The keel boards were centered/leveled and I used the 90 degree angle brackets to attach them to each crossmember using 2 grade 8 3/4" bolts/washers/lock washers/lock nuts. I just drilled through the crossmembers and bolted on the brackets then bolted down the lower keel board (using a wood drill bit I sunk the heads of the bolts on the lower keel board so that they would allow the upper keel board to sit flush with the lower board). Once the bolts securing the lower keel board to the frame were in I secured the upper keel board to the lower keel board using lag bolts. Much the same as I sunk the lower keel board bolts, I pre drilled and sunk the upper keel board bolts so that when it was secured to the lower keel board the bolts were flush. I figured this would help prevent keel scratches in the future should I ever decide to float it on/off or if the crane made a height mistake when loading/unloading. I ended up securing the top keel board to the bottom keel board using 8 lag bolts spaced evenly with pairs side by side front to back (see below photo and my apologies that my windows paint skills are pretty bad!...I forgot to take enough detailed photos during the build itself since I was in a time crunch). The trailer had several holes already drilled in the crossmembers....I was not just guessing and drilling holes!
Once the keel boards were set it was all about the side supports and ensuring they had a balance between adjustability and strength. Long story short, I ended up drilling holes in the trailer crossmembers so that the lower portion of the u-bolt was fixed in place while the upper portion of the u-bolt had about 1/2" distance between it and the top of the crossmember when sitting straight up vertical in relation to the crossmember. This allowed for enough left/right rotation on the bolster bracket to give me angle adjustments between 47" to 56" (total separation width wise side to side) for the side bunk supports while ensuring I had strength by keeping the lower u-bolt stud snug.
I took some final measurements and realized I did not account for the forward and aft rise that the side supports would need to account for the shape of the boat. I ended up ordering some new adjustable/taller swivel brackets off Amazon to account for this and give me more adjusting options of lift day. Amazon.com
This was my final picture prior to the boat being put on. Note how the bow and stern most bolster brackets are higher than the 2 middle bolsters....that is important to keep in mind if you are building a trailer from scratch for a sailboat. The curves are not exactly weight bearing given that 90% of the weight will be resting on the keel support beams but it is still important to ensure your bow and stern bolsters are curved upwards to help cradle the boat and prevent any movement while trailering. Now obviously this does not apply to roller bunk trailers.....you roller trailer guys are crazy anyways
.I should also mention that the curve shape is not intentional. I just used a floor jack and jacked up the fore/aft trailer bolsters to give it that shape. My thought was get the wood shaped ahead of time prior to the boat being sit down on it. I also added some reflective tape on the sides of the trailer for safety sake....probably unnecessary but I do not trust Virginia drivers so everything helps to ensure they can see stuff at night!
So now that the trailer was as ready as I could make it for the boat to be plucked out of the water....lets get to the fun stuff. I had give or take a 2.5 hour sail to get from my dock to the yard where I was being pulled (Newport News, VA to South Norfolk, VA). I left after work on a Tuesday around 3pm and about 5 miles from the yard I ran out of wind....then about 1/2 mile from the yard I ran out of gas....bad planning lol. Luckily since my forward sail was on a roller furling I had left it attached (main sail I had already taken down). What little wind and current I had was in my favor so I very luckily managed to sail her in on the forward sail alone at a blistering fraction of a knot. The next morning I returned to the yard to get her picked.
This is my first sailboat so this entire process was pretty amazing to me. Not the trailer building part because working with wood and metal is easy; just watching the boat get lifted was pretty awesome to see. Seeing the underside of my boat for the first time (and the boats first time out of the water in a while from what I was told by the previous owner) was fantastic. You can see in the photo below that my swing keel was hanging down regardless of how tight the rope in the cockpit was pulled. Salt water growth was preventing it from seating flush so I had the travel lift hold her while I cleared the growth/barnacles and it seated flush.....on with the story.
Time was tight once the boat was on the lift so I had to work fast. That said I do not have photos of the process of setting the new trailer to the boat but I will do my best to explain what I did in detail. (By the way the lift cost was $190 for a single short haul and an additional $75 per adjustment after the initial placement on the trailer if necessary...so we are up to a total of $1116.07 so far without travel lift adjustments). Here is the process:
I had a tongue weight hitch on my truck so I could monitor the tongue weight being placed on my truck. I told the travel lift fella ahead of time about it and to watch my hand signals. We ended up settling the boat with 550-600lbs of tongue weight on my truck (it is hard to tell with the hitch scale that is built in my hitch but I knew I wanted it somewhere between 500-600 since O'day says that a 78 O'25 has 4500~ish worth of dry weight). Once the boat was sat down and the estimated 550 magic tongue weight number was hit the travel lift just held the weight of the boat and I pulled out my floor jack from the bed of the truck. I jacked up each individual bunk bolster from the ground. My method here was lightly jack each bolster up until the 2x6 barely touched the hull, then give it another 1/2 pump (basically just enough to visually see the boat move up ever so slightly but not enough to be any minor load bearing weight). My thought process here was attempting to keep 90% weight on the keel boards and only 10% or less going to the side supports. I repeated this process another 7 times for each bolster bracket and tightened all the side support bolster brackets and side support bolts down once I was satisfied. The travel lift time was maybe 30 minutes and he was able to pull the lift out from under the boat safely. I then pulled the boat forward on the trailer under its own weight (dont get me wrong I was nervous but I had faith in my build!) and the mast stepping process was started!
I wont go into mast stepping procedures here because that is a whole other topic....but I will say this. If you have the ability to put a winch on your truck....do it. I discovered that using a winch on the truck in tandem with the forward halyard makes for quite possibly the easiest way to lower a mast by yourself without having to do any heavy lifting. NOTE!!! ensure you have some method to prevent the mast from moving side to side if using the winch lowering method. Once the mast gets to about the 30 degrees lowered mark....it will want to move side to side. So either have a wireless winch remote and climb up on the boat and manually direct it as it comes down the final bit or build a wooden mast support to catch it around that 30 degree lowered mark before it can move side to side. The winch basically can take the weight of the forestay/roller furling and allow you to safely detach the forestay/furling without any mast movement then begin to lower towards aft safely with mechanical assist....just keep in mind if you have a 25 or similar that the boom vang might contact the cabin hatch....this WILL happen on a 25 when lowering the mast to the aft of the boat so ensure your mast support or brute strength will hold the mast once it reaches that almost horizontal position while lowering. (truck winch with the tandem forward halyard photo below. I have a synthetic winch line with tree protector laying against the hood to prevent winch line scratches on the hood/grill)
So at this point I covered mostly everything I think....from build to story. Now it is time to cover the important details of measurements. I will let the marked photos speak for themselves. I hope this helps other folks in a similar situation. DIY is the way! Happy sailing to everyone and thank you to everyone here on the forum, and the 2 Facebook groups I mentioned in the beginning for all of your assistance in my many questions prior to beginning this build!
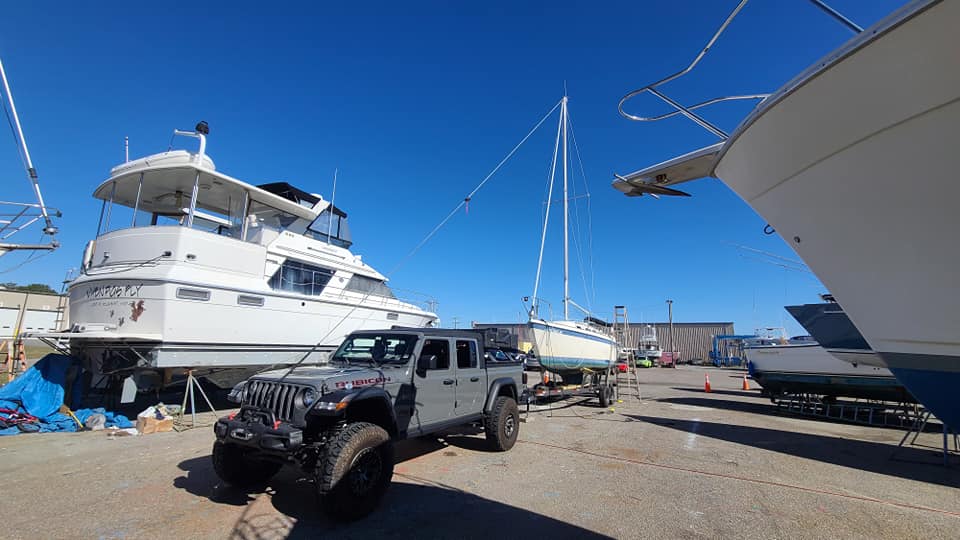
ANOTHER EDIT: I forgot to mention I did have to buy a new winch for the trailer and I also had to reposition the bow support. I simply moved it back on the trailer (towards the bow) and drilled new holes to mount it AFTER the boat was on the trailer. I am in the process of building a keel guide so that the bow stops at the same point every time. Idea here is to keep the tongue weight the same for future crane on (or maybe a sail on at some point).
Trailer winch was $60 even (https://www.amazon.com/gp/product/B08LCJ3HVG/ref=ppx_yo_dt_b_search_asin_title?ie=UTF8&psc=1)
TRAILER TOTAL NOW: $1176.07
This total is before any keel guides are built. This does not include cost of the lumber used (forgot to keep that receipt). This also does not include the brake system that I still have to rebuild. I imagine once its all said and done I will likely have around $1700-$1900 total in the trailer because an entire new brake kit for twin axles can be pricey.
Here are all the measurements (EDIT: the forum only allows 10 images so I will post all measurements as the first comment on this post.
Attachments
-
 585.3 KB Views: 559
Last edited:
