Anchor locker

Oct 28, 2013
678
Hunter 20 Lake Monroe
Every since we bought our boat I have wished it had bow storage for the anchor and rode. I think the worst part of sailing for me is dragging the anchor, chain, and rode forward and back each time we go to drop the hook. Between narrow sidekicks, the shrouds, and the waves, it is always a accident waiting to happen.
Well I had finally had enough and over the winter started planning on how to get a anchor locker. I had bought three large Old Town hatches from topkayaker.com that I installed in three of our kayaks and thought it was about the right size. After a trail run to see if our anchor would fit, which it did with no problem, I went to order another one. Just my luck, discontinued. After searching for something similar I finally gave up and just stole the hatch out of the spare kayak we keep for guest. I will worry about finding a replacement for it later.
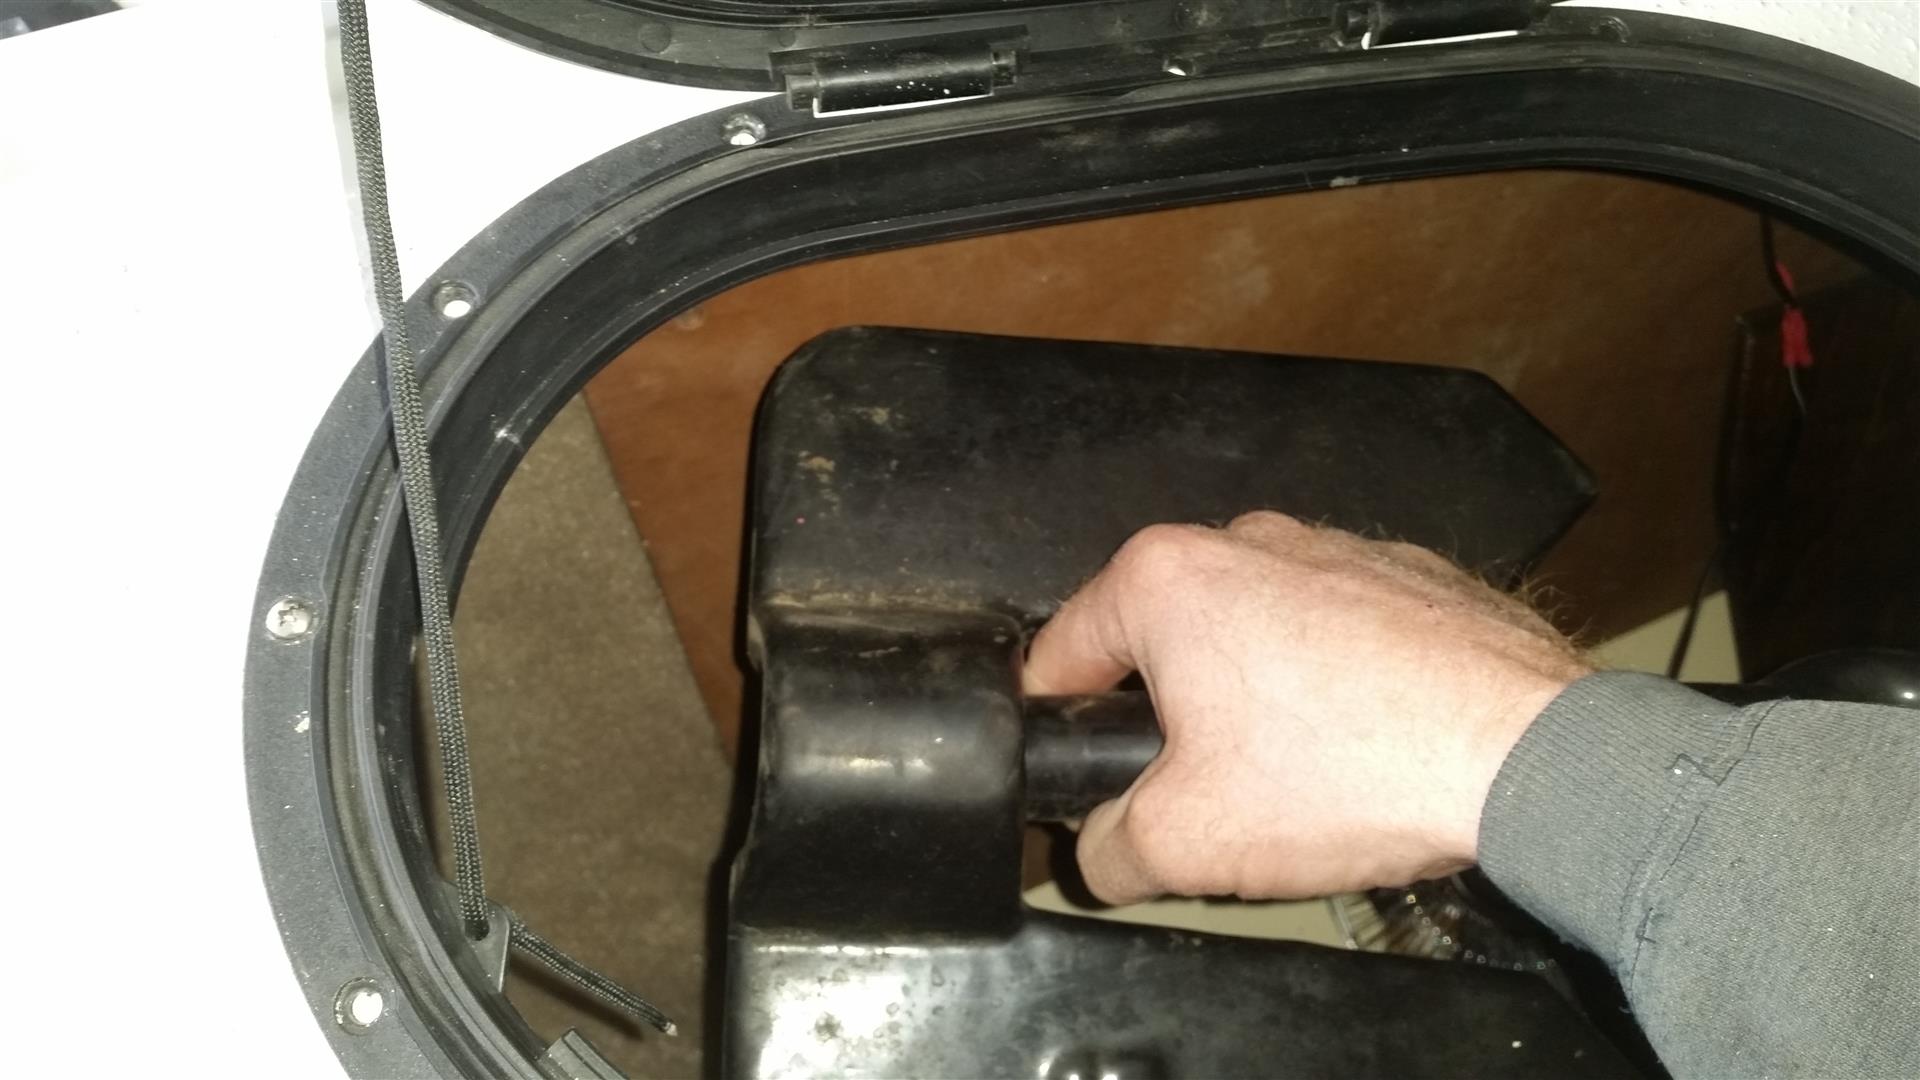
Yesterday I started cutting and making templates. Here is the hatch in the hole


Anchor locker.jpg

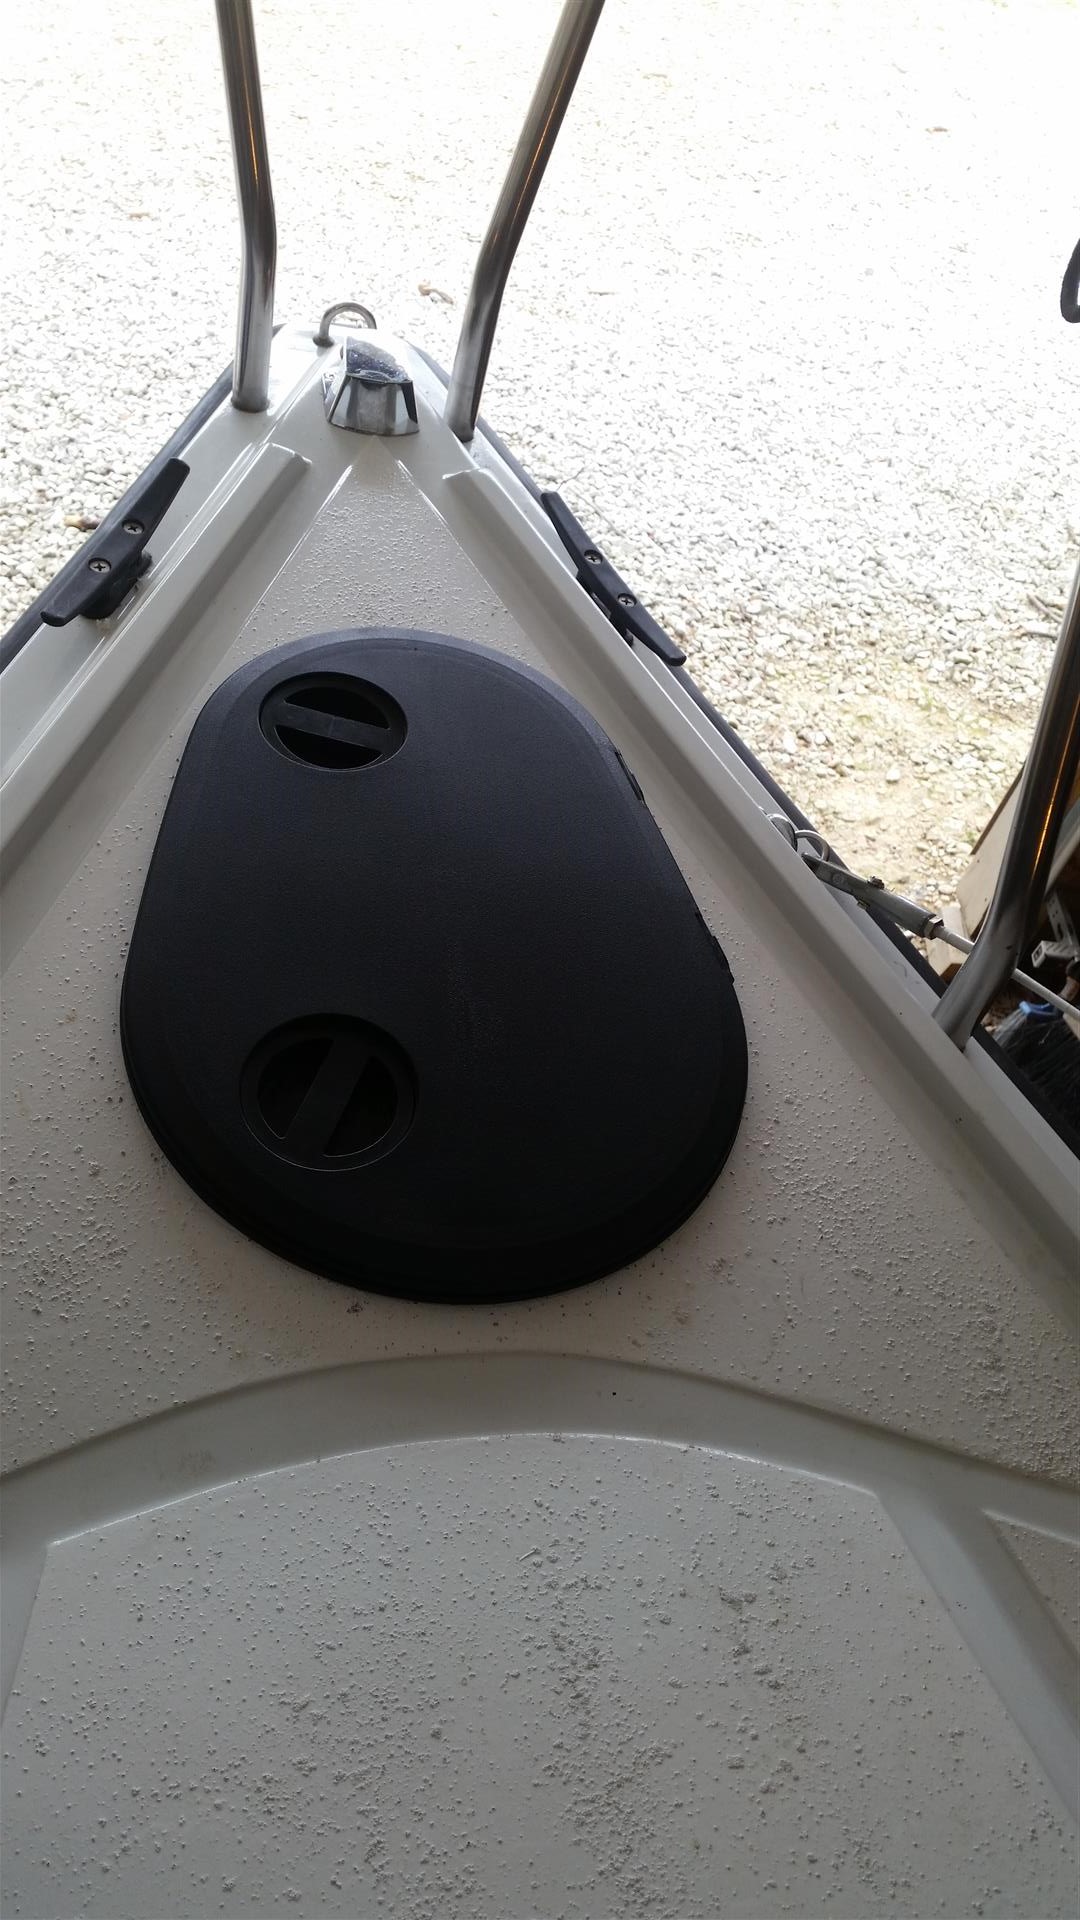
It is a really nice hatch with dual latches and tether for the lid. Before I cut any holes I put it on the ground an jumped up and down on it to make sure it was tough enough. If it was going to break better it break on the floor than the boat.
opened.jpg

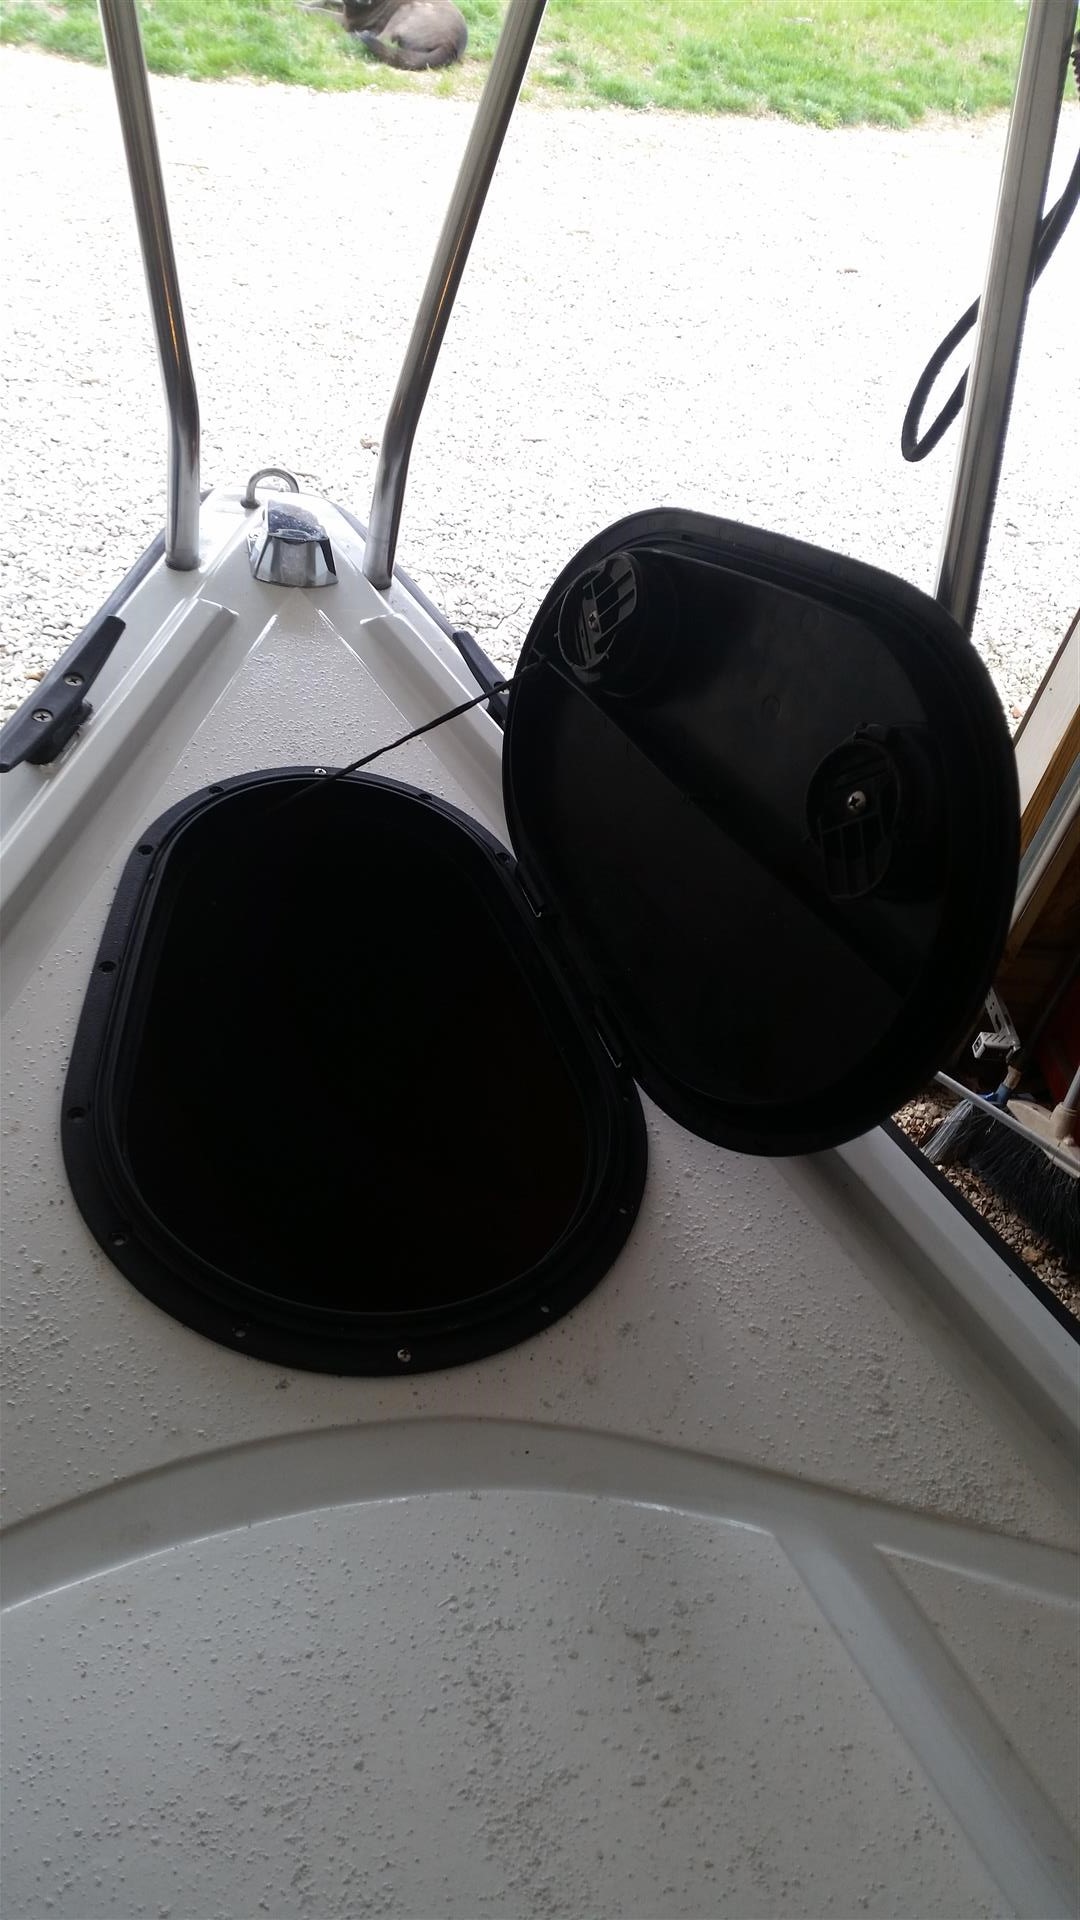
It is a sealed hatch and I have not had any issues with water leaking in on the kayaks. It is going to be self draining locker so even if a little gets in it will drain out on its own.
Now time to go inside. I had to peel the carpet back off the walls, and remove the glue first then mark off the level I wanted to floor of the locker well.
marked off.jpg

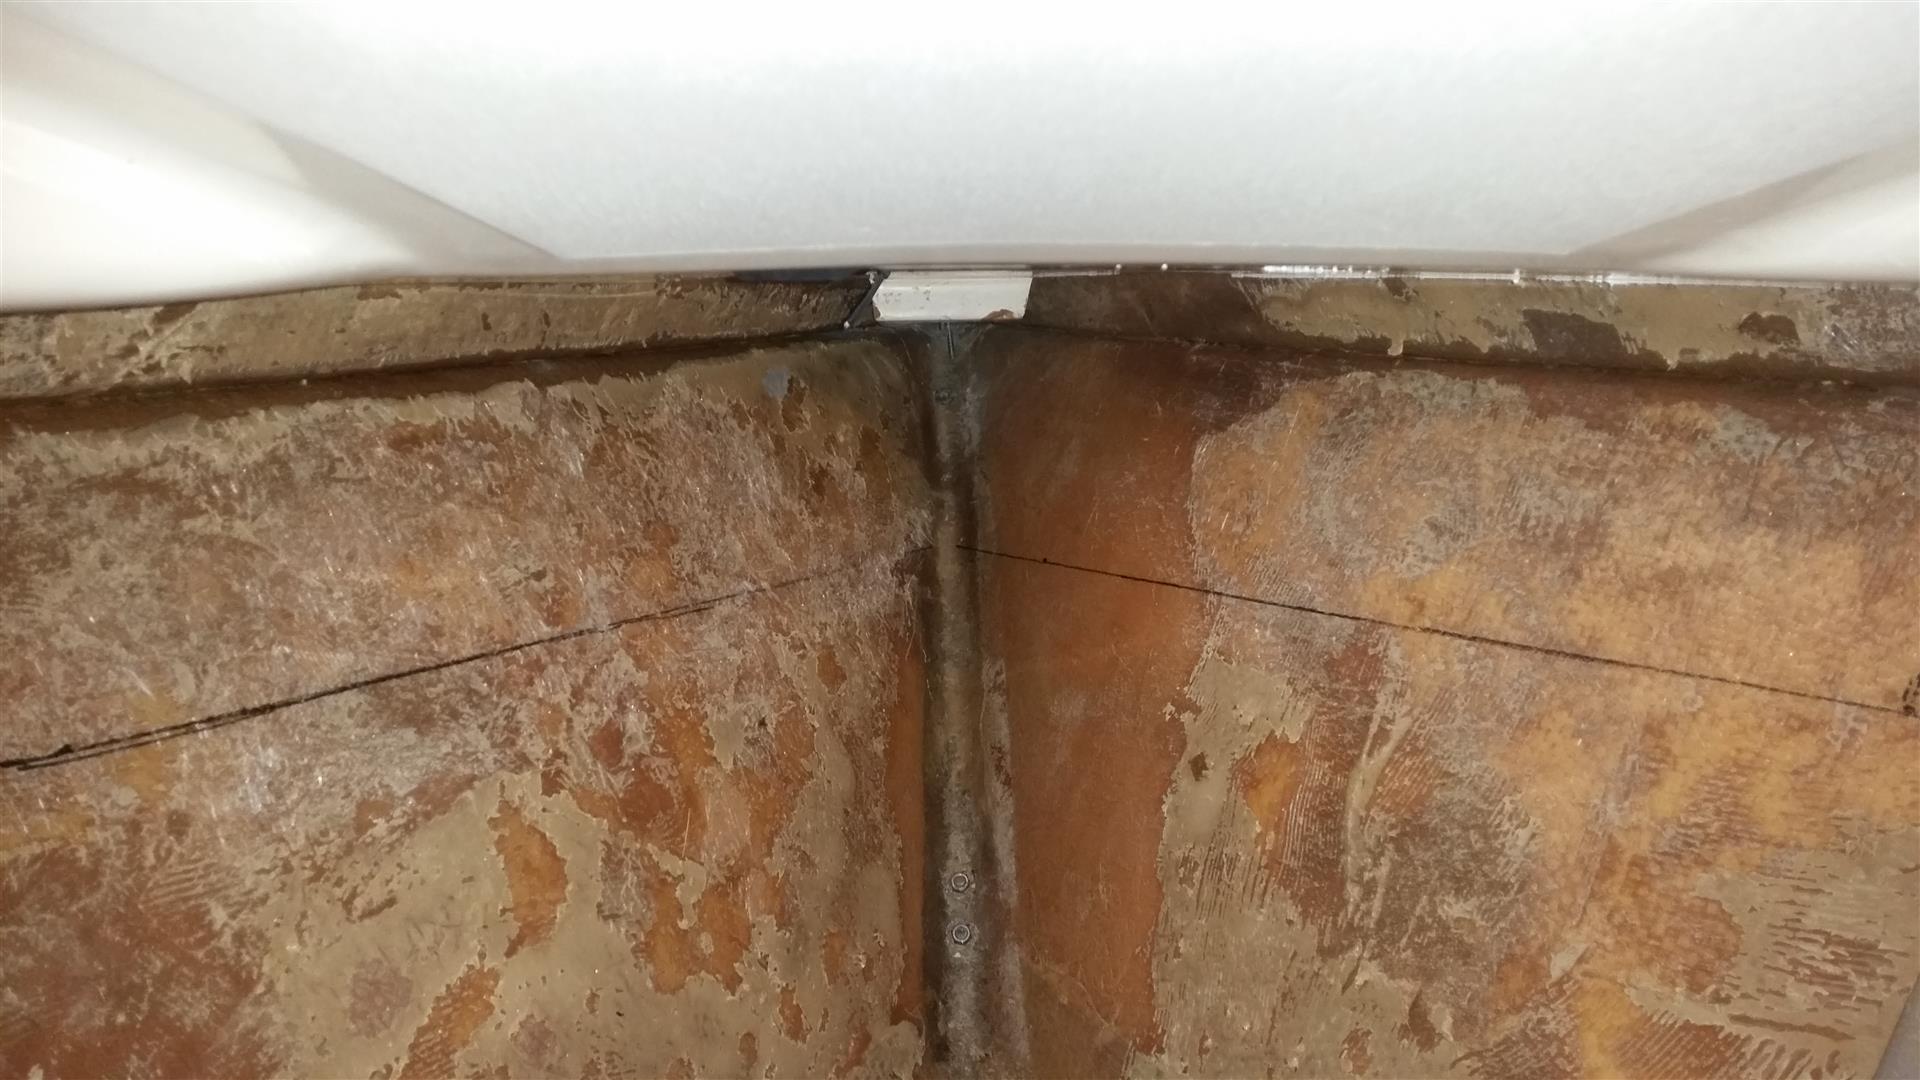
I put a 2 inch drop towards the bow so the water will run forward and then out the drain hole. Scraping the glue off was by far the worst part of the job. Lets just say it stuck to the hull better than the carpet.
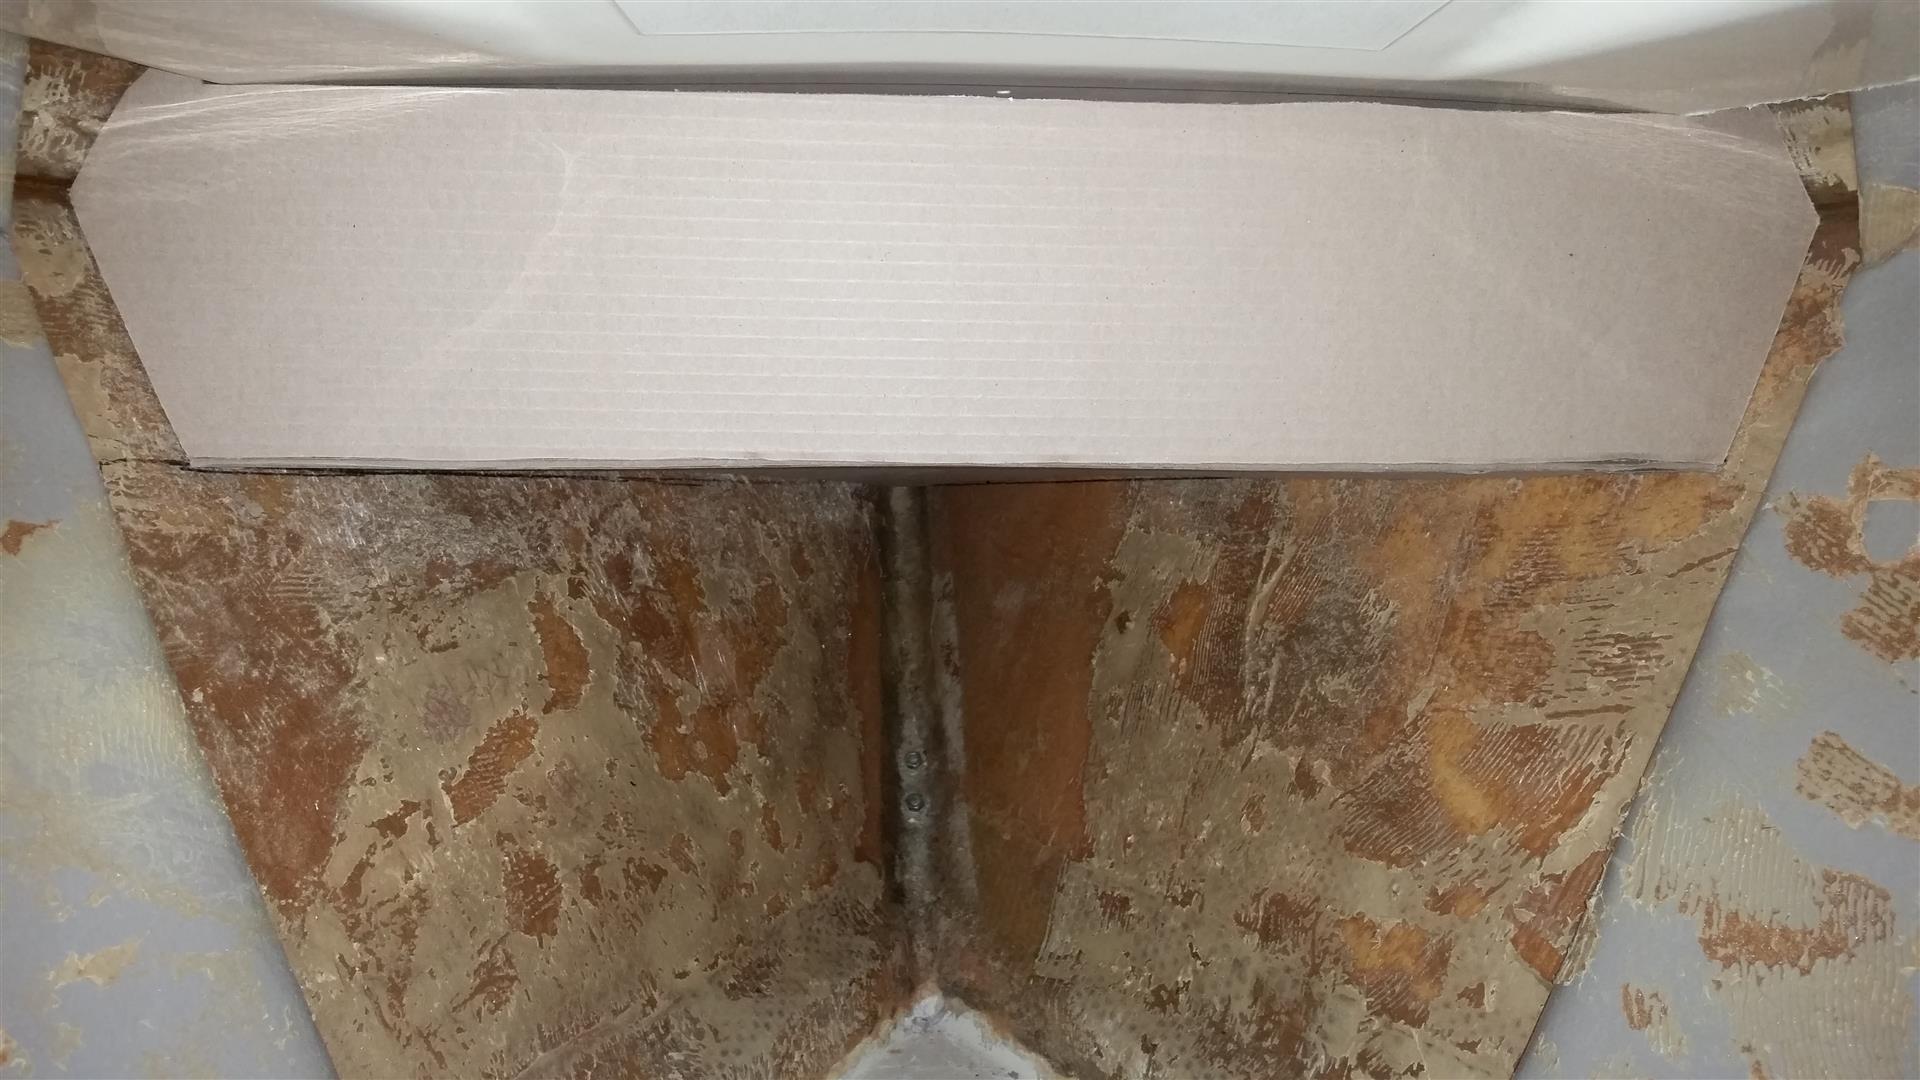
With the glue scraped away it was time to make a pattern for the bottom and the back of the locker out of cardboard.
bottom template.jpg

back template.jpg

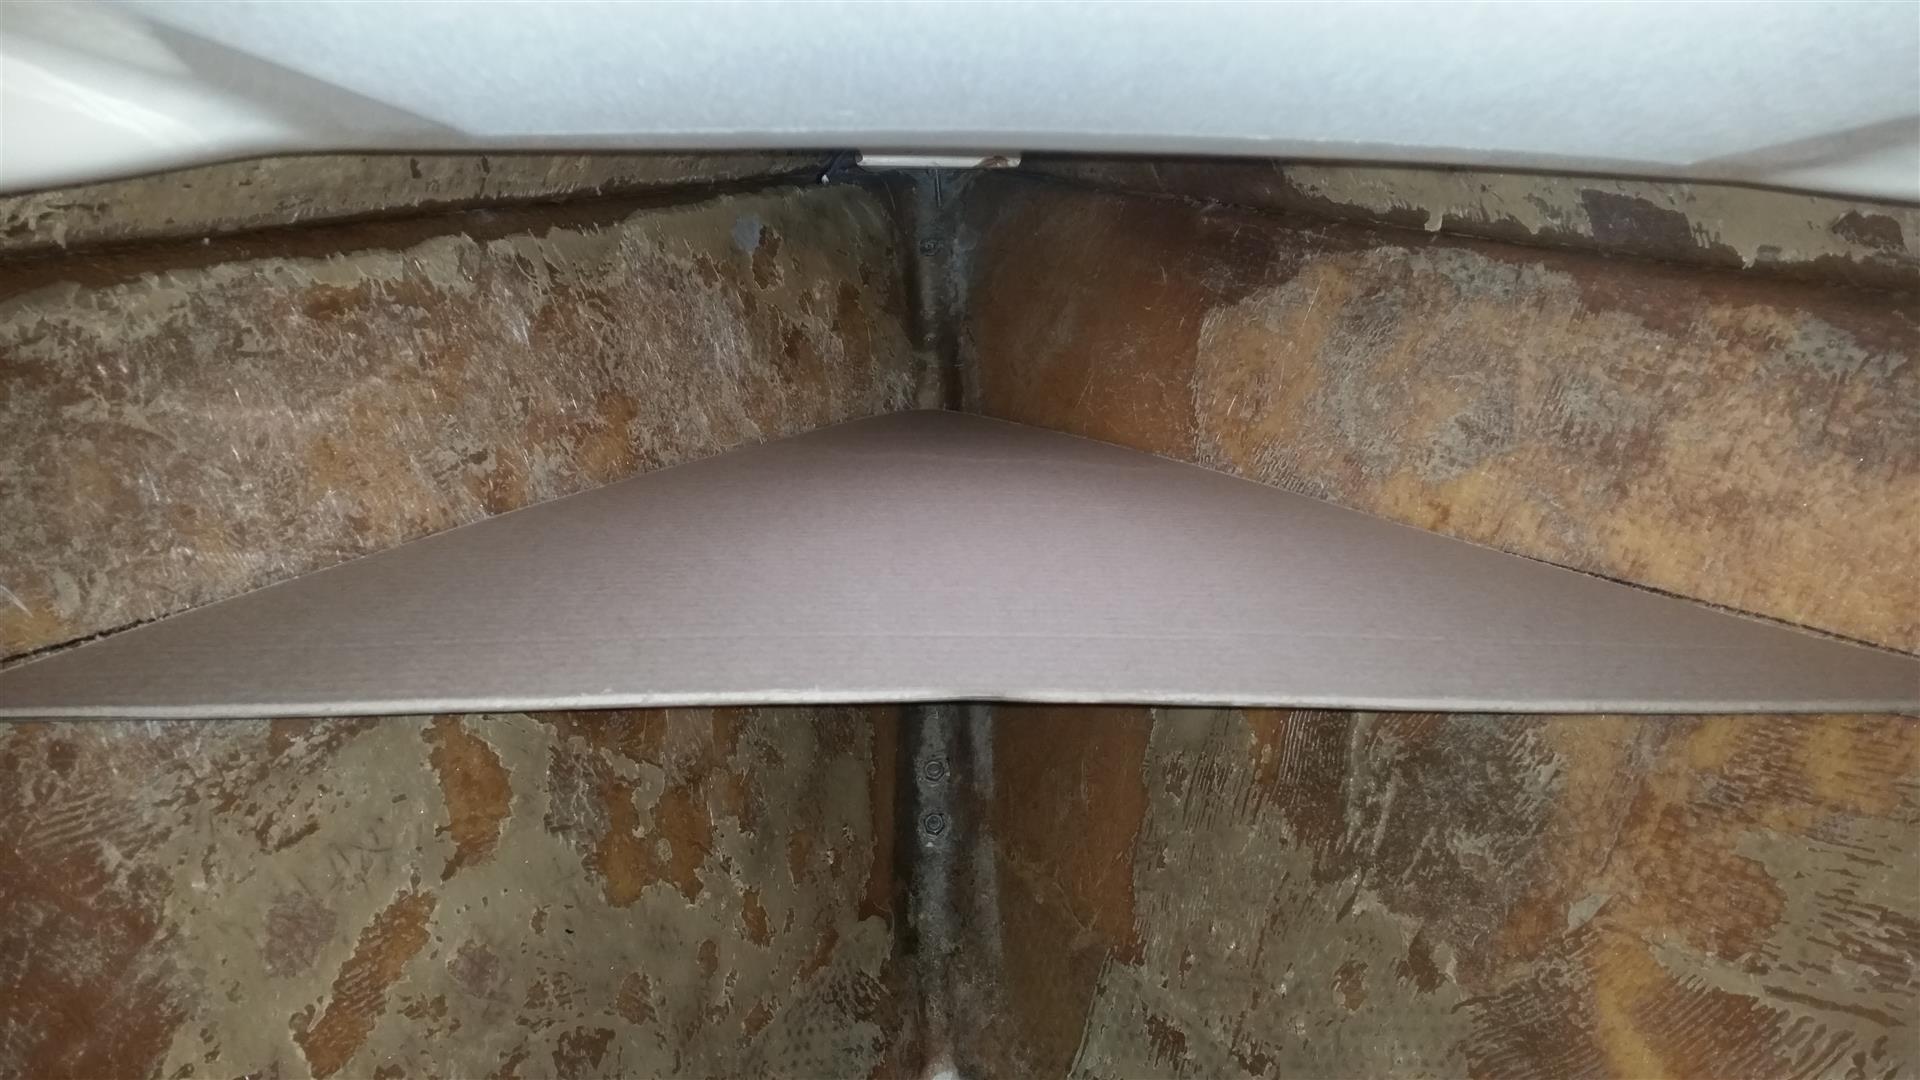
Not too bad for the first try. After making a few adjustments and added measurements I cut the pieces out of 1/4" ply. After I fit those pieces I will start glassing them with 6 oz fabric and West systems epoxy that I use on kayaks. Once that is done I can epoxy them into the boat.
Cindy wasn't too sure about this project, probably because she never had to drag the anchor forward to the bow or back. Her big concern was that we would not have room for our feet as she likes sleeping in the V birth. Well we used to have a small 12 volt fan that hung there and it was down 9". The locker extends down 6 inches at the back edge so we actually have more room now. I tried it out and it will work out just fine
more room for feet.jpg

The fan never really moved air that well anyway and it was noisy so now I can replace it with a quitter fan and put it someplace better.
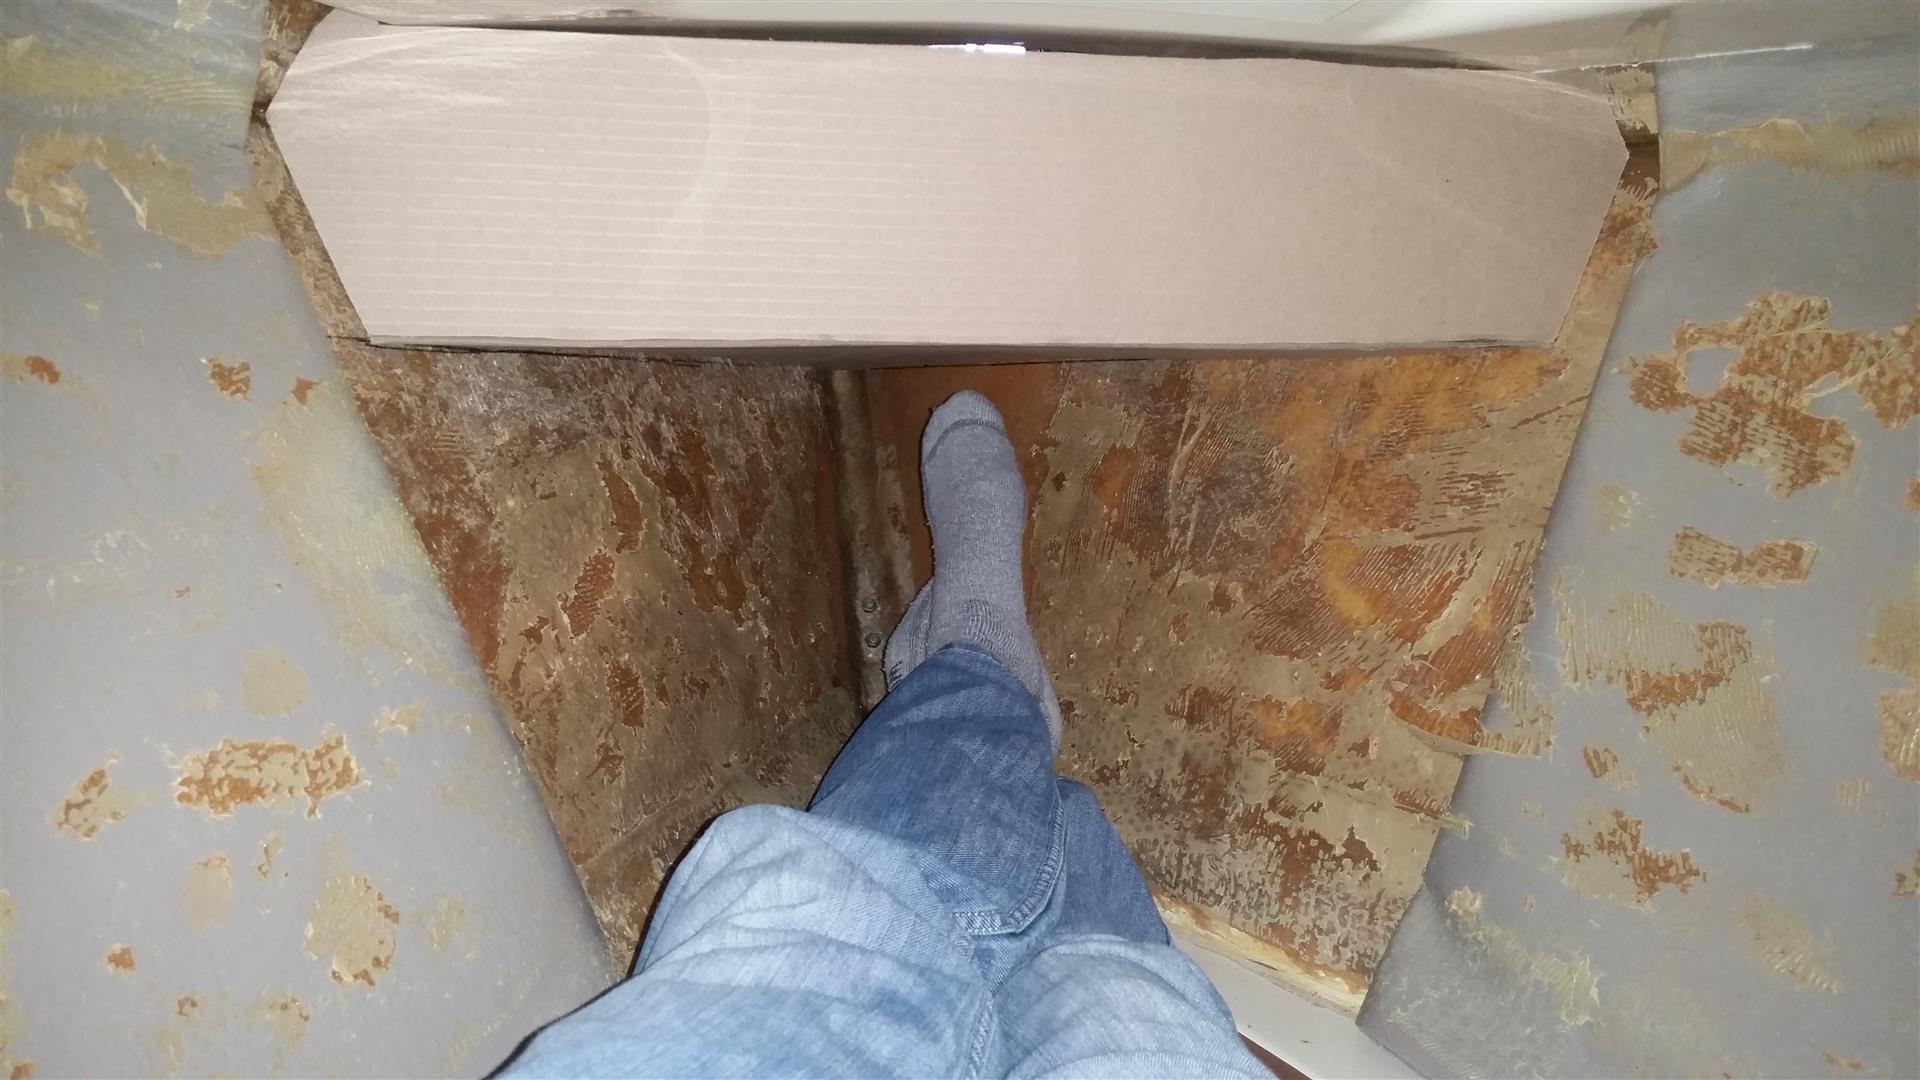
I did a test fit with the anchor and it is going to have plenty of room for the anchor we use and I think that the small claw anchor we have might even have enough room to go in there as well.
trail fit.jpg

Either way I am very excited to have a place on the bow to store the anchor and rode. I plan on painting the hatch gray to match the new antiskid paint as I am changing the white to a light gray. I really liked the look of the white when I did it originally last spring but after seeing how dirty it looked after sitting out on the slip after the first week I hated it. Seemed like each time we sailed I was scrubbing the dirt off the decks. Friends of our had gray antiskid and it did not show dirt nearly as bad. Live and learn.
I was happy to see that the deck was cored with 1/4" ply instead of balsa. It was right at a 3/4" thick in that area and is still very strong, as determined from my bounce test. I will post more pics as the project progresses.

Sam
 
May 24, 2004
7,131
CC 30 South Florida
My first thought was that "he must be a lake sailor" and confirmed my impression by looking at your profile. Nothing wrong with the job, I think it was well done and looks good. My initial reaction responded to the many times we have dipped the bow of the boat under sea swells which I do not think that hatch could be designed to withstand. I have had many boats and some of them did not have an anchor locker so I understand your concerns. If it is safe for your area it is definitely a good improvement.
 
Oct 28, 2013
678
Hunter 20 Lake Monroe
We are definitely lake sailors Benny. The closest thing to blue water we get is when the blue green algae rolls in LOL! That said, the hatch is a strong hatch that seals up very well. Not that I want to dip the bow but if it happens there are others things I will be worried about breaking before this hatch.
It was a slow night last night as all I could do once I got the wood pieces fitted was to get the first coat of glass on the bottom side of the bottom and the back side of the back.
first layer of glass.jpg

It was cool in the shop so it dried pretty slowly. I trimmed the edges this morning when I let the boys out. It was still green enough they trimmed easily.
I had just enough thick coarse weave mat left over to do the bottom of the bottom piece. I will give it one more coat of 8 oz glass tonight on the bottom and then flip them over. It is going to be carpeted on the inside so I am not too worried about how they look as they wont be visible.
I spent the rest of my evening trying to find a 17/32 drill bit to open up the top rudder bushing I just installed in the gudgeon blocks of our rudder. Took all of 10 mins to install Acetal flange bushings, and several more hours to get them to slip down over the pintles together. Seems the pintles are not in perfect linear alignment with each other. They are off just far enough to give me headaches. Another 10 min project turned into hours of my life I will never get back. But now the rudder is nice and tight, moves very smoothly, and won't be banging around on the bottom pintle at 5 am when the first bass boat goes skimming across the lake a mile away!
18 days till we can splash her in!

Sam
 
Last edited:

Doug J

.
May 2, 2005
1,192
Hunter 26 Oceanside, CA
Nice project! I like the hatch, looks good! But... " It is going to be carpeted on the inside so I am not too worried about how they look as they wont be visible." Are you sure you want carpet inside? You'll probably have some of that algae growing in there, and the smell! :confused:
 
Jan 19, 2010
12,407
Hobie 16 & Rhodes 22 Skeeter Charleston
Nice project! I like the hatch, looks good! But... " It is going to be carpeted on the inside so I am not too worried about how they look as they wont be visible." Are you sure you want carpet inside? You'll probably have some of that algae growing in there, and the smell! :confused:
I think he means on the inside of the boat... not the inside of the locker... :rolleyes:
 
Oct 28, 2013
678
Hunter 20 Lake Monroe
LOL! Correct, on the inside of the boat. That would probably get pretty ripe after a while. I am going to put a rubber liner down in the main area on the inside of the boat just incase I drop the anchor into the well at some point. Epoxy cracks pretty easy sometime and the rubber will be cheap insu rance against water getting to the plywood core.
While I was working last night I got to thinking that the back wall of the anchor locker might make a nice place to put the 10" Fire tablet so we could watch movies in the V birth. I will have to look into that idea. This project has so many benefits I can't believe I waited to do it.

Sam
 
Jan 19, 2010
12,407
Hobie 16 & Rhodes 22 Skeeter Charleston
LOL! Correct, on the inside of the boat. That would probably get pretty ripe after a while. I am going to put a rubber liner down in the main area on the inside of the boat just incase I drop the anchor into the well at some point. Epoxy cracks pretty easy sometime and the rubber will be cheap insu rance against water getting to the plywood core.
While I was working last night I got to thinking that the back wall of the anchor locker might make a nice place to put the 10" Fire tablet so we could watch movies in the V birth. I will have to look into that idea. This project has so many benefits I can't believe I waited to do it.

Sam
You failed to describe that gut clenching moment right before you cut a big -a$$ hole in the bow of your boat....:yikes: I put a hatch in the cockpit of a Mac V22 that I once owned... and I can still remember wincing right before I pulled the trigger on my skill saw....
 

Doug J

.
May 2, 2005
1,192
Hunter 26 Oceanside, CA
You failed to describe that gut clenching moment right before you cut a big -a$$ hole in the bow of your boat....:yikes: I put a hatch in the cockpit of a Mac V22 that I once owned... and I can still remember wincing right before I pulled the trigger on my skill saw....
That's how I felt Sunday when I cut a 4.25" hole for my new compass. I checked and triple checked. But when I started to do it there was that sinking feeling in my stomach. That would've been a tough mistake to cover up.
 
Oct 28, 2013
678
Hunter 20 Lake Monroe
Last night was spent spreading more epoxy over the 2nd layer of glass. I tested the strength of the bottom after the first layer of extra coarse mat and I could barely get it to move pressing down on it between two saw horses. After adding the layer of woven fabric and epoxy last night I have almost a 3/16" buildup of material on the bottom side of the bottom. I think two layers will be more than enough to keep the bottom from sagging from the weight of the anchor and chain.
2nd layer of glass.jpg


I also applied another coat of epoxy to the raw edge of the hole I cut in the deck for the hatch sealing it back up.
I will flip the pieces and put a layer on the top side before I install them in the boat. Once I fillet them into the boat I will add additional layers running those layers up over the fillets and onto the hull to help tie it all together.
I also started epoxying the rear rail motor mount I made for our dinghy motor.
rear rail mount.jpg

We have a Cruise and Carry 10 lb outboard that I rebuilt. It runs like a champ and works great with our small raft/dinghy. I bought one of the factory made rear rail mounts but it was sized for a battleship, not a 20 footer. So I made our own out of some scrap I had in the shop. Once I have it all glassed I plan on adding 1/8" aluminum plates to the front and back side when the clamp and bracket will hit it. It should work fine and is just the right size for the application. Anyone need a rear rail mount that is good for a 8hp motor?
I was also finished up the rudder bushing project. Who knew finding a drill bit larger than a 1/2" was going to be such a job? I found one at Fastenal in town but they wanted 40 bucks for it. That was not going to happen. I was ready to order a 17/32 online for 10 bucks but then a friend called and he had a 33/64. It was all I needed to open up the top bushing and allow the rudder to slide down on the pins. It is snug and there is zero play but the rudder is super smooth and oh so quite. I used flanged bushings so there is no metal to metal contact anywhere now. Before it was all metal to metal with just enough play to make a God awful noise at 5 am. I can't wait to overnight now that we will be able to sleep in.
Somehow I got some fiberglass on my arm last night. Still itching.

Sam
 
Jun 19, 2015
3
Hunter 20 SW Idaho
Sam, how are you handling the drain water?
The local lake opens to boating Saturday with a forecast of 70 deg. and wind 10-15. I am ou of my mind with anticipation.
 

Apex

.
Jun 19, 2013
1,198
C&C 30 Elk Rapids
Looks good, are you putting a drain in the locker? A simple pipe from the front lower corner of the locker angle down and out the front of the boat and bed in on both sides. That worked well for our C25. The Oday 28 has a vertical plumbed drain in the locker, with a hose fitted to the bow drain. I am not a fan of the plumbing in the v-berth in that solution.
 
Oct 28, 2013
678
Hunter 20 Lake Monroe
I have been wondering about you Russ. You have Lady Lorraine ready to hit the water? We can move into our slip on May 1st so we plan on heading over and spending the weekend on her then leaving her in the slip on the 1st.
Yes, I will be putting a drain in the starboard front corner as I sloped the floor 2" down towards the bow so all the water runs forward and out the drain.
I should be able to start bonding the pieces to the hull tonight if I get home soon enough. Will probably be tomorrow though.
Going to step the mast and rig the new furler this weekend. Measure and order new sheets and halyards so I can replace those and we will pretty well be set to head over by the end of the month. Can't wait to start enjoying her on the water again. Been a long spring full of boat projects. Really looking forward to the tent top and sleeping in with a quite rudder.

Sam
 
Oct 28, 2013
678
Hunter 20 Lake Monroe
I am proud to say that even though I wound up having to fly both days this weekend I was still able to make progress on the anchor lock. I got the bottom and the back glassed in to the hull Saturday night and it actually went ok, other than that large chunk of hair I had to cut out due to a epoxy drip. That will teach me to stick my head down in the hole to make sure I got all the seams covered.
glassed in the boat.jpg

I used thickened epoxy to fillet around all the edges then covered that with 6 oz glass cloth. Of course the seam line shows through the layers of glass. I really thought it would have hidden but I ran out of that type of material and the other clothe I had becomes transparent. It will be hidden with a rubber material so no real issue, plus who cares if there is a seam in the material 3 layers down.
I let it dry overnight before I gave it the real test.
Thre is a anchor in there!.jpg

That, my friends, is a thing of beauty! I have wanted a anchor locker since before we ever sailed. I was really pulling for a Precision 18 when we started looking at boats because of the size and the anchor locker. We wound up with a little bigger boat with a pop top and I finally got my anchor locker.
I will add another layer of glass tonight and that will finish up the glass work. Will just need to add the drain and finish up topside.
We stepped the mast yesterday so we could install the furler. I had to install a open turnbuckle as we had the yoke style stay adjusters. Well the open turnbuckle added quite a bit of length to the adjuster and even after switching to short shackle at the chain plate I knew it was going to be close. Well, it was very close but the bigger issue was that the short shackle had the furler so low it blocked the nav lights on the bow. Arggghhh!!! So, first thing this morning I ordered a new forestay cable that is short enough to go back to the longer shackle so we can see the nav lights again. It is always something.
We also hoisted the new mainsail for the first time. Boy, talk about crisp! I hope it loosens up a bit or we will never get it flanked so we can get the sail cover over it. I measured for the new topping lift cable that will keep the boom up out of the cockpit. That alone is worth the cost of the sail.
Before we stepped the mast I took a hour or so and fixed all the bent stay adjusters and t bolts. I ran a die over all the threads and cleaned them up which was worth every minute of my time as they adjusted so much easier than before. To prevent the t bolts or tensioner bodies from getting bent again I use Grip Ties to hold them vertical as we step the mast.
shroud retainer.jpg

The shrouds line right up now as the mast stands up. It seemed to be a pretty simple solution and cheap insurance.
They told me the new forestay should be hear Thursday so we should be good to go still on our timeline. Can't wait to splash her in!

Sam
 
Jan 19, 2010
12,407
Hobie 16 & Rhodes 22 Skeeter Charleston
Bravo! That looks like a really nice upgrade. Congrats.

Regarding your hair issue...
You probably already know this but white vinegar will dissolve epoxy so long as it is not fully cured. It even works on mostly cured epoxy. I always keep a gallon of vinegar and a roll of paper towels handy when I'm doing epoxy work. And then wipe down my hands, arms and tools before I close up shop for the day. Epoxy is a poly amide (base) and vinegar is an acid... so the vinegar actually reacts with the part of the epoxy that is trying to bind to its neighboring molecule.... and rinses it away.

I'd bolt some anchor chocks in the bottom to hold the anchor in place...

 
Oct 28, 2013
678
Hunter 20 Lake Monroe
Funny thing, we were out of vinegar and I thought glacial acetic acid was probably a bit too strong. Plus, epoxy hardens a lot quicker at 80 than at 60.
The hair will grow back, in time. Small price to pay to not have to lug that anchor forward anymore.

Sam
 
Last edited:
Jan 19, 2010
12,407
Hobie 16 & Rhodes 22 Skeeter Charleston
yeah... you don't want to put glacial on your skin. Vinegar is 5% ..... you could add a few oz. glacial to a gallon of water.

When I was in graduate school, my thesis advisor kept his boat at Lake Monroe.... but he only invited me to sail on the first and last days of the season.... he wanted help raising and lowering his mast. :angry: