So it's mid season, your boat is in the water, and your old depth sounder dies. What are you to do? There is often a good chance that your transducer is fine and it's only the display that has died. Despite the transducer being old there is a chance it may be the same frequency as the new depth sounder. If it's a 200Khz transducer it will likely work with Raymarine and some others that are 200Khz. I've done this a number of times. While certainly not ideal, or the "perfect" solution, mixing old and new, this can save you hundreds of dollars in a short haul expenses if you need the changing out of a drilled through the hull transducer. Either way, if you're in a pinch, it is worth a try.
The new transducer that came with the display can always be installed when you haul for paint, or for the winter, if you are in an area where the water gets hard for half the year.
To use an old transducer you will want to ascertain what the model number or brand is and then hopefully you can track down the frequency. Often times the old depth sounder manual will tell you the frequency in the specs. The transducer frequency must match that of the display head to make it work.
In order to do this you will likely need to cut the old connector off the end of the coax. Many older depth sounders used an RCA connector and some used a BNC type. The center conductor of the coax cable is hot or the signal send wire and the shield becomes ground or the signal return wire.
To confuse everyone the new Airmar transducers, Raymarine, Garmin, Furuno and many others use Airmar as their transducer supplier, are often three wires, hot, ground and a shield. When using an old coax transducer just make the center conductor hot and the shield the ground. On the Raymarine ST-60 for example you can just ignore the shield input and use ground/black and hot/blue and it will work fine if it is a 200Khz unit.
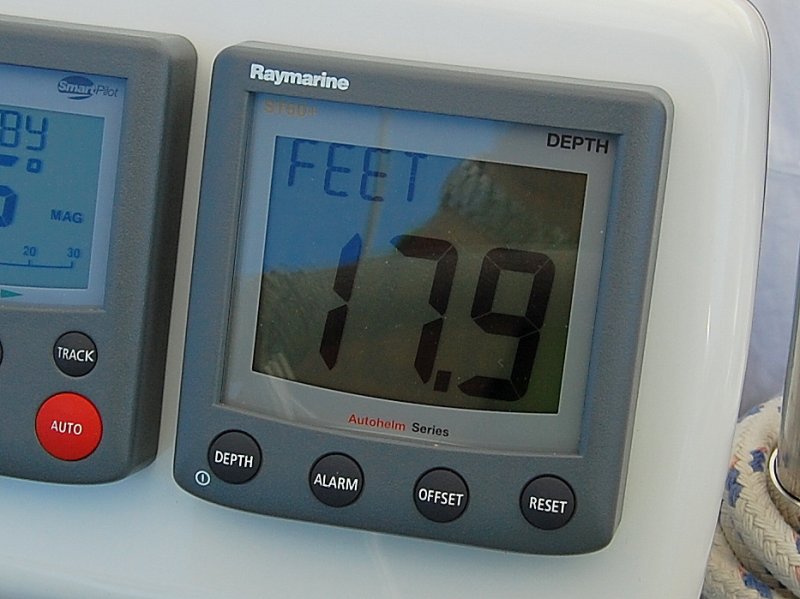
Most of the old transducers for depth were 200 or 210 Khz but there were also some other frequencies used as well. If if your old transducer is a 210 Khz it won't work at all or accurately with a newer 200 Khz display. For this post I used a 31 year old Radarsonics 200Khz transducer with a 2010 Rayamarine ST-60+. This transducer also worked with my 2006 ST-60 non + model before it got hit by lightning. Interestingly enough the ST-60 and every other piece of electronic gear was wiped out by that lightning strike. The only thing still working was my trusty 31 year old Radarsonics transducer!!") I also have the Raymarine/Airmar P-79 unit that came with the ST-60 mounted as a "shoot through" for back up but currently disconnected at the instrument.
I also have the Raymarine/Airmar P-79 unit that came with the ST-60 mounted as a "shoot through" for back up but currently disconnected at the instrument.
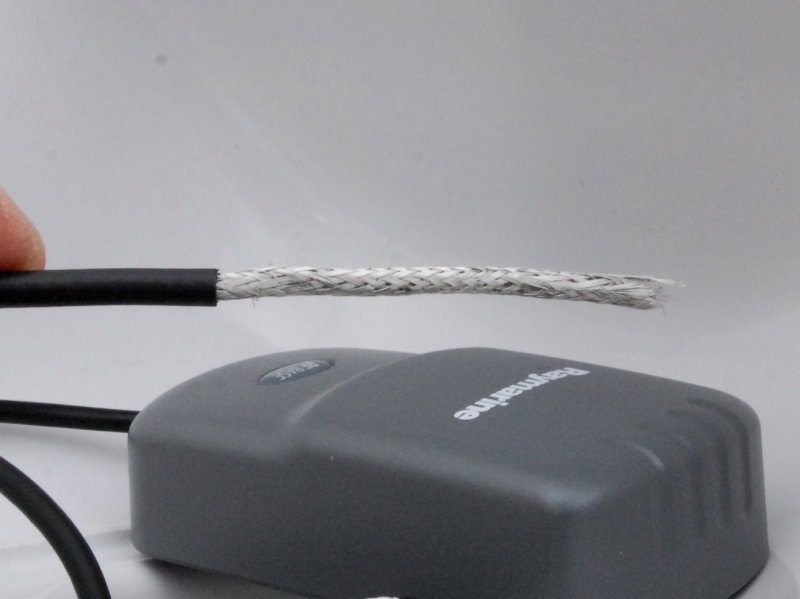
STEP #1 Strip the jacket back about 3" and be careful not to cut the shield wires of the coax cable.
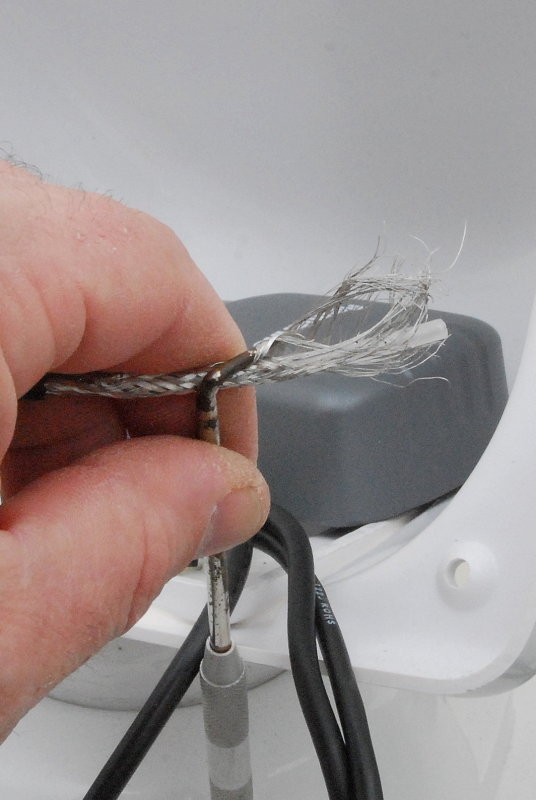
STEP # 2 - Using a mechanics pick or other pointy object carefully un-braid the shield wires all the way back to the wire jacket.
STEP #3 - Once the coax shield strands have been un-braided, carefully straighten them and then twist the wires into a single conductor.

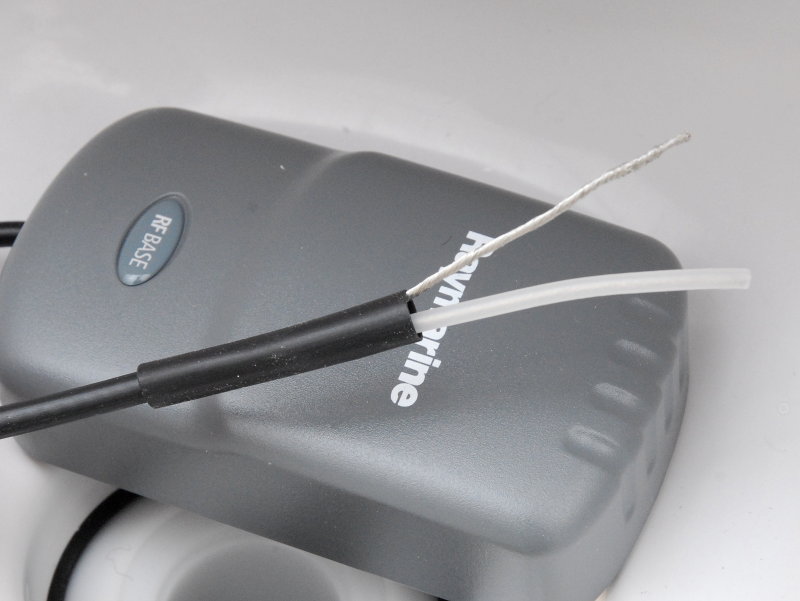
STEP #4 - Cut a piece of heat shrink about 3" long that is large enough in diameter to get two smaller pieces of heat shrink under, one for the pos/send and one for the neg/return wires. Once this is on you can slide it out of your way for now.
STEP #5 - Using a smaller diameter piece of black heat shrink slide it over the twisted shield wire leaving enough poking out the end for a crimp fitting.
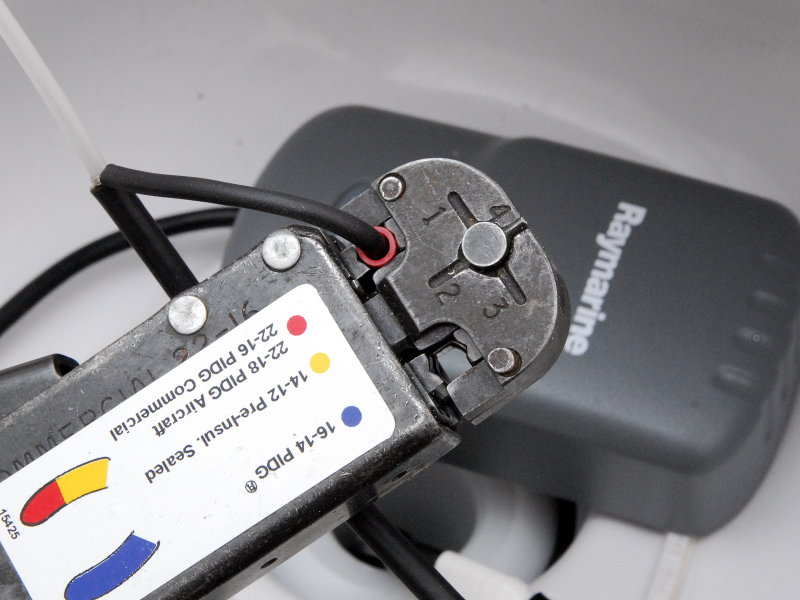
STEP #7 - Using a heat gun shrink the tubing then simply crimp on your terminals.
STEP #8 - When the negative/return wire is done strip a little off the end of the main conductor to fit a terminal. Next wrap the main conductor with aluminum foil, this replaces the shield you just removed, and slide some red heat shrink over it. Now hit it with the heat gun and shrink it.
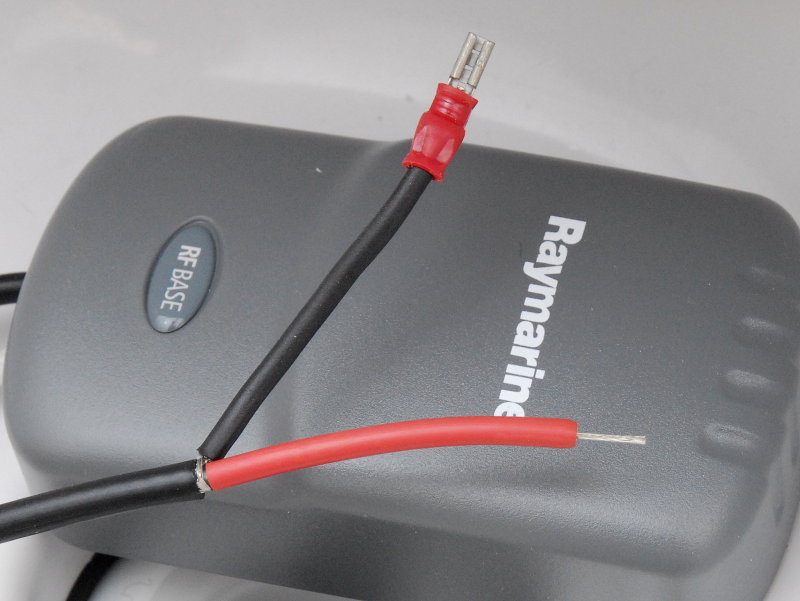
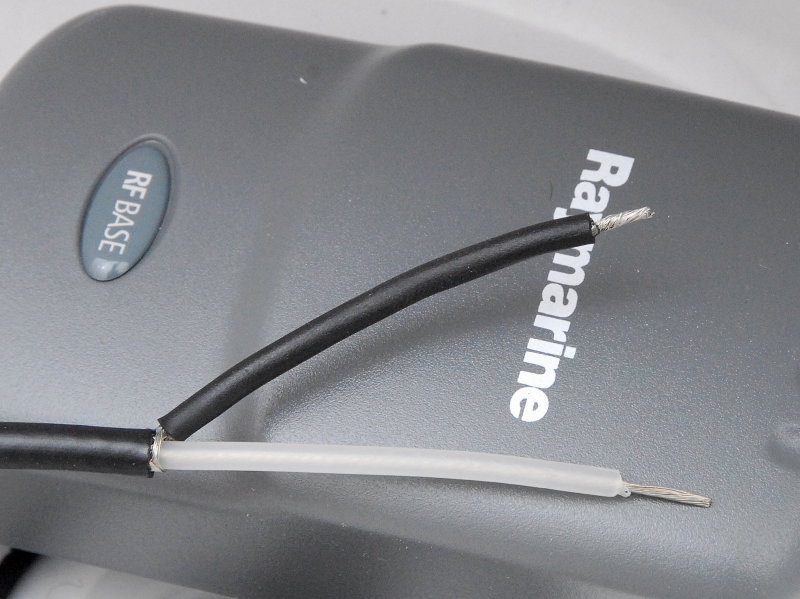
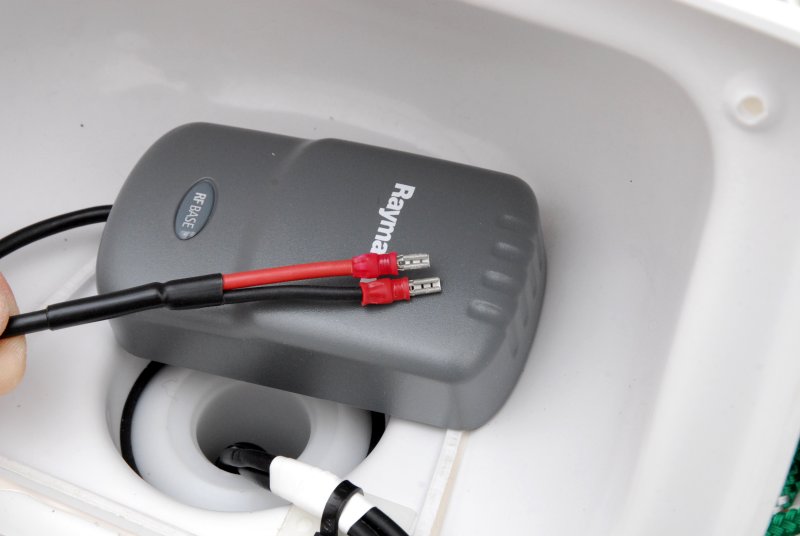
This is what the finished cable ends will look like. You don't have to use red for your signal/send wire and could ideally use whatever color matches your new instruments color codes. In this case, with a Rayamrine ST-60, that would be blue. For DC simplicity I chose to used the standard red/black for pos/send and neg/return. Alternatively, yellow can also be used as a DC negative color.
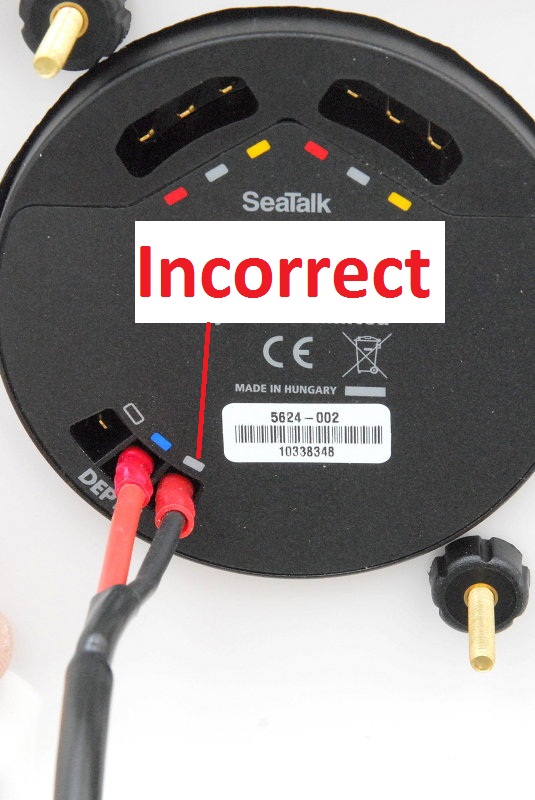
This photo shows how NOT to hook you your old transducer to an ST-60. The silver square on the ST-60 is simply for the third shield wire of the newer Airmar three wire transducers. The blue is hot and the black square is for the neg wire. The red wire in this photo is in the correct socket but the black/neg/return signal wire is not.
WRONG WAY!
These three wires are from the Airmar transducer that came with the Raymarine ST-60 Depth. The black is the transducer neg/signal return wire, blue hot/signal send and the silver wire is the wires shield which they attach to the display.
Factory Wires:

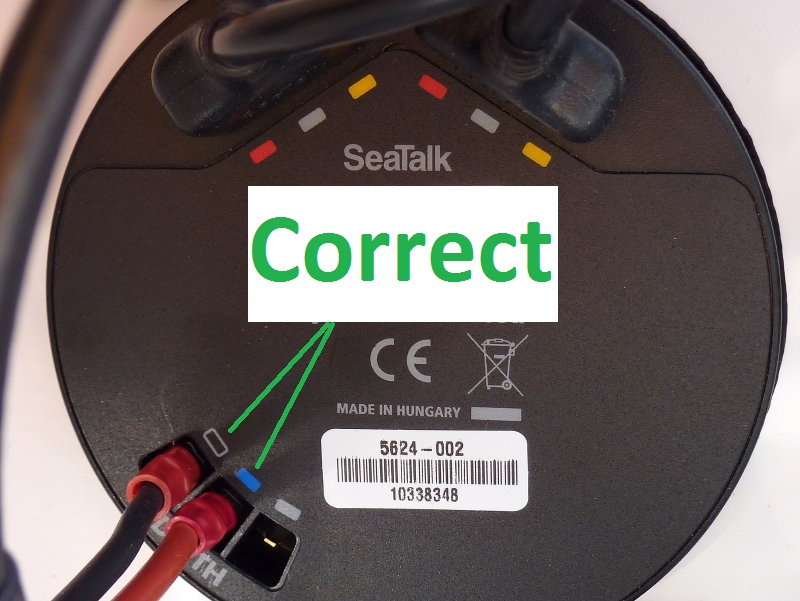
Here is how to correctly connect an old 200 Khz transducer to a new Raymarine ST-60 depth display. Your transducer will work very well wired this way and can buy you time until a haul out. Shield goes to the black socket and the center conductor goes to the blue socket.
RIGHT WAY:
This whole mating of the new display to the old transducer will take about 20 minutes to perform, and it works very well.
The new transducer that came with the display can always be installed when you haul for paint, or for the winter, if you are in an area where the water gets hard for half the year.
To use an old transducer you will want to ascertain what the model number or brand is and then hopefully you can track down the frequency. Often times the old depth sounder manual will tell you the frequency in the specs. The transducer frequency must match that of the display head to make it work.
In order to do this you will likely need to cut the old connector off the end of the coax. Many older depth sounders used an RCA connector and some used a BNC type. The center conductor of the coax cable is hot or the signal send wire and the shield becomes ground or the signal return wire.
To confuse everyone the new Airmar transducers, Raymarine, Garmin, Furuno and many others use Airmar as their transducer supplier, are often three wires, hot, ground and a shield. When using an old coax transducer just make the center conductor hot and the shield the ground. On the Raymarine ST-60 for example you can just ignore the shield input and use ground/black and hot/blue and it will work fine if it is a 200Khz unit.
Most of the old transducers for depth were 200 or 210 Khz but there were also some other frequencies used as well. If if your old transducer is a 210 Khz it won't work at all or accurately with a newer 200 Khz display. For this post I used a 31 year old Radarsonics 200Khz transducer with a 2010 Rayamarine ST-60+. This transducer also worked with my 2006 ST-60 non + model before it got hit by lightning. Interestingly enough the ST-60 and every other piece of electronic gear was wiped out by that lightning strike. The only thing still working was my trusty 31 year old Radarsonics transducer!!
I also have the Raymarine/Airmar P-79 unit that came with the ST-60 mounted as a "shoot through" for back up but currently disconnected at the instrument. STEP #1 Strip the jacket back about 3" and be careful not to cut the shield wires of the coax cable.
STEP # 2 - Using a mechanics pick or other pointy object carefully un-braid the shield wires all the way back to the wire jacket.
STEP #3 - Once the coax shield strands have been un-braided, carefully straighten them and then twist the wires into a single conductor.
STEP #4 - Cut a piece of heat shrink about 3" long that is large enough in diameter to get two smaller pieces of heat shrink under, one for the pos/send and one for the neg/return wires. Once this is on you can slide it out of your way for now.
STEP #5 - Using a smaller diameter piece of black heat shrink slide it over the twisted shield wire leaving enough poking out the end for a crimp fitting.
STEP #7 - Using a heat gun shrink the tubing then simply crimp on your terminals.
STEP #8 - When the negative/return wire is done strip a little off the end of the main conductor to fit a terminal. Next wrap the main conductor with aluminum foil, this replaces the shield you just removed, and slide some red heat shrink over it. Now hit it with the heat gun and shrink it.
This is what the finished cable ends will look like. You don't have to use red for your signal/send wire and could ideally use whatever color matches your new instruments color codes. In this case, with a Rayamrine ST-60, that would be blue. For DC simplicity I chose to used the standard red/black for pos/send and neg/return. Alternatively, yellow can also be used as a DC negative color.
This photo shows how NOT to hook you your old transducer to an ST-60. The silver square on the ST-60 is simply for the third shield wire of the newer Airmar three wire transducers. The blue is hot and the black square is for the neg wire. The red wire in this photo is in the correct socket but the black/neg/return signal wire is not.
WRONG WAY!
These three wires are from the Airmar transducer that came with the Raymarine ST-60 Depth. The black is the transducer neg/signal return wire, blue hot/signal send and the silver wire is the wires shield which they attach to the display.
Factory Wires:
Here is how to correctly connect an old 200 Khz transducer to a new Raymarine ST-60 depth display. Your transducer will work very well wired this way and can buy you time until a haul out. Shield goes to the black socket and the center conductor goes to the blue socket.
RIGHT WAY:
This whole mating of the new display to the old transducer will take about 20 minutes to perform, and it works very well.

