Preface: To avoid the usual onslaught by the tight wads in the sailing community, for my suggestion of yet another expensive tool, I have researched the following for you.")
Genuinedealz.com (LINK) will fabricate battery cables to your spec for $1.00 per crimp plus the wire and supplies. You can stop reading here if that is a route you are comfortable going. This is actually a very, very good deal.
For those of you who prefer the ability to do your own stuff, where & when you want please read on..
Battery cables are not mysterious nor difficult or complicated to make but considering the prices folks charge for pre-made and custom sizes you'd think you were buying a rocket booster tank for the Space Shuttle. There are some who even charge $14.00 per crimp + $6.00 to $14.00 per foot for battery cable depending upon the gauge...
In the last ten years I have owned many boats, too many. I don't plan to not be a sailor or boat anytime soon either. This is why I don't quibble over the cost of the proper tools for the job. Yes I paid about $150.00 for my battery crimpers but the cost per crimp that they have now done is under $0.35 per crimp at the face value I paid for them. If I were to have been paying someone locally to do these crimps, & make me cables, the cost I paid for them would have been eaten up in just one battery bank job. So if you figure I have re-wired at least seven different battery banks & boats with them they have been a lot more than free at this point.
I'll be perfectly honest here and say that I think the price for the Ancor hammer crimper pictured below is MUCH more offensive than the FTZ crimpers I own. If that Ancor tool sold for $15.00 it would be a good deal but it sells for $80.00 and that is Defender's price.
While the Ancor crimper makes an ok crimp it is not one I feel comfortable with personally so these instructions are based on the FTZ crimper. If you use the Ancor I do recommend using a vice to make the crimp with as opposed to a hammer, but this is not to say a hammer won't work.
Yes I own both the Ancor hammer crimper and the FTZ 94285. The FTZ 94285 makes a beautiful compression crimp that is very, very solid. A full 360 degree compression crimp makes a truly cold formed connection between the wire and the lug and that is why I use it.
As I always say tools are free if you DIY!
Genuinedealz.com (LINK) sells the FTZ 94285 crimper for $231.25. I am working on another source for tool this and will provide that info as soon as I have the details.
Edit: I found the source & part number:
K.L. Jack in Portland, ME is a local fastener wholesaler/distributor. They sell the FTZ crimper for 149.99. The K.L. Jack part number for this crimp tool is ET50116 and their phone number is 1-800-639-8805. They will ship anywhere..
Genuinedealz.com also sells a similar 2GA wire to what I used in this post for $2.31 per foot! Their marine wire is made by Pacer and mine by Berkshire but it is all made to the UL 1426 spec just as Ancor is..
I actually have another source for my wire but Genuinedealz.com is a very, very good deal. The money you save in wire alone, when compared to buying it from a chandlery, will nearly buy the good FTZ crimper!!
As of 3-01-09 chandlery pricing for 2GA battery cable per ft is:
2 GA Battery Cable
West Marine = $6.59
Defender = $6.99
Hamilton Marine = $6.03
Genuinedealz.com = $2.31(NOT Ancor)
On a 30 feet of battery cable that is roughly a $140.00 dollar savings alone.
When you figure that an Ancor hammer crimper would cost you nearly $80.00 and the cost savings in battery cable from Genuinedealz.com is so HUGE that the high quality crimper is nearly no additional expense. This is man math at its best. Do not run this scenario by your spouse.. Plus you can always split the crimper with a buddy or sell it here when you are done with it! Remember these cables run the highest amperage's on your boat.

This battery lug is the wrong size for this starter terminal post and is too big.
This lug is the correct size for this stud. You should strive to use the proper size lug for the terminal post..
Not all battery lugs are created equal. The one on the left was purchased at an auto parts store and is cheap, thin & un-tinned copper. The lug on the right is made by FTZ Industries, generally higher quality than Ancor, and is thick tin plated copper. This FTZ lug is a solid connector with no voids what so ever.

In just this one photo we have; non adhesive lined heat shrink, non-tinned wire, wire stranding for battery cable that does not meet the UL Marine spec for number of strands, oxidation already beginning, too much exposed copper from the wire stripping and a rather poorly executed hammer type crimp.
While this fitting did and does work the question would be for how long, and when, not if, would it have let you down? It should be noted that this cable was only two seasons old, located in a very dry area of the vessel and yet already beginning to oxidize

To strip the battery cable simply close the wire cutters around the jacket and make a circle. Do not press to hard or you will damage wire strands. If you look closely you can see that none of them have been cut. There are many ways to strip battery cable I just find this one, with a little practice, to be the quickest and easiest.
My only suggestion here is to use proper wire cutters similar to the ones pictured. In this photo I've chosen to use my Klein High-Leverage Cable Cutter's Part No. 63050. They cost about $20.00 at Home Depot. Chanel-Lock also makes a set that are slightly less money but nowhere near as accurate. Klein Tools are fairly high quality and will hold an edge for a long time when compared to products like Chanel Lock. The right tool, for the right job, is always well worth the expense!
Using a set of Diagonal Cut Pliers or "Dykes" as they are normally called will not make as clean or as nice a cut, or strip, as a good set of cable cutters will.

This is an incorrect fit. In this photo I have stripped the wire and inserted it until it bottomed out in the lug. It's always easier to strip off more than you need and then cut to length. I went a little overboard here for illustrative purposes..
Here I have trimmed some of the wire off, with my Klein cutters, and re-inserted it. The fit is now ready to be crimped

This is more of a good tip than anything. Depending upon your battery lug and wire size a 3/4 inch adhesive lined heat shrink tube may not fit over the crimped lug. Simply install it over the wire before you make the crimp. I usually cut my heat shrink to about two inches long.

This is the head of the FTZ lug crimper. As you can see it compresses the lug in a circumferential manner (360 degrees) making the entire lug smaller and creating a true cold formed connection between wire and lug. Proper crimps lead to little to no resistance. A poor crimp can be a point of resistance and heat generation.
You can see the die heads have letters marking them. Each of these heads rotates and there are dies for many sizes of lugs.
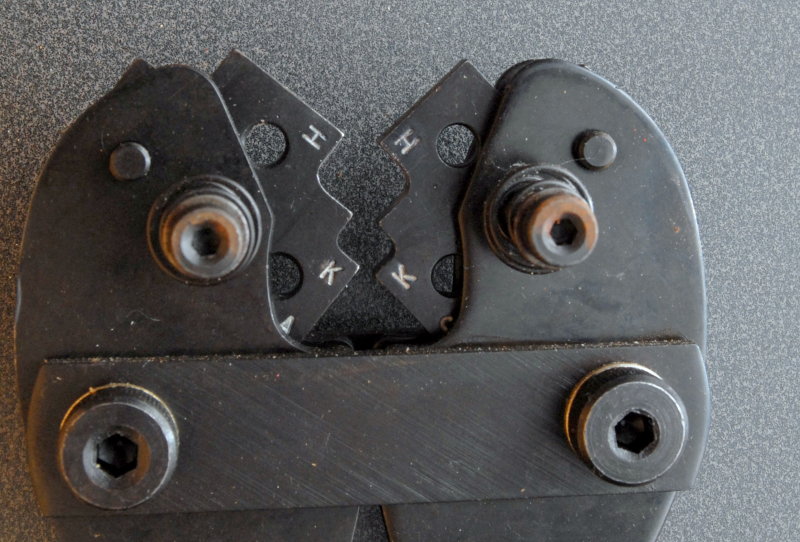
Industry standardized crimpers like the Amp Rota-Crimp and the FTZ have the die settings and the number of crimps required stamped on the crimp tool themselves. When you use quality lugs like those by FTZ they too have all the information clearly marked on them as well.
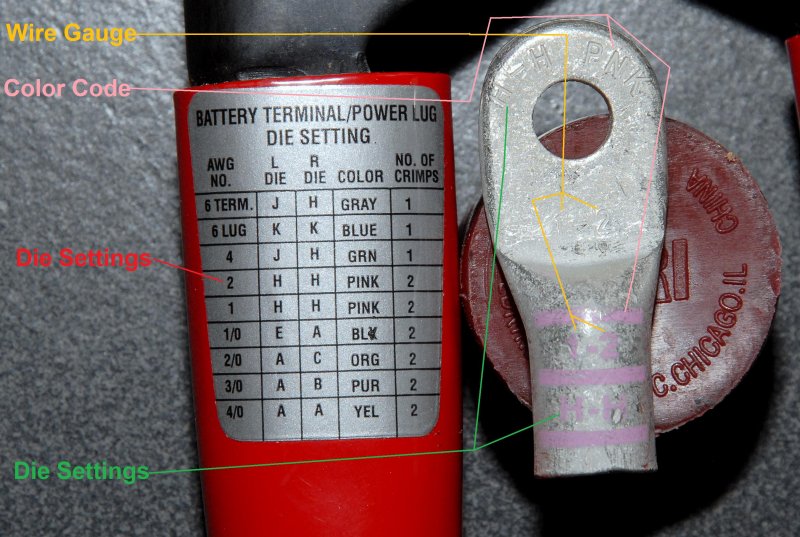
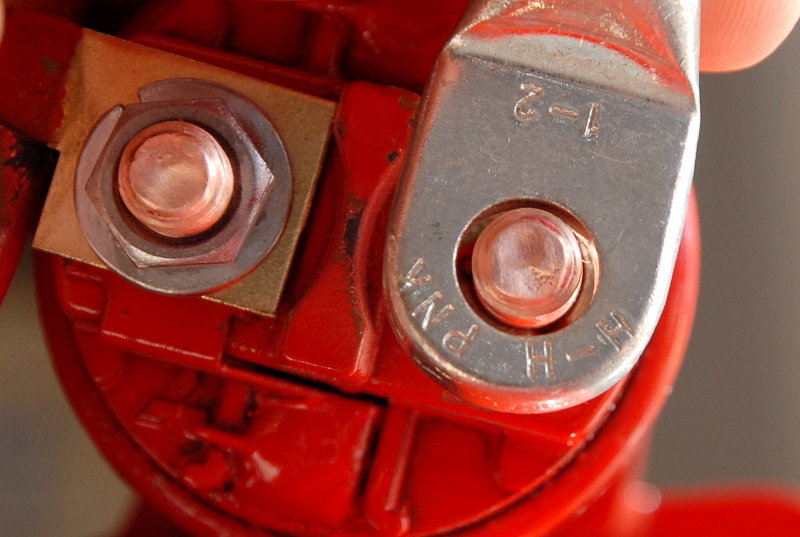
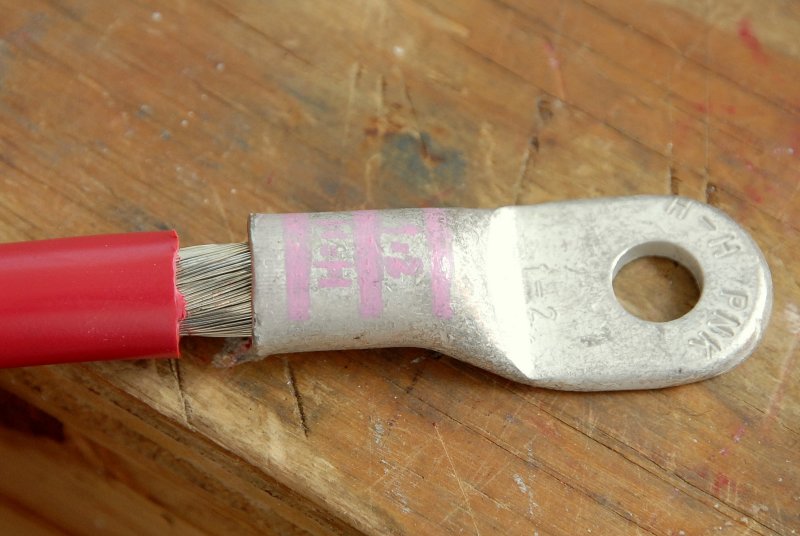
This FTZ Industries battery lug is industry standard pink color code for # 1 & 2 ga wire and is embossed with the letters H-H.
This H-H embossing tells you the correct dies to use when crimping with professional quality crimpers. The industry standard crimper for battery lugs is the AMP Rota-Crimp (LINK) tool. Unfortunately this tool costs well over $500.00. FTZ has their own tool, which is significantly less money, yet uses the same rotating die standard with the same letter codes as the AMP tool.
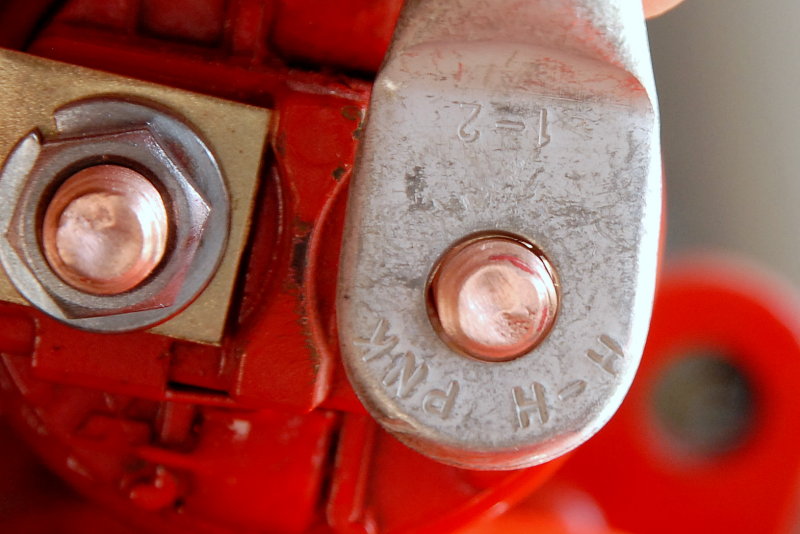
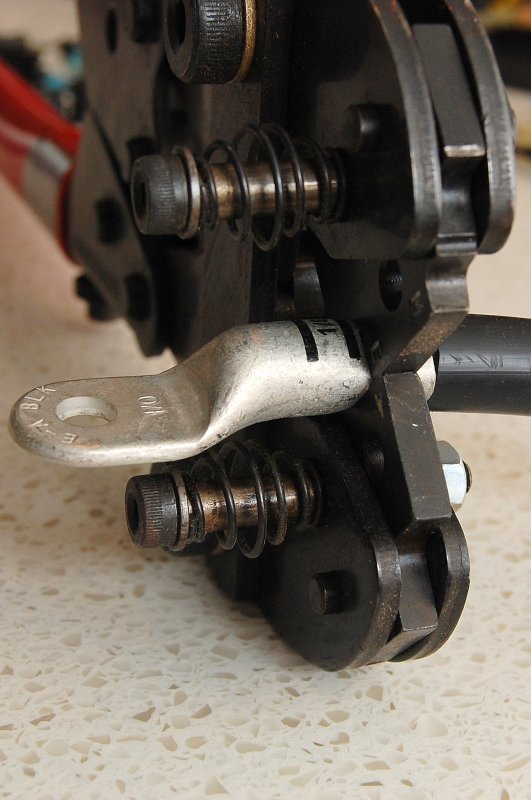
As you can see in the photo there are two positions separated by pink stripes where your crimp tool is to make two separate crimps. In the picture I am in the first crimp position..
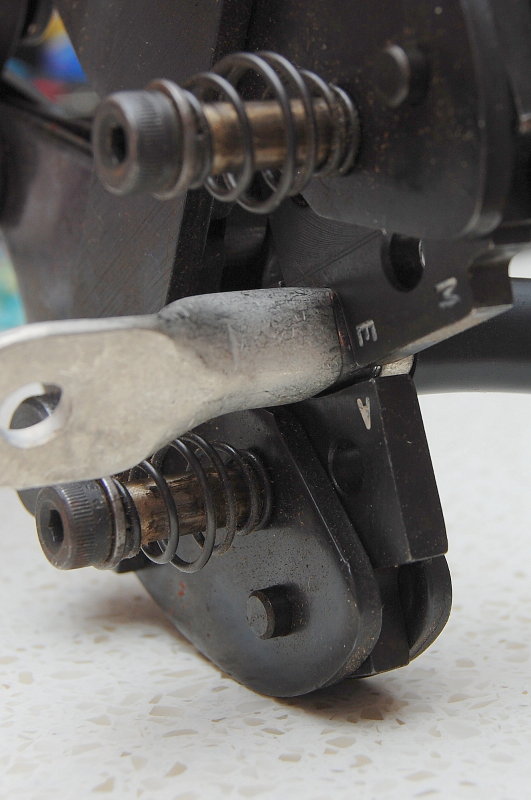
This image shows the actual crimp and the locations to crimp on the lug.
When heat shrinking battery cable it is always best to use an adhesive lined product designed for heavy duty use. By doing so you create a hermetically sealed connection that will allow no water or moisture to corrode or damage the crimped fitting.
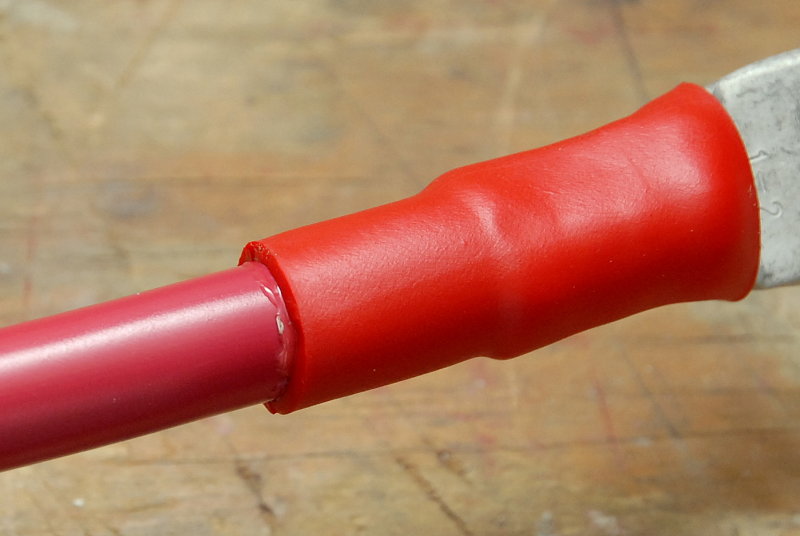
You also need to ensure that the adhesive melts out of the ends of the shrunk connection. If you do not see the glue leaking out, as you do in this photo, continue with your heat gun until you do. Remember heat evenly!
The finished product !

Good luck!!
Genuinedealz.com (LINK) will fabricate battery cables to your spec for $1.00 per crimp plus the wire and supplies. You can stop reading here if that is a route you are comfortable going. This is actually a very, very good deal.
For those of you who prefer the ability to do your own stuff, where & when you want please read on..
Battery cables are not mysterious nor difficult or complicated to make but considering the prices folks charge for pre-made and custom sizes you'd think you were buying a rocket booster tank for the Space Shuttle. There are some who even charge $14.00 per crimp + $6.00 to $14.00 per foot for battery cable depending upon the gauge...
In the last ten years I have owned many boats, too many. I don't plan to not be a sailor or boat anytime soon either. This is why I don't quibble over the cost of the proper tools for the job. Yes I paid about $150.00 for my battery crimpers but the cost per crimp that they have now done is under $0.35 per crimp at the face value I paid for them. If I were to have been paying someone locally to do these crimps, & make me cables, the cost I paid for them would have been eaten up in just one battery bank job. So if you figure I have re-wired at least seven different battery banks & boats with them they have been a lot more than free at this point.
I'll be perfectly honest here and say that I think the price for the Ancor hammer crimper pictured below is MUCH more offensive than the FTZ crimpers I own. If that Ancor tool sold for $15.00 it would be a good deal but it sells for $80.00 and that is Defender's price.
While the Ancor crimper makes an ok crimp it is not one I feel comfortable with personally so these instructions are based on the FTZ crimper. If you use the Ancor I do recommend using a vice to make the crimp with as opposed to a hammer, but this is not to say a hammer won't work.
Yes I own both the Ancor hammer crimper and the FTZ 94285. The FTZ 94285 makes a beautiful compression crimp that is very, very solid. A full 360 degree compression crimp makes a truly cold formed connection between the wire and the lug and that is why I use it.
As I always say tools are free if you DIY!
Genuinedealz.com (LINK) sells the FTZ 94285 crimper for $231.25. I am working on another source for tool this and will provide that info as soon as I have the details.
Edit: I found the source & part number:
K.L. Jack in Portland, ME is a local fastener wholesaler/distributor. They sell the FTZ crimper for 149.99. The K.L. Jack part number for this crimp tool is ET50116 and their phone number is 1-800-639-8805. They will ship anywhere..
Genuinedealz.com also sells a similar 2GA wire to what I used in this post for $2.31 per foot! Their marine wire is made by Pacer and mine by Berkshire but it is all made to the UL 1426 spec just as Ancor is..
I actually have another source for my wire but Genuinedealz.com is a very, very good deal. The money you save in wire alone, when compared to buying it from a chandlery, will nearly buy the good FTZ crimper!!
As of 3-01-09 chandlery pricing for 2GA battery cable per ft is:
2 GA Battery Cable
West Marine = $6.59
Defender = $6.99
Hamilton Marine = $6.03
Genuinedealz.com = $2.31(NOT Ancor)
On a 30 feet of battery cable that is roughly a $140.00 dollar savings alone.
When you figure that an Ancor hammer crimper would cost you nearly $80.00 and the cost savings in battery cable from Genuinedealz.com is so HUGE that the high quality crimper is nearly no additional expense.
This is man math at its best. Do not run this scenario by your spouse.. Plus you can always split the crimper with a buddy or sell it here when you are done with it! Remember these cables run the highest amperage's on your boat.
This battery lug is the wrong size for this starter terminal post and is too big.
This lug is the correct size for this stud. You should strive to use the proper size lug for the terminal post..
Not all battery lugs are created equal. The one on the left was purchased at an auto parts store and is cheap, thin & un-tinned copper. The lug on the right is made by FTZ Industries, generally higher quality than Ancor, and is thick tin plated copper. This FTZ lug is a solid connector with no voids what so ever.
In just this one photo we have; non adhesive lined heat shrink, non-tinned wire, wire stranding for battery cable that does not meet the UL Marine spec for number of strands, oxidation already beginning, too much exposed copper from the wire stripping and a rather poorly executed hammer type crimp.
While this fitting did and does work the question would be for how long, and when, not if, would it have let you down? It should be noted that this cable was only two seasons old, located in a very dry area of the vessel and yet already beginning to oxidize
To strip the battery cable simply close the wire cutters around the jacket and make a circle. Do not press to hard or you will damage wire strands. If you look closely you can see that none of them have been cut. There are many ways to strip battery cable I just find this one, with a little practice, to be the quickest and easiest.
My only suggestion here is to use proper wire cutters similar to the ones pictured. In this photo I've chosen to use my Klein High-Leverage Cable Cutter's Part No. 63050. They cost about $20.00 at Home Depot. Chanel-Lock also makes a set that are slightly less money but nowhere near as accurate. Klein Tools are fairly high quality and will hold an edge for a long time when compared to products like Chanel Lock. The right tool, for the right job, is always well worth the expense!
Using a set of Diagonal Cut Pliers or "Dykes" as they are normally called will not make as clean or as nice a cut, or strip, as a good set of cable cutters will.
This is an incorrect fit. In this photo I have stripped the wire and inserted it until it bottomed out in the lug. It's always easier to strip off more than you need and then cut to length. I went a little overboard here for illustrative purposes..
Here I have trimmed some of the wire off, with my Klein cutters, and re-inserted it. The fit is now ready to be crimped
This is more of a good tip than anything. Depending upon your battery lug and wire size a 3/4 inch adhesive lined heat shrink tube may not fit over the crimped lug. Simply install it over the wire before you make the crimp. I usually cut my heat shrink to about two inches long.
This is the head of the FTZ lug crimper. As you can see it compresses the lug in a circumferential manner (360 degrees) making the entire lug smaller and creating a true cold formed connection between wire and lug. Proper crimps lead to little to no resistance. A poor crimp can be a point of resistance and heat generation.
You can see the die heads have letters marking them. Each of these heads rotates and there are dies for many sizes of lugs.
Industry standardized crimpers like the Amp Rota-Crimp and the FTZ have the die settings and the number of crimps required stamped on the crimp tool themselves. When you use quality lugs like those by FTZ they too have all the information clearly marked on them as well.
This FTZ Industries battery lug is industry standard pink color code for # 1 & 2 ga wire and is embossed with the letters H-H.
This H-H embossing tells you the correct dies to use when crimping with professional quality crimpers. The industry standard crimper for battery lugs is the AMP Rota-Crimp (LINK) tool. Unfortunately this tool costs well over $500.00. FTZ has their own tool, which is significantly less money, yet uses the same rotating die standard with the same letter codes as the AMP tool.
As you can see in the photo there are two positions separated by pink stripes where your crimp tool is to make two separate crimps. In the picture I am in the first crimp position..
This image shows the actual crimp and the locations to crimp on the lug.
When heat shrinking battery cable it is always best to use an adhesive lined product designed for heavy duty use. By doing so you create a hermetically sealed connection that will allow no water or moisture to corrode or damage the crimped fitting.
You also need to ensure that the adhesive melts out of the ends of the shrunk connection. If you do not see the glue leaking out, as you do in this photo, continue with your heat gun until you do. Remember heat evenly!
The finished product !
Good luck!!

