Repairing Hunter 40 damage from Hurricane Matthew

Apr 5, 2009
2,785
Catalina '88 C30 tr/bs Oak Harbor, WA
Odds & ends, Pt. VII:

A generous application of anti-seize and - voila!

Cheers,

Mark
Now that you are starting to reassemble the bits, what are you useing for your dissimilar metal components. 6-7 years ago I replaced all of my standing rigging and while at it, I stripped and repainted my mast. At that time I was introduced to Marlube TEF 45 for bimetal isolation. It has been working great for me. MareLube TEF 45
You should also put a dielectric tape on the surface between the fixture and base to furtare isolate it. dielectric tape
I didn't have this tape so I used 3M preservation tape on the mating surface of all SS fixtures before I attached them. So far, I am very happy with the results with only one paint bubble that I know of.
 
  • Like
Likes: limbodog
May 8, 2013
629
Hunter 40 Dataw Island, SC
Now that you are starting to reassemble the bits, what are you useing for your dissimilar metal components. 6-7 years ago I replaced all of my standing rigging and while at it, I stripped and repainted my mast. At that time I was introduced to Marlube TEF 45 for bimetal isolation. It has been working great for me. MareLube TEF 45
You should also put a dielectric tape on the surface between the fixture and base to furtare isolate it. dielectric tape
I didn't have this tape so I used 3M preservation tape on the mating surface of all SS fixtures before I attached them. So far, I am very happy with the results with only one paint bubble that I know of.
You know that E2000 epoxy paint is available in white
I have been using regular Permatex anti-seize but will research both of these choices. Thanks guys! :)
 
  • Like
Likes: limbodog
May 8, 2013
629
Hunter 40 Dataw Island, SC
Odds & Ends, Pt. XIII:

Here's a close-up of the corner-round detail:


Disclaimer! This particular corner is not a 90! It's supposed to look like this, I promise :biggrin:

As you can see I doubled up the ends of the cabinet face. I have found that with 3/4" ply I can add the pocket holes and have adequate spacing and depth for good clamping force with the screws into the corner piece. When I use 1/2" ply though, there just isn't enough material for the screws to get a good bite. The best solution I found is to add material. I glue and screw an additional 3/4 x 1/2 ply doubler and it does the trick.

More odds & ends: I built up the door jams for the aft head entry:


Although the angles don't show up well in this photo, this area was kinda weird to figure out since the door closes at a 45 (-ish!) to each bulkhead. I had the old pieces to use as patterns (sort of) but it did take some headscratching to figure out how to replicate these - and at the same time improving the setup!

It may seem to be an out-of-sequence detail to be adding right now but I needed these pieces in place to move forward on a few items to be added soon in this area. Now all I have to do is remember where I put my plug cutter set so I can cover the screw holes and permanently install the jams!

Cheers,

Mark
 
May 8, 2013
629
Hunter 40 Dataw Island, SC
Aft lockers & admiral's perch:

Continuing with the work on the port-side aft cabinetry:


Finished the hanging locker. The eagle-eyed among you (that's pretty much all you guys!) will see a blue smudgy looking thingy on the upper corner - this is an ink stamp on the ply that all the sheets have. It sands off:


The storage locker is framed up and the openings are done. I still need to finish the cabinet top though, and add shelves.

Seat base corner detail done:


I've also been working on cutting the openings into some of the various cabinets in other areas. So far I have been able to reuse my templates several times! That will make building the doors much easier when the time comes :thumbup:

Stay tuned for the next post - I have another project that's been on the long-term to-do list that is coming up!

Cheers,

Mark
 
May 8, 2013
629
Hunter 40 Dataw Island, SC
Next big project:

It's raining! Inside. Harder than it is outside :yikes:

I have a leak. Well, to be honest, it's not a new leak, it's been a thorn in my side since forever. The companionway hatch has always leaked, varying from a mild annoyance to a waterfall-esque deluge. It currently is the waterfall and all stems from the basic design:


The hatch (#1) is 3/8" acrylic which is captured and slides in an aluminum extrusion (#2) which has a fiberglass cover (an arm molded into the big hatch cover). The extrusion is screwed to the deck and extends forward underneath the cover the length of the opened hatch. All good so far except that over time the groove in the extrusion traps leaves, dirt and debris. This is made worse because the fiberglass arm covers, where they terminate at the aft end (#3) are closed so there is no way for water to drain, thus making the trapped dirt and debris even worse. The arm ends also capture the hatch so it will not slide out the aft stops. To make things even worse the hatch cover is open to the elements, with openings at each side that run completely through for the halyard runs. So there is no way to seal up the area under the hatch cover.

I have removed the hatch cover several time over the years to clean everything underneath and try to fix the basic problem of debris buildup but - tweaks to a poor basic design will never fix the problem of - a poor basic design :huh:. The problem is made even worse by two additional elements - the deck forward of the (closed) hatch is flat, which allows water and debris to collect there, and over time the hatch has developed a sag which allows water to pool on the hatch itself when it rains.

So what to do? I have had this repair/redesign on the long-term list for a while but I was below during the rainstorm we got here a few days ago and I swear water was pouring in faster with the hatch closed than if the hatch was open! The hatch needs some fixing now instead of later since I'm really concentrating on getting the interior done.

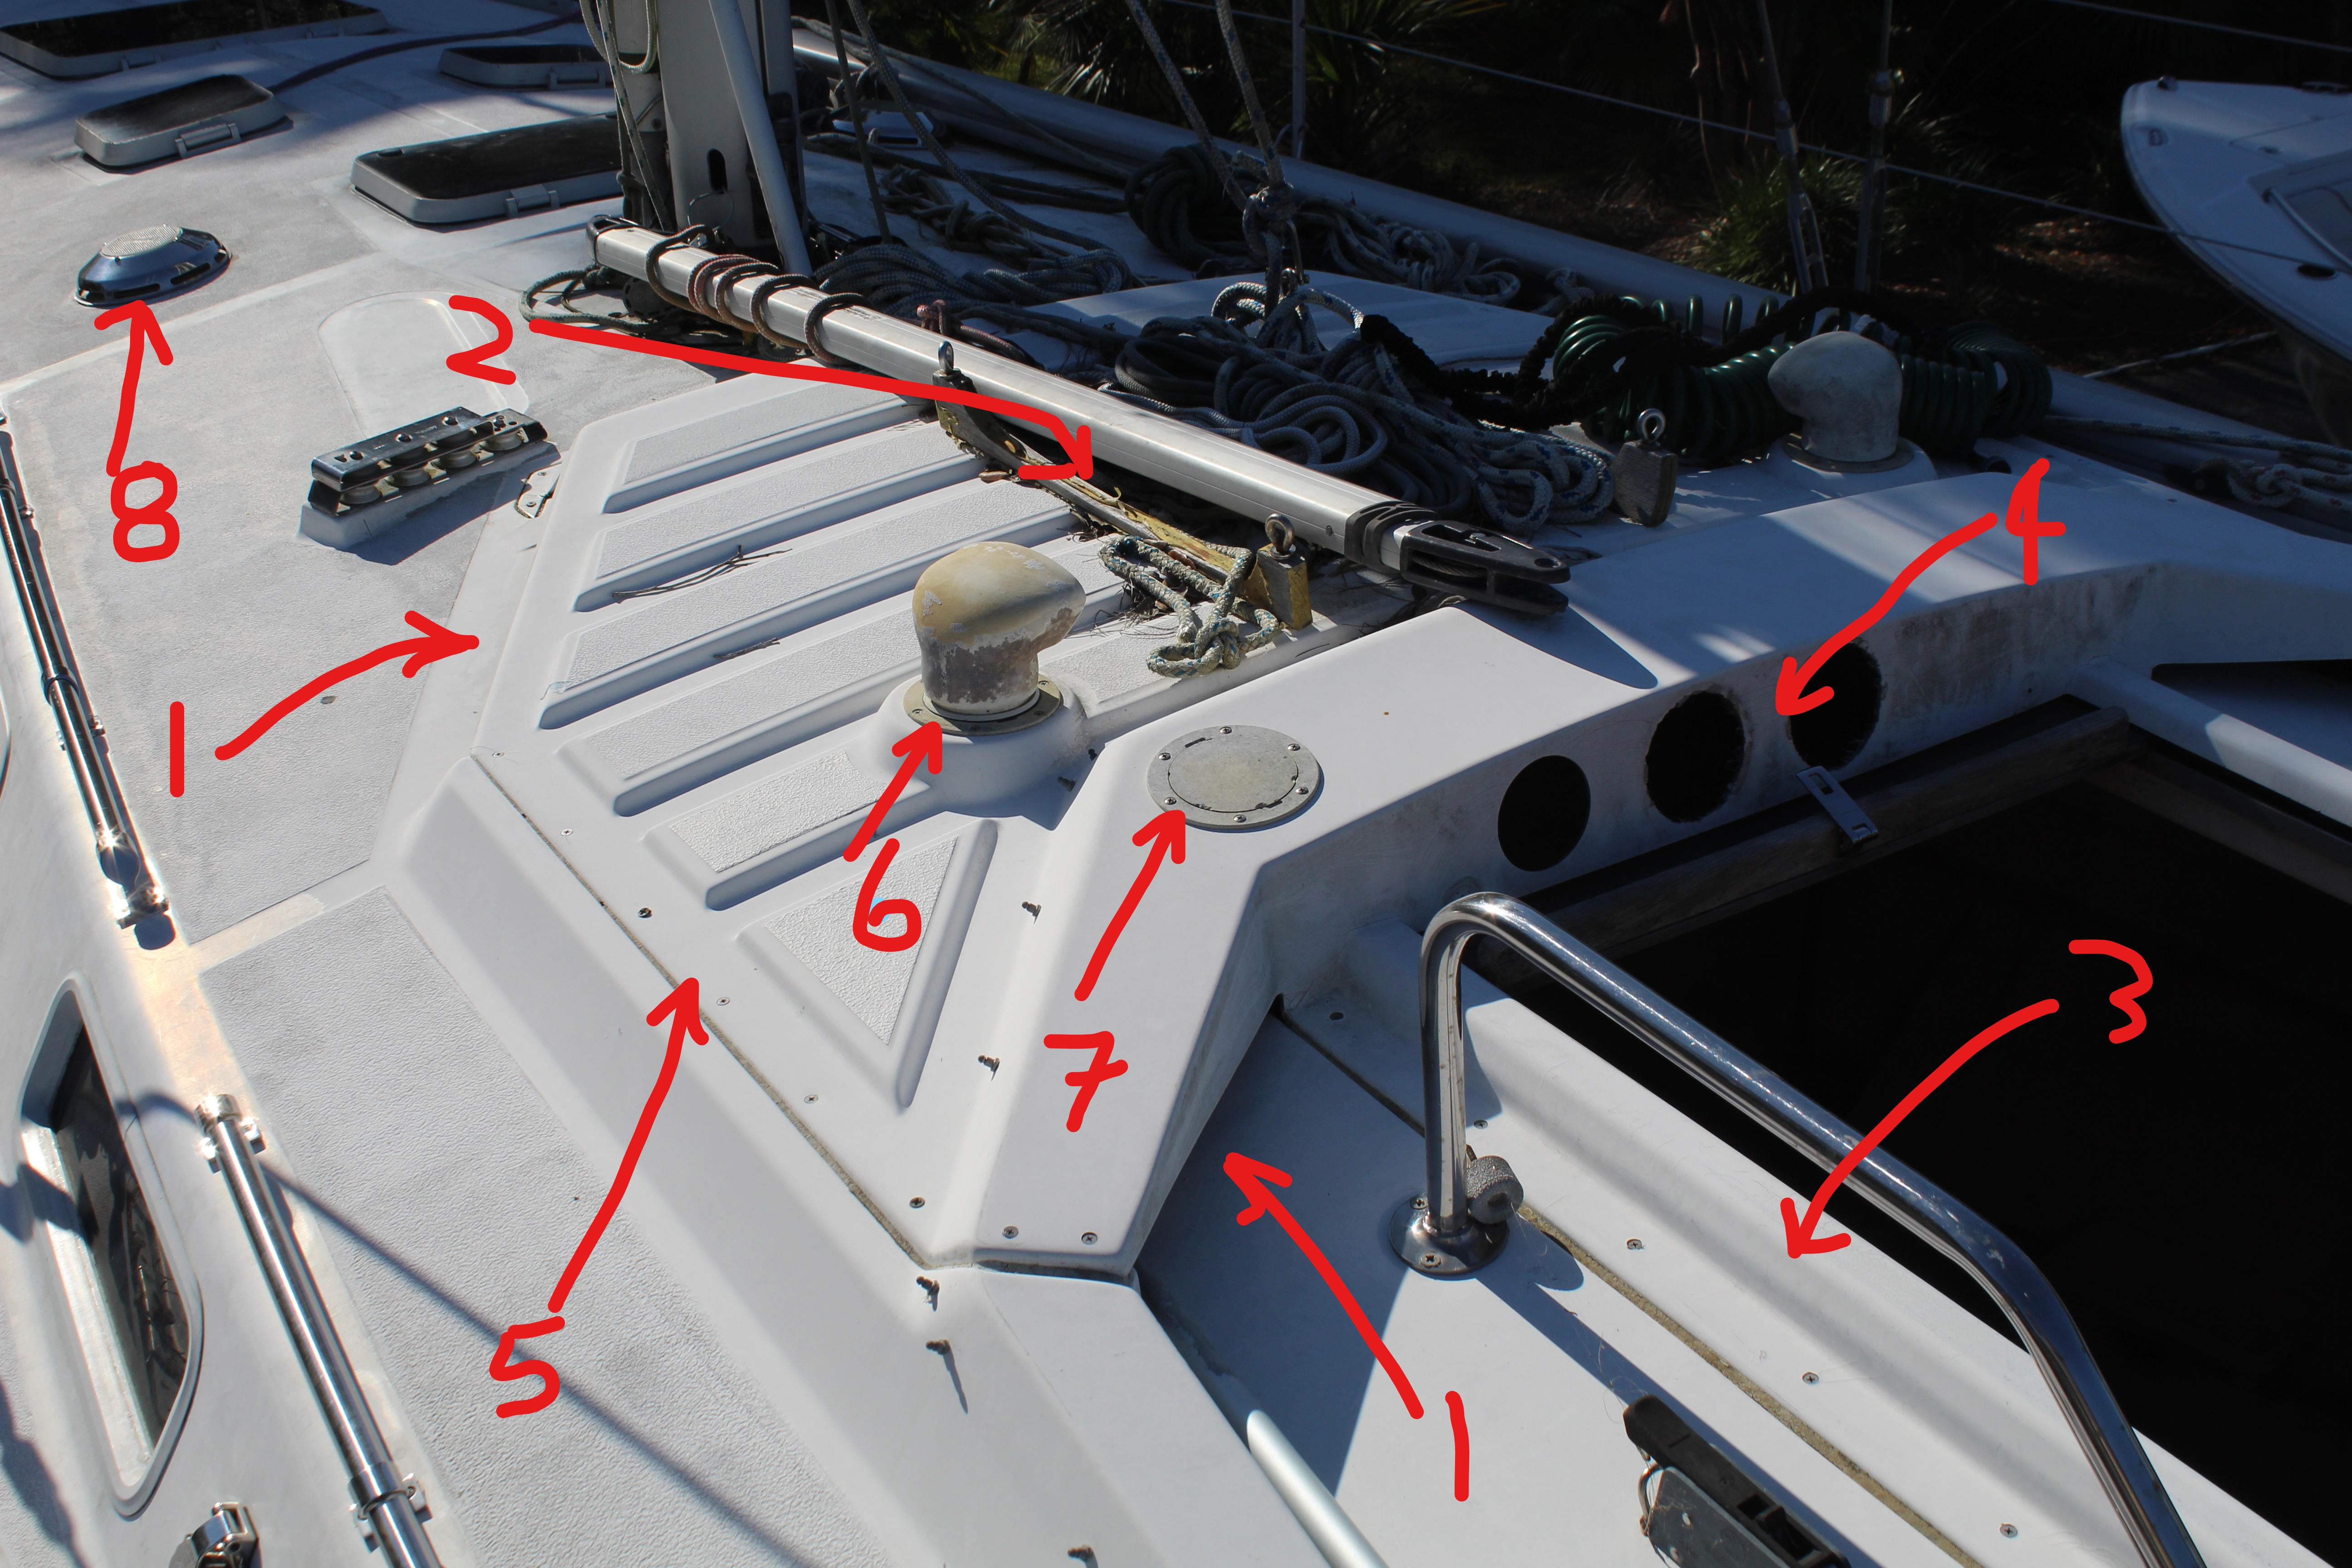
Fixing the hatch itself only cures half of the problem - the hatch cover is the real problem. It's screwed to the deck and is big, heavy and bulky so removing it routinely to clean underneath is not an option so I have to deal with the hatch cover as part of the fix.So here's the hatch highlighted with concern areas:


1: openings fore and aft for the halyard runs, biggest entry area for debris.
2: The area under the hatch cover is totally open with about 3 or 4 inches clearance to the deck but with no real way to access this area.
3: The integrated hatch arm covers.
4: Old area for sailing instruments. No longer needed.
5: Attachment points around the perimeter for the cover. All these screw holes are in bad shape and need lots of fixing.
6: Dorades - I can't really figure out how these are supposed to work. based on my (admittedly limited) knowledge of how a dorade is supposed to work vs. this setup.
7: No clue why there is a deck plate here!
8: These Nico vents for the cabin haven't worked in years, so I have to replace them with something. Maybe build a dorade here?

Overall the hatch cover, were I to refurbish it in it's present form, would need a ton of rehab to get it back into good shape so I'm thinking maybe a redesign of the hatch cover in conjunction with remaking the hatch itself might be the answer. To add a complication into the mix I have to integrate a dodger as well.

I'm mulling over several ideas but any thoughts from you guys?

Cheers,

Mark
 
  • Like
Likes: limbodog
Sep 20, 2014
1,320
Rob Legg RL24 Chain O'Lakes
I can think of something for #1. Find some conveyor belt material. Cut it about 5 inches tall and the width of the opening. Then slit the edge so it has like fingers hanging down. You may need a few layers so you can off set the fingers. But that should help keep a lot of the dirt out.
 
Oct 19, 2017
7,745
O'Day 19 Littleton, NH
My first impression is, that hatchway was designed to sport a dodger.
With all the other points of concern you've pointed to in your photo, it is a daunting engineering task.

-Will (Dragonfly)
 
  • Like
Likes: limbodog
Oct 29, 2016
1,915
Hunter 41 DS Port Huron
My first impression is, that hatchway was designed to sport a dodger.
With all the other points of concern you've pointed to in your photo, it is a daunting engineering task.

-Will (Dragonfly)
I believe you have identified a critical point, our Sapphire has a similar design without the line channels (not as wide), the dodger is always there and I have none of the mentioned issues. In fact I am thinking about building a more permanent dodger than the current canvas and vision panels.
Although you can see the attachment points for the dodger which really would not address the dirt in the line channels that is for certain.
 
  • Like
Likes: limbodog
May 8, 2013
629
Hunter 40 Dataw Island, SC
I can think of something for #1. Find some conveyor belt material. Cut it about 5 inches tall and the width of the opening. Then slit the edge so it has like fingers hanging down. You may need a few layers so you can off set the fingers. But that should help keep a lot of the dirt out.
I thought about that but I'd have to do it on both ends since even with the dodger the channels will be open to debris entry. And it doesn't hit any of the other problems with the whole setup. This would be a good step in the process if I decide to keep things as they are but just refurbish the parts & pieces.
 
  • Like
Likes: limbodog
May 8, 2013
629
Hunter 40 Dataw Island, SC
I believe you have identified a critical point, our Sapphire has a similar design without the line channels (not as wide), the dodger is always there and I have none of the mentioned issues. In fact I am thinking about building a more permanent dodger than the current canvas and vision panels.
Although you can see the attachment points for the dodger which really would not address the dirt in the line channels that is for certain.
Yep, there are dodger attachment points and I have the (assumed) factory dodger. There is, however, a big problem with the factory setup. With the dodger in place the entryway is reduced to a crawlspace! The high bridge deck, though great for some things, does cause entry issues when the dodger is incorporated. Even with the dodger in place the debris still enters from the open halyard channels and collects under the cover. See my next post, I have pictures!
 
May 8, 2013
629
Hunter 40 Dataw Island, SC
The companionway saga begins:

Yesterday and today I got started removing the hatch cover and scoping things out underneath. First thing was to cut the hatch arm cover thingys so they could be removed before the full cover:


You can see how leaves and gook and stuff is trapped in the channel and builds up at the end. The covers have no provision for draining this area.

After that I worked on getting the cover itself off. Man that thing is big, heavy and cumbersome! Under it I found this:


I then spent several hours cleaning things up, scraping off several pounds (not kidding!) of butyl compound - or plumbers putty - and 5200. Then I sat down and just looked things over and mulled over several options. The primary end result obviously is to end the waterfall inside but an equally important goal is to incorporate a functional dodger. The laundry list of other fixes will be looked at as well. So far I've come up with:

1. Clean everything up, refurbish the hatch cover and hatch and leave things be. Live with the dodgy dodger situation. I'm not liking this option.
2. Clean everything up, refurbish the hatch cover, cover the halyard runs, replace the hatch and modify the ends so water and debris can run out or be flushed. Modify the existing canvas dodger setup by incorporating a cutout so we can stand up while entering and exiting. My canvas guy does NOT like this option - he says it would make his life hell trying to make it work!
3. Same as 2 but build a hard dodger to fit the existing location. This addresses some shortcomings but I would still have dorades that don't dorade and the hatch itself would still be subject to sagging if I replace it with the same 3/8th acrylic.
4. Same as 2 and 3 but redesign the hatch itself to incorporate a slight dome to allow water to run off and modify the hatch cover to fit. This fixes most of the problems but is not a complete solution.
5. Now for the crazy idea: Build a permanent upper deck enclosure, box in the halyard runs, eliminate the current hatch completely and redesign the aft section to incorporate the hatch into the upper deck and close the entry area with doors instead of the current lift-out board. I would also build new dorades over the current forward vent openings.

Has anyone figured out I'm a glutton for punishment?

Cheers,

Mark
 
Last edited:

DArcy

.
Feb 11, 2017
1,703
Islander Freeport 36 Ottawa
Or maybe just make a hatch cover similar to many other boats - no arms, no halyard covers, or maybe just very thin halyard covers so you have something to fasten a dodger to over the halyards.
Just enough to cover the hatch when closed.
 
Oct 19, 2017
7,745
O'Day 19 Littleton, NH
I like your thoughts around #5, but why box in the halyard runs? I see there is that funky deck structure that originally boxed them in. I just think it's extra complexity for more headache than benefit.
A suggestion to consider. Get a 1/2" piece of Lexan, formed in a shallow arch over the forward opening to cover all the upper exposed areas, leaving an opening big enough for comfortable use of the companionway. Then put whatever dodger (hard or soft) over the open area and replace the sliding hatch with another piece of Lexan. You get a great skylight area and waterproofing with no where to trap leaves except under the dodger where you can easily clean them out.

Good luck and have fun.

-Will (Dragonfly)
 
  • Like
Likes: limbodog
Apr 5, 2009
2,785
Catalina '88 C30 tr/bs Oak Harbor, WA
I have never understood some boat designers fascination with enclosed line runs. It seems like more hassle than it is worth. Good luck on the redesign.
 
May 8, 2013
629
Hunter 40 Dataw Island, SC
Or maybe just make a hatch cover similar to many other boats - no arms, no halyard covers, or maybe just very thin halyard covers so you have something to fasten a dodger to over the halyards.
Just enough to cover the hatch when closed.
I think there should be something covering the halyard runs because since they are running along the deck they pose a trip hazard. Pretty important for safety underway. This is the simplest solution but doesn't resolve the other issues, the biggy being a truly functional dodger.
 
  • Like
Likes: limbodog
May 8, 2013
629
Hunter 40 Dataw Island, SC
I like your thoughts around #5, but why box in the halyard runs? I see there is that funky deck structure that originally boxed them in. I just think it's extra complexity for more headache than benefit.
A suggestion to consider. Get a 1/2" piece of Lexan, formed in a shallow arch over the forward opening to cover all the upper exposed areas, leaving an opening big enough for comfortable use of the companionway. Then put whatever dodger (hard or soft) over the open area and replace the sliding hatch with another piece of Lexan. You get a great skylight area and waterproofing with no where to trap leaves except under the dodger where you can easily clean them out.

Good luck and have fun.

-Will (Dragonfly)
Trying to picture your idea - would the arched Lexan be basically a windshield? Interesting idea though I have no idea who could create a piece of curved Lexan that size. I talked to our local glass/acrylic shop a while ago about re[placing the sagging hatch with a curved piece of acrylic and the cost was astronomical for a piece 48 x 30.
 
  • Like
Likes: limbodog
May 8, 2013
629
Hunter 40 Dataw Island, SC
Odds & Ends, Pt. XXIV:

While I'm brainstorming the companionway/hatch/dodger dilemma I've also been catching up on odd & ends. Here's more:

After finishing both shower sumps I needed to run new discharge hoses so I fed an old piece of coax as a leader for the new hose. Worked great for the aft hose but I messed up on the forward. I didn't tape the coax to the new hose securely enough :yikes:. You can guess what happened next!Trying to feed the coax back through the channel and catching it on the bottom was a miserable fail so out with the endoscope:


I taped the scope to a long straightened coat hanger (two, actually), fired up the camera on the laptop and watched as I fed it through. There was one little area that caused the hangup before and with a little fishing:


The camera is the little lighted thingy - the lights make it so useful in dark scary places! Now all hoses in their proper place :thumbup:

Next up was a little work finishing up the bilge. Some may have noticed these big holes in the bilge walls:


In my zeal to close up all the old holes, why leave these? I actually cut those holes in purposefully, to add access plates:


Finally, time to permanently mount the new bilge pump. First off is locating it and the mounting holes:


It's always weird drilling into fresh finished surfaces and here there's an added bonus - if you drill too far you can ventilate the boat! So I used the depth of the glass I added to the sump bottom as my stopping point (I actually cheated; I knew I added 3/8" of glass to the bottom so I set the drill depth to 5/16":


I'm not a fan of using sheet metal screws threading into fiberglass in the bilge (it tends to tear the fibers) - I prefer machine screws. I had to modify one of my taps by grinding the end flat to get the thread depth deeper into the hole but in the end, success!


Of course, I forgot to take the batteries home to charge them so I couldn't hook up the pump :banghead:. Will test and make things functional today.

I did solicit opinions from a few of the cruisers at the marina and so far the consensus is - aside that I'm nuts! - full hard dodger/deck enclosure. As I've been looking at things going that way is the way to go. Now I have to let the idea percolate for a few days to plan it properly, order materials, etc. Today though I will remove the old hatch cover (leaving the hatch itself for now) and temporarily glass over and fill in the various holes. And there's a lot of them!

Cheers,

Mark
 

HMT2

.
Mar 20, 2014
899
Hunter 31 828 Shoreacres, TX
For what it’s worth I find these super helpful in pulling wires and messengers. Keep one at home and one on the boat.

Boeray 11' Fiberglass Running Electrical Wire Cable Pulling Fish Tape Kit with 5 Different Attachments and Fish Tape Tool in a Carrying Case https://www.amazon.com/dp/B07G9FNTLB/ref=cm_sw_r_cp_tai_PY5AEbKGHGQ4H

Edit: Actually this is the one I have.

Premium 33-Feet Fiberglass Fish Tape Cable Rods, Electrical Wire Running Pull/Push Kit | Fishing Feeder Pole Sticks Snake Tool for Coaxial Wall Wiring - Ram-Pro Premium 33-Feet Fiberglass Fish Tape Cable Rods, Electrical Wire Running Pull/Push Kit | Fishing Feeder Pole Sticks Snake Tool for Coaxial Wall Wiring - Ram-Pro - - Amazon.com