
Opinion on this sail trim
- Thread starter Ward H
- Start date

Ward you may have missed this; I sent it at the same time you last responded and it ended up before yours on the first page.
http://forums.sailboatowners.com/index.php?threads/opinion-on-this-sail-trim.177534/#post-1275985
http://forums.sailboatowners.com/index.php?threads/opinion-on-this-sail-trim.177534/#post-1275985

Jackdaw, thanks for the thorough set up process. Just what I need to get the wrinkles out.Ward you may have missed this; I sent it at the same time you last responded and it ended up before yours on the first page.
http://forums.sailboatowners.com/index.php?threads/opinion-on-this-sail-trim.177534/#post-1275985
A couple of comments:
1) To me, your main luff looks too TIGHT, except below the lower slower luff slider, where the luff is wrinkled. IMO that can only happen if the slider isn't sliding, either because it's just stuck or because the outhaul was too snug when the sail was hauled (so the slide can't slide). Address that.
2) I can't believe you need a halyard winch, especially if you know how to "sweat" a line (halyard) tight. If it's not tight enough when you pull it by hand (and again, most of it looks plenty tight, just not the bottom), then cleat it and grab the cleated halyard a yard or two a way from the cleat (up along the mast?) and pull it perpendicular to its length (like forward or aft). That will pull a bend in the halyard, which will tighten it with maybe a 10:1 mechanical advantage! With one hand, tighten the line in the cleat while taking line out of that bend. Rinse and repeat, "pumping" the halyard tighter and tighter until it's enough. (Don't rip the sail!) This great old trick will work with any cleat that works like a ratchet: a cam cleat, a clam cleat, even a simple horn cleat with a wrap around it but no knot while you're doing the "sweating". (BTW, be warned that you'll probably have to do this again later, to get the cleat to release.) I've never had a boat with clutches (just bought our first!), so I'm not sure how/if that works or if you need a 3rd hand or something.
3) For cruising and getting a good luff tension, a sliding boom should be able to do EVERYTHING a Cunningham does! Except win races. The only reason Cunninghams rule in racing (and sliders are Old School) is because the C let's you adjust luff tension while keeping the luff length at the class-legal maximum, from the top black band to the bottom one. That's it! By contrast, a slider makes the main luff (and area) smaller when you want more slack/draft, i.e. when the wind is light. For a cruiser that may mean you're 2 minutes late for dinner, but in a race that's huge. But the sail can't tell how you're pulling the bottom down! (And again, if you can't pull the boom down by hand, SWEAT it down, no blocks needed!)
BTW, if you Google "sweat a halyard" you'll find other descriptions, and maybe even videos.
1) To me, your main luff looks too TIGHT, except below the lower slower luff slider, where the luff is wrinkled. IMO that can only happen if the slider isn't sliding, either because it's just stuck or because the outhaul was too snug when the sail was hauled (so the slide can't slide). Address that.
2) I can't believe you need a halyard winch, especially if you know how to "sweat" a line (halyard) tight. If it's not tight enough when you pull it by hand (and again, most of it looks plenty tight, just not the bottom), then cleat it and grab the cleated halyard a yard or two a way from the cleat (up along the mast?) and pull it perpendicular to its length (like forward or aft). That will pull a bend in the halyard, which will tighten it with maybe a 10:1 mechanical advantage! With one hand, tighten the line in the cleat while taking line out of that bend. Rinse and repeat, "pumping" the halyard tighter and tighter until it's enough. (Don't rip the sail!) This great old trick will work with any cleat that works like a ratchet: a cam cleat, a clam cleat, even a simple horn cleat with a wrap around it but no knot while you're doing the "sweating". (BTW, be warned that you'll probably have to do this again later, to get the cleat to release.) I've never had a boat with clutches (just bought our first!), so I'm not sure how/if that works or if you need a 3rd hand or something.
3) For cruising and getting a good luff tension, a sliding boom should be able to do EVERYTHING a Cunningham does! Except win races. The only reason Cunninghams rule in racing (and sliders are Old School) is because the C let's you adjust luff tension while keeping the luff length at the class-legal maximum, from the top black band to the bottom one. That's it! By contrast, a slider makes the main luff (and area) smaller when you want more slack/draft, i.e. when the wind is light. For a cruiser that may mean you're 2 minutes late for dinner, but in a race that's huge. But the sail can't tell how you're pulling the bottom down! (And again, if you can't pull the boom down by hand, SWEAT it down, no blocks needed!)
BTW, if you Google "sweat a halyard" you'll find other descriptions, and maybe even videos.
Last edited:
I know I'm late to this discussion, but have you checked to make sure the rope sewn inside the luff hasn't shrunk with respect to the sail? I had this on a used 1991 Catalina 30. A rope had been sewn into the sail luff for the first ~15 feet up from the tack, anchoring the sail to the rope. Over time the had shrunk enough to cause horizontal wrinkles just like your picture, no matter how tight we got the halyard. Carol Haase of Port Townsend Sails coached me on a simple and completely effective repair. I laid the sail out flat, unstitched the rope, pulled the sail out flat, and restitched. The wrinkles were gone! You might check for this by examining the luff for a sewn-in rope.

It's hard to tell from your picture, but is the luff of the sail further away from the mast from the first slug down to the clew?? This would allow the very bottom of the sail to be pulled further aft along the boom than the rest of the sail from that first slug upwards. I had similar wrinkles in my main, and I got rid of them by wrapping a line through my Cunningham cringle and clew and around the mast to pull that part of the sail closer to the mast.

I think Jackdaw is on the right track. I noticed I could not haul in my halyard hard enough to get the wrinkles out of my sail (looked a lot like yours). Read somewhere to make sure ease the main sheet before raising the sail. Worked like a charm and no more wrinkles.While its possible for them to mean other things, groups of parallel wrinkles normally indicate a stretch of the sail in that direction.
So the first thing I would check is to make sure you are raising the sail correctly, and see if they exist then.
To do so, ease EVERYTHING, vang, outhaul, cunningham and mainsheet. The first job is to get the sail up and luff tight without other controls pulling against it. There is no way you are adding noticeable stretch by hand on that length of warpspeed, but that's never the issue anyway. What you need to be able to do is raise it tight enough so you take true slack out, so the sail pressure is pulling against taunt line. That way the halyard can do its job and resist stretch from the sail loading up.
Once you are up and tight, add outhaul to shape the foot. Then you can sheet, and add vang and cunningham as needed.
EDIT - OH I see you have a boom downhaul. That might be too low. That would also cause the wrinkles for the reasons noted above. Raise it a bit and set it permanently. Then use a cunningham. Boom downhauls were not a great idea back in the day, and less so now.
Greg
OK, time for an update.
I've read this thread several times, took notes and added a Cunningham. Now, I don't get to play with a full main often. We've had good winds so I've only sailed without a reef 3 times in 14 day sails this year and only two could I really play with different trim methods.
While the Cunningham definitely helped, the post by THECUSCUS pointed me to what I think is the real problem.
The sailmaker did not cut the tack with the proper offset.
They also forgot to put the O'day insignia on the sail as requested. They sent me two when I called them about it so I laid the new sail over the old one to get the proper placement. Looking at them I noticed that the tack on the old sail was cut angled away from the mast from the bottom sail slug to the tack cringle. The new sail had less sail slugs and had a square cut tack.
When I installed the sail I flipped the gooseneck slide so the ring on the slide used to pull the gooseneck down was now on top. I then shackled the tack cringle to this ring which held the tack closer to the mast. This helped but not enough. Also I found that the cunningham, which I had run down to a block on the port side of the mast organizer pulled the tack to port instead of straight down. I moved it to a center point and it worked better.
I then tried using a long D shackle to shackle the tack cringle to the ring. I also lashed the tack and shackle to the mast to keep it close. I re read JackDaw's instructions for raising the main and noticed that even though the outhaul line was loose, the clew strap was so tight it didn't really loosen up. I fixed that. I also checked the slugs and they slid easily.
This time I was able to get a good taught luff when raising the main.
The outhaul still pulled the tack away from the mast a little but the wrinkle was much reduced. After a bit the bottom of the luff did loosen a bit so the Cunningham worked to tighten that. Not sure why the luff loosened. Maybe the line slipped in the clutch? I don't think I can be sure until the tack angle is fixed.
I called the sailmaker and he said it was strange that an offset was needed on a small boat but to measure how far aft the tack pin was from the aft edge of the mast. He suggested just what I had done, to try lashing the cringle to the mast for the season and send it back to be fixed in the off season. I didn't push why they didn't know it needed an offset since they supposedly were building it to O'day 25 specs except for the options of a loose foot and 2 x 2 batten setup. Lesson learned there.
I'll also have them install a Cunningham cringle.
I wouldn't have figured all of this out without the help from you guys so much appreciated.
Photo 1- The original sail where you can see the tack angles aft from the mast.

Photo 2- A close up of the gooseneck and shackle holding the tack forward more than the pin would.

Photo 3 - Some improvement to the wrinkle and the Cunningham really helped.

Photo 4 - I tried a long D ring and lashing to hold the tack closer to the mast.

Photo 5 - Big improvement in reducing the wrinkle.

I've read this thread several times, took notes and added a Cunningham. Now, I don't get to play with a full main often. We've had good winds so I've only sailed without a reef 3 times in 14 day sails this year and only two could I really play with different trim methods.
While the Cunningham definitely helped, the post by THECUSCUS pointed me to what I think is the real problem.
The sailmaker did not cut the tack with the proper offset.
They also forgot to put the O'day insignia on the sail as requested. They sent me two when I called them about it so I laid the new sail over the old one to get the proper placement. Looking at them I noticed that the tack on the old sail was cut angled away from the mast from the bottom sail slug to the tack cringle. The new sail had less sail slugs and had a square cut tack.
When I installed the sail I flipped the gooseneck slide so the ring on the slide used to pull the gooseneck down was now on top. I then shackled the tack cringle to this ring which held the tack closer to the mast. This helped but not enough. Also I found that the cunningham, which I had run down to a block on the port side of the mast organizer pulled the tack to port instead of straight down. I moved it to a center point and it worked better.
I then tried using a long D shackle to shackle the tack cringle to the ring. I also lashed the tack and shackle to the mast to keep it close. I re read JackDaw's instructions for raising the main and noticed that even though the outhaul line was loose, the clew strap was so tight it didn't really loosen up. I fixed that. I also checked the slugs and they slid easily.
This time I was able to get a good taught luff when raising the main.
The outhaul still pulled the tack away from the mast a little but the wrinkle was much reduced. After a bit the bottom of the luff did loosen a bit so the Cunningham worked to tighten that. Not sure why the luff loosened. Maybe the line slipped in the clutch? I don't think I can be sure until the tack angle is fixed.
I called the sailmaker and he said it was strange that an offset was needed on a small boat but to measure how far aft the tack pin was from the aft edge of the mast. He suggested just what I had done, to try lashing the cringle to the mast for the season and send it back to be fixed in the off season. I didn't push why they didn't know it needed an offset since they supposedly were building it to O'day 25 specs except for the options of a loose foot and 2 x 2 batten setup. Lesson learned there.
I'll also have them install a Cunningham cringle.
I wouldn't have figured all of this out without the help from you guys so much appreciated.
Photo 1- The original sail where you can see the tack angles aft from the mast.
Photo 2- A close up of the gooseneck and shackle holding the tack forward more than the pin would.
Photo 3 - Some improvement to the wrinkle and the Cunningham really helped.
Photo 4 - I tried a long D ring and lashing to hold the tack closer to the mast.
Photo 5 - Big improvement in reducing the wrinkle.

Hello Ward,
Hope to see you soon. I was at the marina a few nights ago to drop off my new water tank and the wind was very pleasant. I should have gone for an evening sail, but I didn't.
I find it odd that the tack seems to have been unsecured based on the original set-up. Why wouldn't there be a fitting at the gooseneck to secure the tack properly close to the mast? Your idea to reverse the gooseneck so that you could secure the tack to the ring is a start. In the end, it sounds like you should secure your gooseneck. Then why not permanently secure a fitting at the correct position on the mast to secure the tack at the base of the gooseneck? (And then turn your gooseneck back around to get the ring out of the way)
If you do that, I think there is no reason to change the cut of your sail. To me, it seems like the sailmaker set the tack correctly but the problem lies in the lack of proper fittings at the gooseneck. Alternatively, you might change out your gooseneck if you intend to fix it in place, anyway.
I understand that he probably should have been familiar with the original design, but it seems like the original design wasn't so hot. I don't think I like the tack being angled away from the mast like that (I can't see the purpose or the benefit). That's just my way of thinking!
Just a later thought ... I suppose that the loose tack is purposeful because the boom height is adjustable.
Hope to see you soon. I was at the marina a few nights ago to drop off my new water tank and the wind was very pleasant. I should have gone for an evening sail, but I didn't.
I find it odd that the tack seems to have been unsecured based on the original set-up. Why wouldn't there be a fitting at the gooseneck to secure the tack properly close to the mast? Your idea to reverse the gooseneck so that you could secure the tack to the ring is a start. In the end, it sounds like you should secure your gooseneck. Then why not permanently secure a fitting at the correct position on the mast to secure the tack at the base of the gooseneck? (And then turn your gooseneck back around to get the ring out of the way)
If you do that, I think there is no reason to change the cut of your sail. To me, it seems like the sailmaker set the tack correctly but the problem lies in the lack of proper fittings at the gooseneck. Alternatively, you might change out your gooseneck if you intend to fix it in place, anyway.
I understand that he probably should have been familiar with the original design, but it seems like the original design wasn't so hot. I don't think I like the tack being angled away from the mast like that (I can't see the purpose or the benefit). That's just my way of thinking!
Just a later thought ... I suppose that the loose tack is purposeful because the boom height is adjustable.
Hey Scott,
Yes, I think the hardware for the sliding boom is partly responsible for the larger than normal offset of the tack pin.
I've been looking for a way to pin the tack cringle closer to the mast without the shackles and lashings. Maybe I need to look on the Kenyon website. Maybe a new boom end / gooseneck would be a better solution.
I have some time to play with things before getting the sail recut.
We hope to sail Sat, Sun and Mon this weekend. hope to see you guys.
Yes, I think the hardware for the sliding boom is partly responsible for the larger than normal offset of the tack pin.
I've been looking for a way to pin the tack cringle closer to the mast without the shackles and lashings. Maybe I need to look on the Kenyon website. Maybe a new boom end / gooseneck would be a better solution.
I have some time to play with things before getting the sail recut.
We hope to sail Sat, Sun and Mon this weekend. hope to see you guys.
Hey Scott,
Using google I got an idea for a bracket that will put the tack pin very close to the mast and keep the luff in a straight line. I made a mock up this past weekend and it worked very well. I got some SS metal coming from McMaster and should be able to make it up for this weekend.
See at the dock.
Using google I got an idea for a bracket that will put the tack pin very close to the mast and keep the luff in a straight line. I made a mock up this past weekend and it worked very well. I got some SS metal coming from McMaster and should be able to make it up for this weekend.
See at the dock.
Thanks to @Scott T-Bird suggestion and a comment from @DrJudyB, I solved the problem of not having enough tack offset on my new main sail without having the sail recut. (if you didn't read all of my posts, Judy wasn't the one who made my sail. She did answer some questions and explained how important it was to get ALL measurements when taking an order for a new sail. She will get my next order)
I did some searching on Judy's sites as well as studying general pictures of goosenecks found by google.
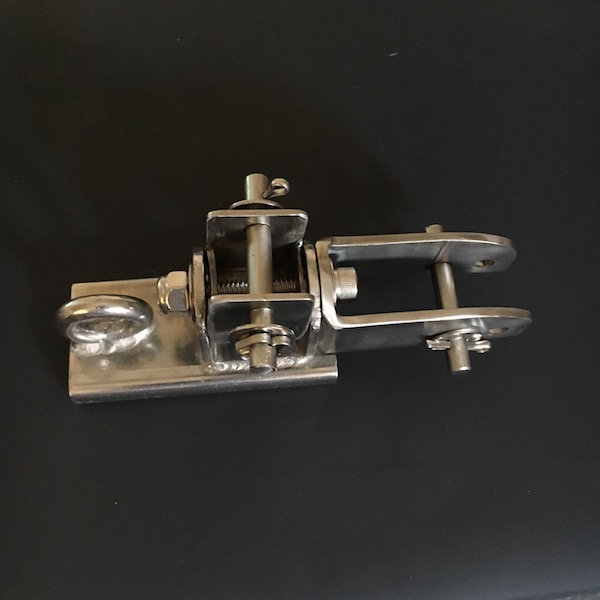
I then made this U shaped bracket (pic 1) for the tack pin and bolted it to the gooseneck slide. I also made my own clevis pins as I couldn't (easily) find the sizes I needed. I soaked the old and new parts in Spotless Stainless to clean and passivate the SS. Main Sail had recommended Spotless Stainless and explained how it passivated the metal to prevent rust staining. It worked on other hardware I cleaned up so I did it to these parts.
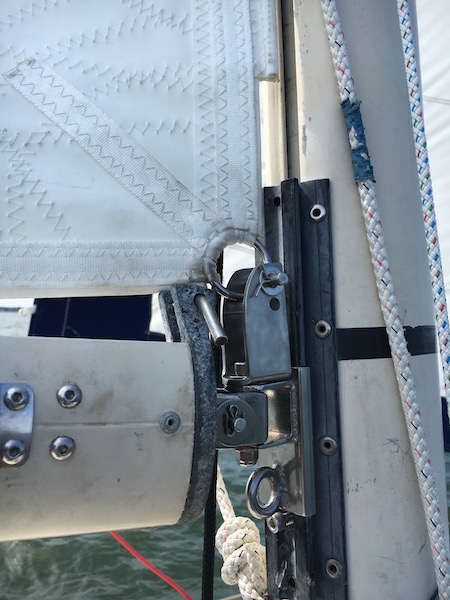
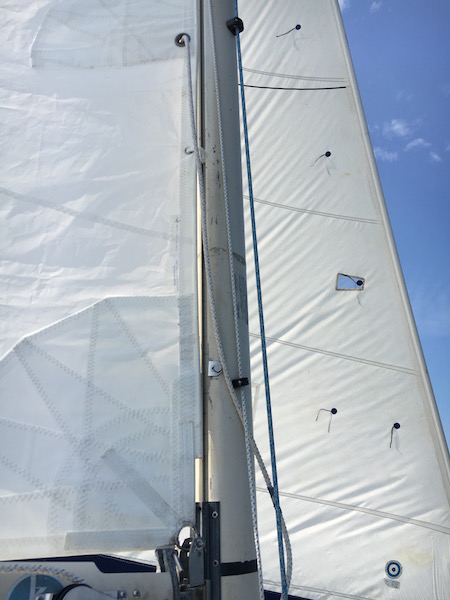
The new tack pin position holds the luff in line with the sail slugs and that ugly wrinkle went away. (pic 2 & 3)
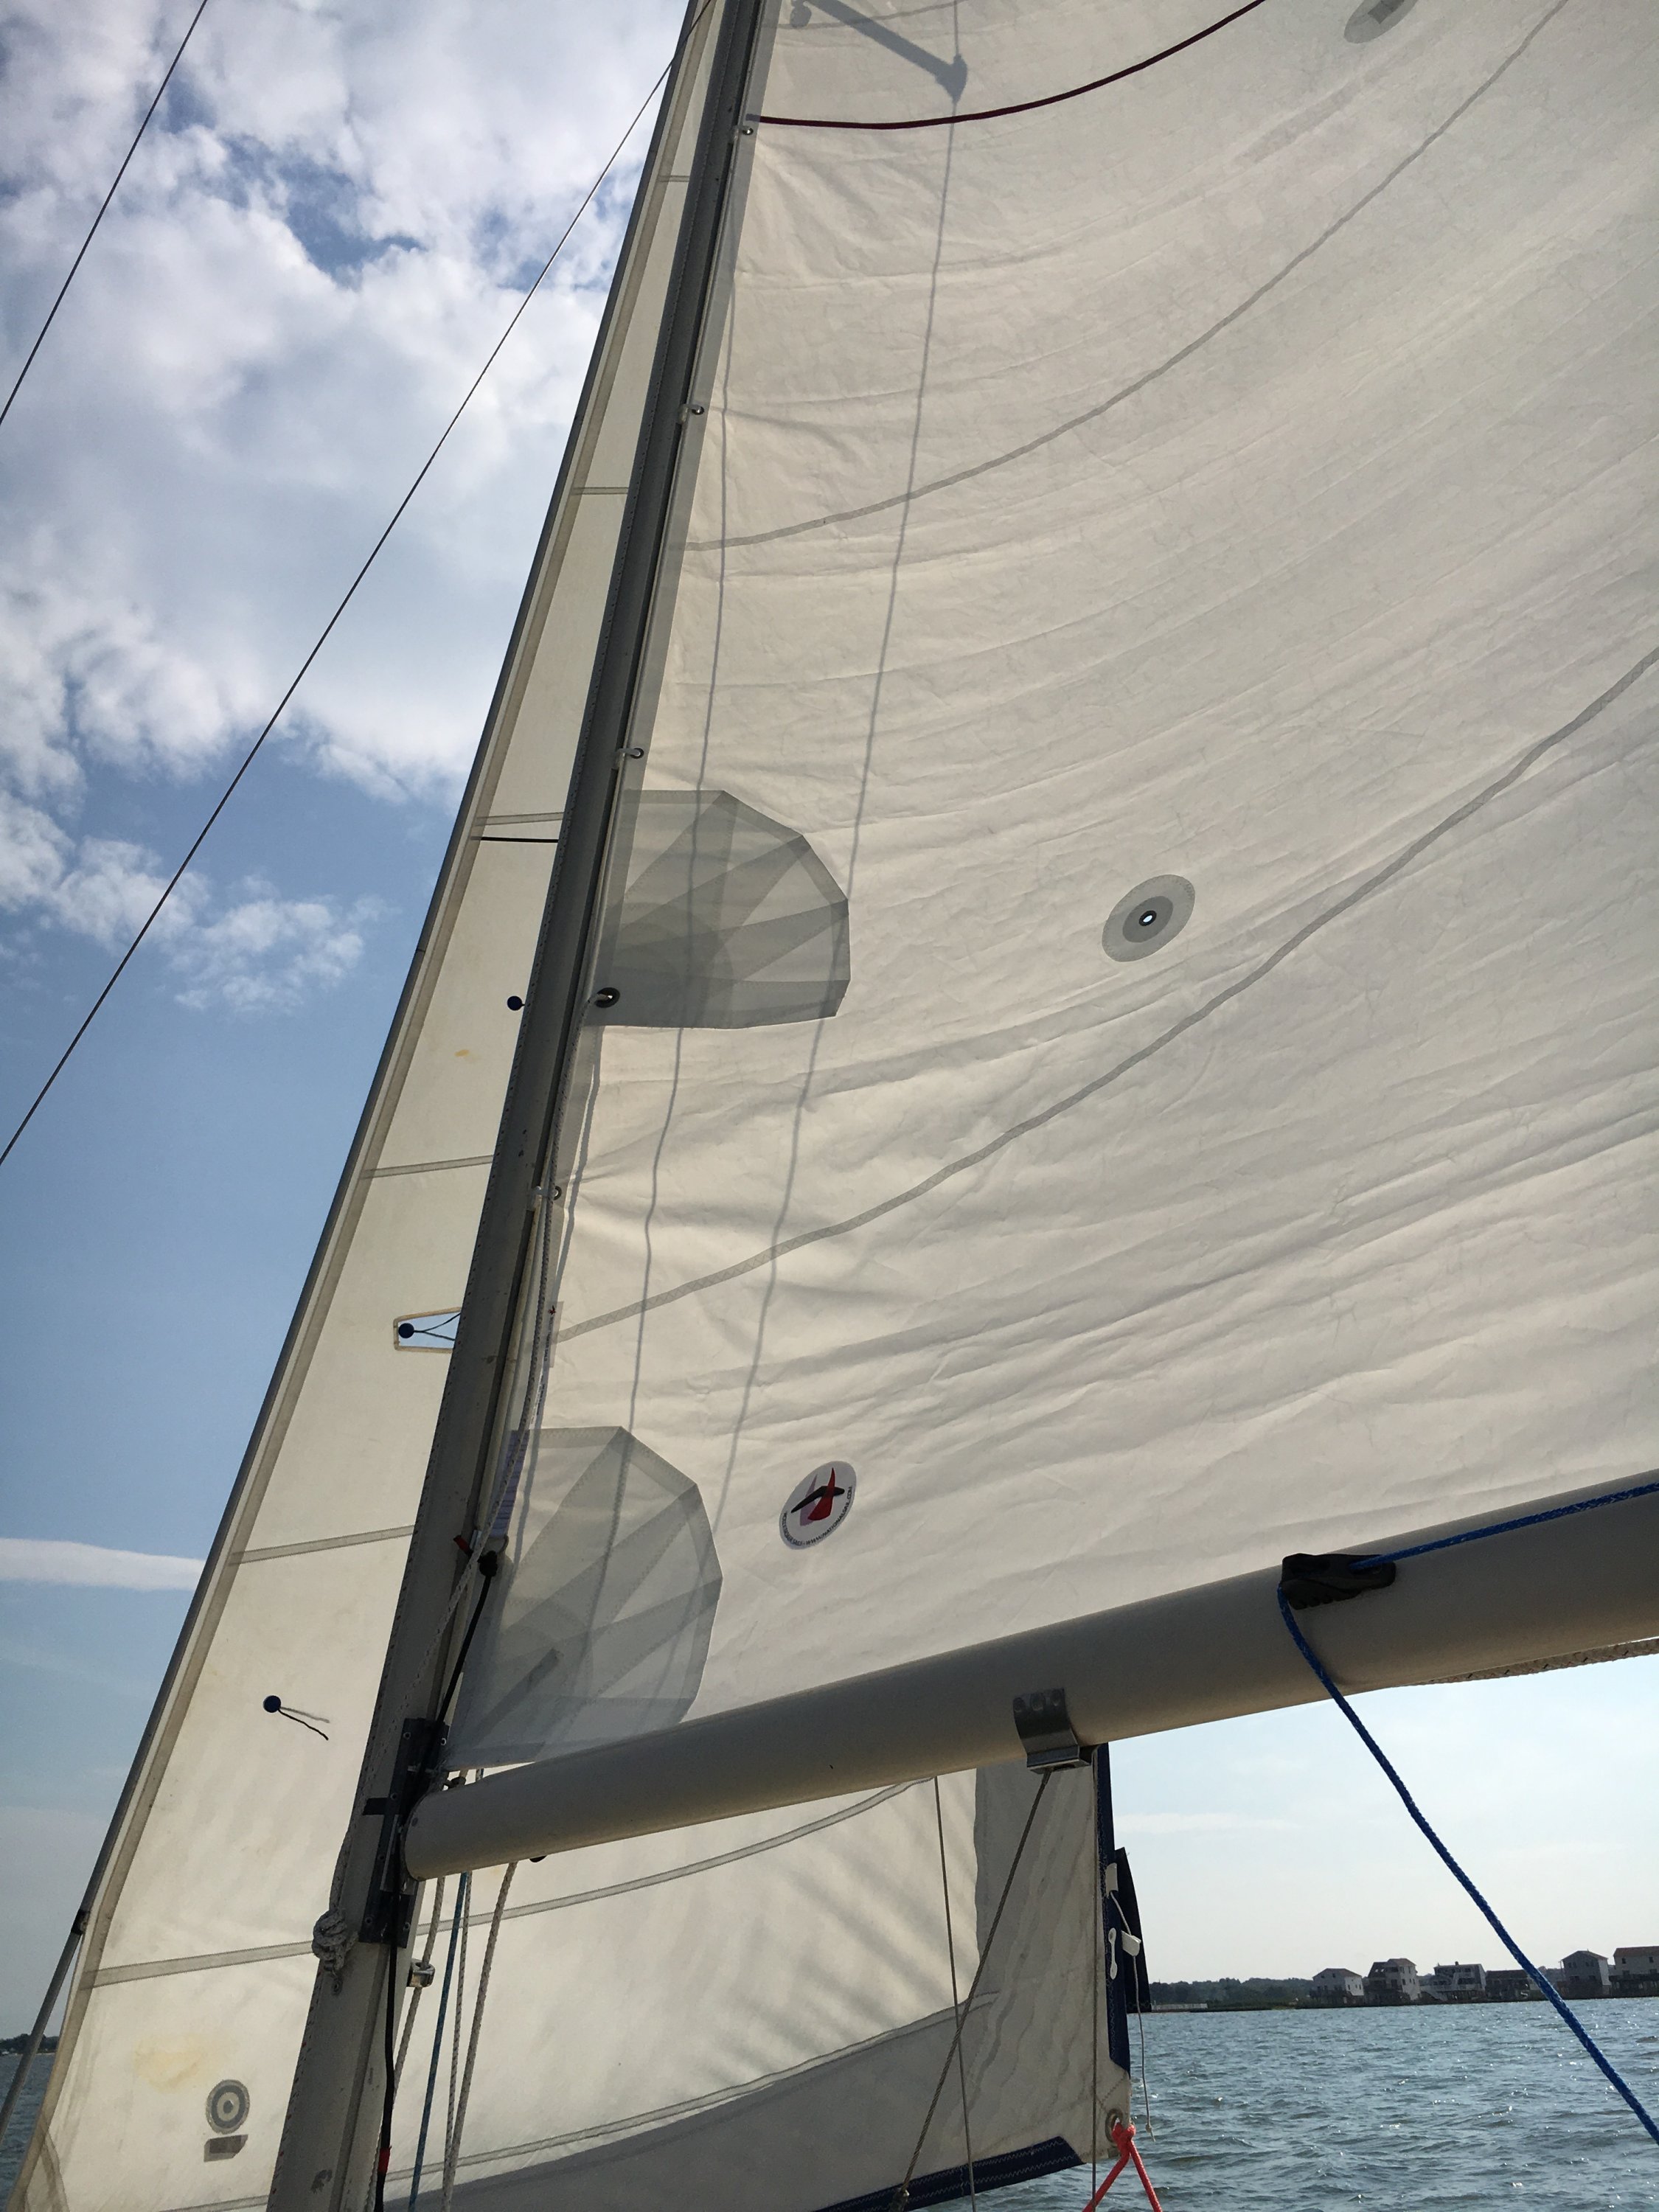
Now I need to work on a better cunningham line. I am thinking about running a line from the cunningham d ring to a small cheek block on the boom end back to a clam cleat near the one seen in pic 4, which is used for my outhaul. That works out very well as I can easily reach it while standing in the companionway. I'm open to suggestions on that.
I did some searching on Judy's sites as well as studying general pictures of goosenecks found by google.
I then made this U shaped bracket (pic 1) for the tack pin and bolted it to the gooseneck slide. I also made my own clevis pins as I couldn't (easily) find the sizes I needed. I soaked the old and new parts in Spotless Stainless to clean and passivate the SS. Main Sail had recommended Spotless Stainless and explained how it passivated the metal to prevent rust staining. It worked on other hardware I cleaned up so I did it to these parts.
The new tack pin position holds the luff in line with the sail slugs and that ugly wrinkle went away. (pic 2 & 3)
Now I need to work on a better cunningham line. I am thinking about running a line from the cunningham d ring to a small cheek block on the boom end back to a clam cleat near the one seen in pic 4, which is used for my outhaul. That works out very well as I can easily reach it while standing in the companionway. I'm open to suggestions on that.