Trouble removing profurl furler

Oct 18, 2019
7
Catalina 30 Alameda
I've been trying to remove my profurl furler as I've taken the jib off and wanted to change out the foresta anyways. But I'm having tons of trouble removing it.

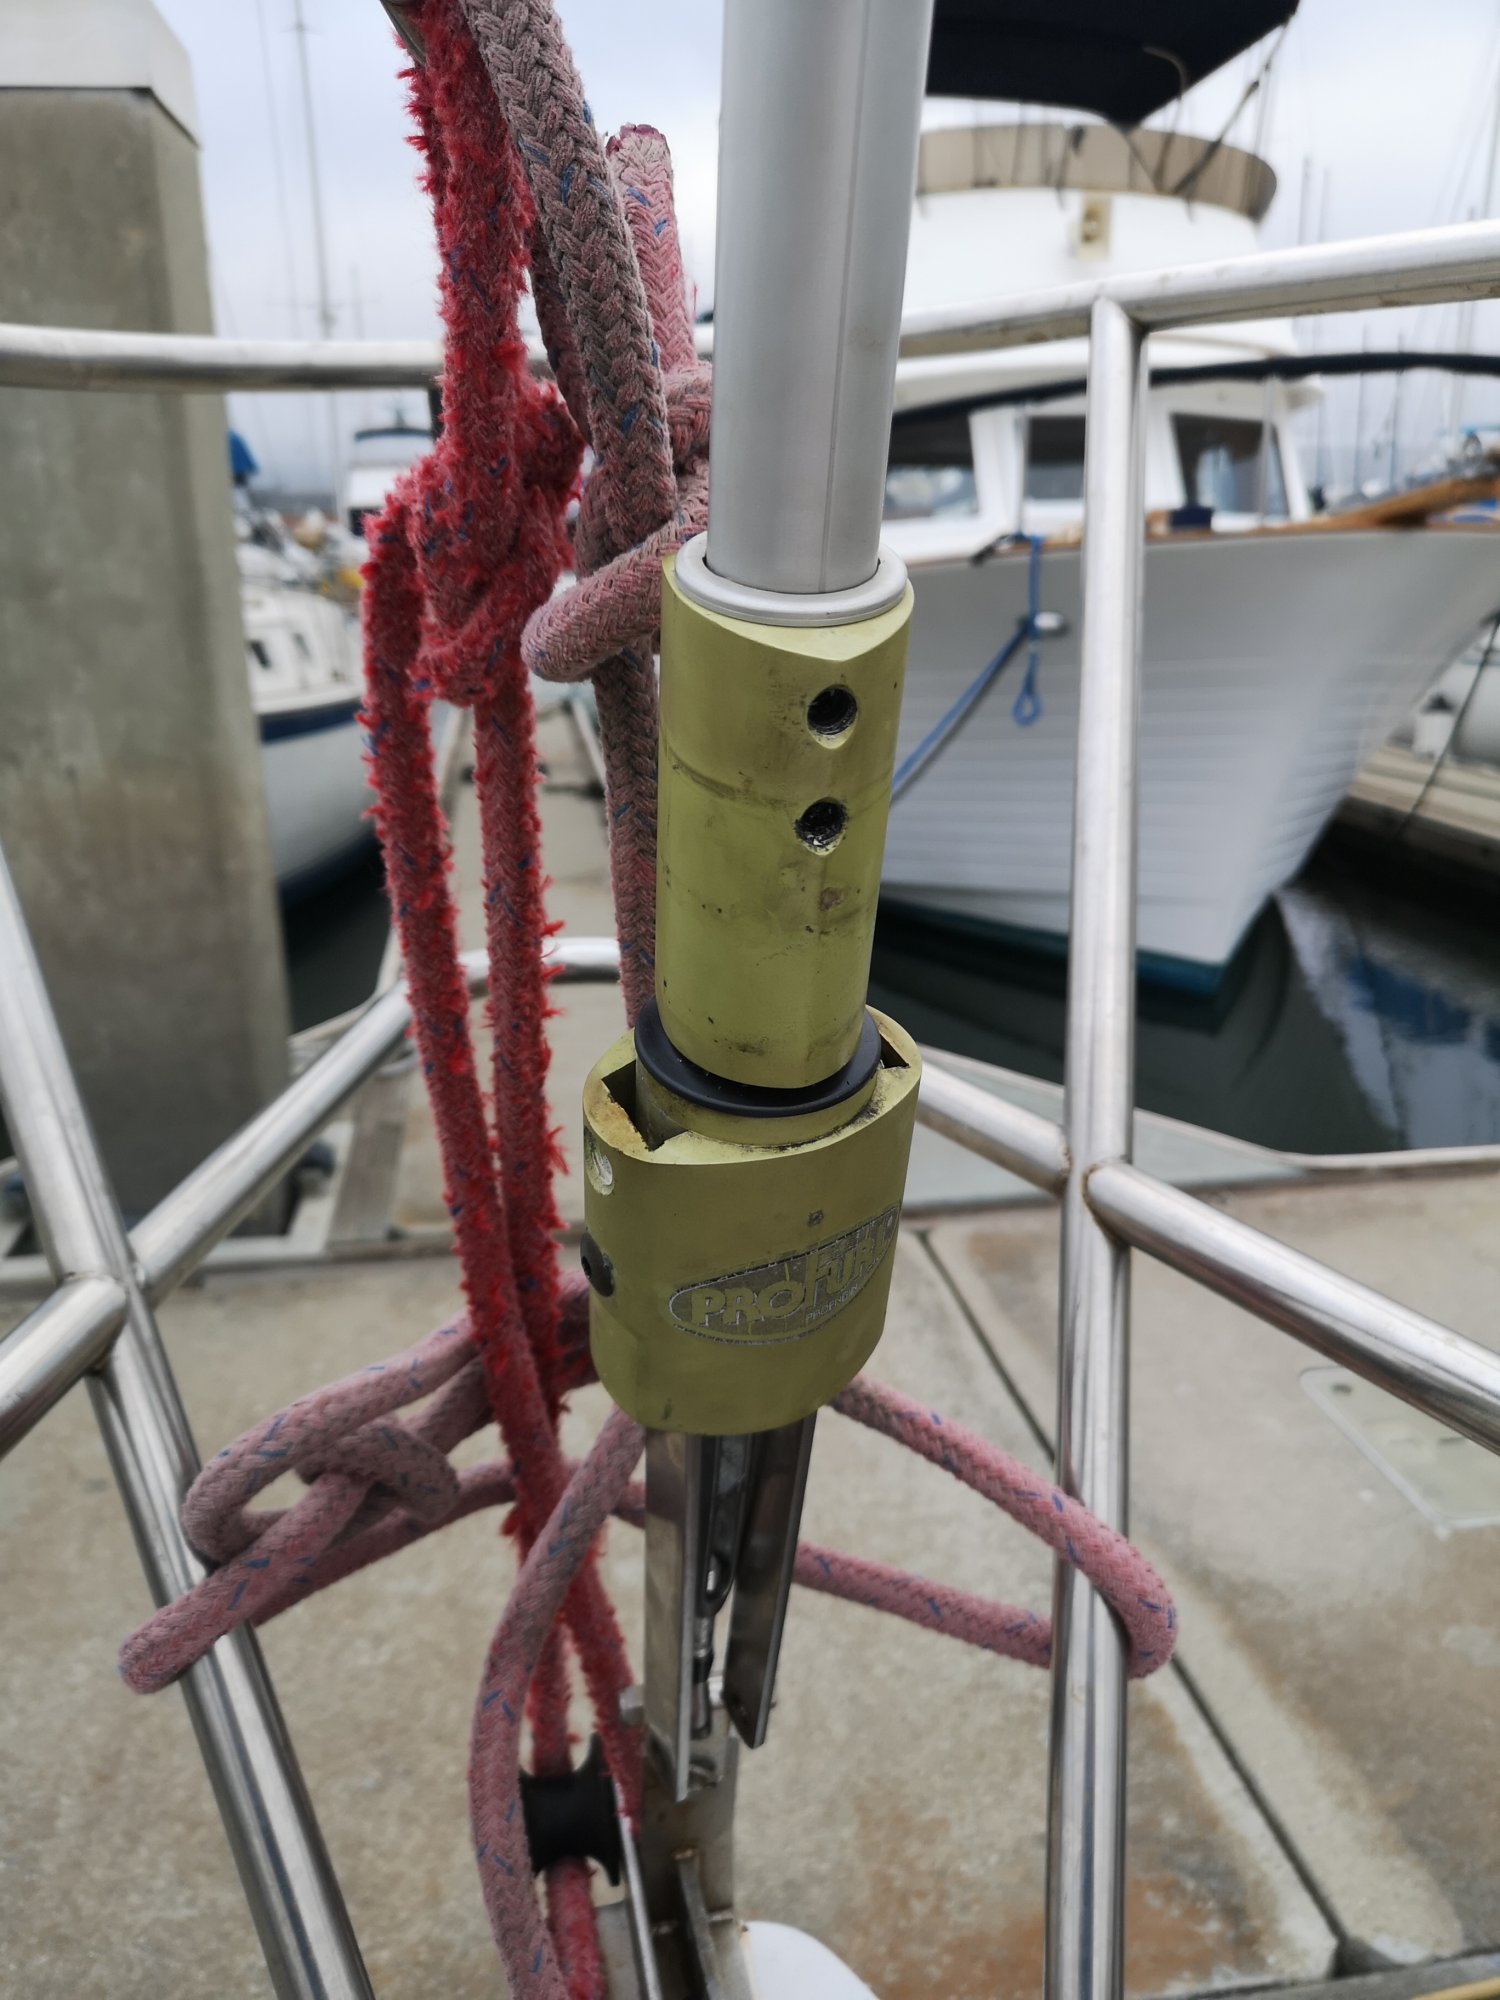
I thought the whole thing would just slide off once I finally got the forestay loose but it seems that's not the case. So I tried removing the screws towards the bottom thinking some of them must be keeping it on there. They were absolutely welded in there so they stripped, I tried to extract them, had no luck there, and finally I just started drilling through them. I have no idea what's underneath there however.

Does anyone know what's actually keeping the furler attached to my forestay and how to remove it? Can I safely drill through these spots to loosen it? How will I put it back together again afterwards?
IMG_20210422_184329.jpg
 
Oct 22, 2014
20,989
CAL 35 Cruiser #21 moored EVERETT WA
Firstly, working on the unit while it is on your forestay attached to the mast and fore deck is not easy or rewarding. You have stainless screws in the aluminum parts that have been exposed to a marine environment for a long time. You will need to try and break through the corrosion. First you need to soften the corrosion. Using a penetrating oil would be the first thing I did if I was thinking of saving and reusing the pro furler. To do this successfully you need to remove the forestay and furler from the boat. Get it down on the ground (protected from the grit on something like cardboard) and let the penetrating oil seep into the screws.
Here is the exploded view of the Pro Furler Design. It might help to see what you are up against. You can find the classic model on the website.
https://www.profurl.com/images/info_pages/basic-nomenclature-finall-56.pdf

Here is the installation manual.

Be sure to protect the extruded pieces to keep them from bending. It took 2 of us supporting the furler and extrusions to get it safely on the hard where we could work on it.
 

DougM

.
Jul 24, 2005
2,242
Beneteau 323 Manistee, MI
My Profurl had to be removed, and the only way to get it off the forestay (which was damaged anyway) was to cut off the lower swage fitting and slide the furler assembly off.
Taking apart the individual segments requires removing the screws which are threaded into a backing plate that slips into the extrusion.

Hopefully, yours had a turnbuckle that can be detached and the upper threaded section is narrow enough to slide through the extrusion without getting hung up. There is no way I would consider changing out a furler without dropping the mast. Who knows what you might run into...
 
Feb 26, 2004
22,759
Catalina 34 224 Maple Bay, BC, Canada
Hopefully, yours had a turnbuckle that can be detached and the upper threaded section is narrow enough to slide through the extrusion without getting hung up.
It's been a long time since my ProFurl LCI32 was installed, but I recall my riggers working on it for some necessary adjustments months after it was initially put on. The original rigger was a jerk, so I hired some much more competent fellas to do the repair work. I recall them sliding the whole assembly off, most likely with the forestay disconnected up top. While I don't recall all of the details, I think Doug's onto something here.

Also, if YOU cant get it off, it might be worthwhile to get a real qualified rigger to help you out. I'm sure they deal with these issues on a regular basis.

And thanks to John for finding a posting that installation manual.

Good luck.
 
  • Like
Likes: jssailem
Oct 18, 2019
7
Catalina 30 Alameda
Firstly, working on the unit while it is on your forestay attached to the mast and fore deck is not easy or rewarding. You have stainless screws in the aluminum parts that have been exposed to a marine environment for a long time. You will need to try and break through the corrosion. First you need to soften the corrosion. Using a penetrating oil would be the first thing I did if I was thinking of saving and reusing the pro furler. To do this successfully you need to remove the forestay and furler from the boat. Get it down on the ground (protected from the grit on something like cardboard) and let the penetrating oil seep into the screws.
Here is the exploded view of the Pro Furler Design. It might help to see what you are up against. You can find the classic model on the website.
https://www.profurl.com/images/info_pages/basic-nomenclature-finall-56.pdf

Here is the installation manual.

Be sure to protect the extruded pieces to keep them from bending. It took 2 of us supporting the furler and extrusions to get it safely on the hard where we could work on it.
Thank you the diagrams are helpful. But I still can't get it to slide off. Something inside is keeping the furler over the forestay.

Which makes me confused about how this was ever put over the forestay in the first place and how I will put it over the forestay that I plan to install..
 
Oct 22, 2014
20,989
CAL 35 Cruiser #21 moored EVERETT WA
Which makes me confused about how this was ever put over the forestay in the first place
Following the install plan, with the forestay laid out, I would
  1. slip the upper most parts on the forestay to include the doughnut
  2. slip the first section over the forestay
  3. slide it up to the top of the stay.
  4. place the coupling on the forestay
  5. slide the coupling up to the extrusion
  6. slide the next extrusion on the stay and up into place
  7. Repeat this process till all of the extrusions are in place.
  8. Now go to the top and start to connect the fittings together and clamp to the top of the forestay.
  9. Proceed down the forestay till you get to the last extrusion. No you need to be sure you have the correct length of extrusions for the forestay. You mark and cut the bottom extrusion to length.
  10. Now you fasten the lower fittings and drum.
  11. Then you install the bottom tangs and attach the unit to the boat.
It is the abbreviated summary as to how you do the install. Your rig might have issues any where along the stay. It is tedious but you need to work from the easiest end and free the furler along the way.

and how I will put it over the forestay that I plan to install..
Once you have the extensions off and the new forestay ready for install you begin again from the top.

Doing it with the mast in place is not easy. It can be done but it will entail you climbing to the top of the furler and releasing the fittings. You will need to secure the mast with a halyard to the bow if you are going to attempt this. Not for the faint of heart. Why so many suggest to drop the mast and work on the furler at ground level.