Installation of Raymarine EV-100 Wheel Pilot

stm11

.
Aug 22, 2020
14
Hunter 336 Cocoa
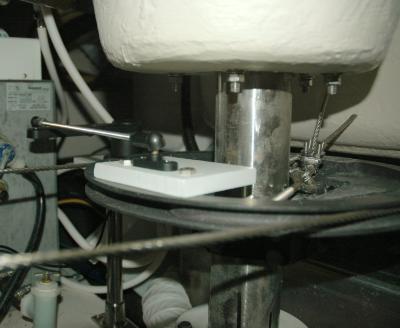
I own a Hunter 336 sailboat. I have a Raymarine EV-100 Wheel Pilot brand new in box and have had it for 3 years...never installed. I would like to install it myself but do not know what I need to do inside the pedestal. I've searched You Tube and found only limited detailed video of this done. I've read other postings on this site in these forums plan to do it myself. I downloaded a picture from this site and if anyone can explain and/or tell me how the wheel is mounted and connected inside the pedestal (I do not know what to expect and if I need to cut a mounting hole through the pedestal, etc). I'd appreciate it. I am also planning to install a radar on my mast...but I'll accomplish first things first. Please help...thanks in advance, Stan.
 

Attachments

HMT2

.
Mar 20, 2014
899
Hunter 31 828 Shoreacres, TX
Stan,

I am not sure I understand exactly what you are asking. I installed the ev100 on my 1983 Hunter. It is pretty easy , with the most difficult thing being getting the cables where they need to go. Some planning of that will help. You will need power to the computer and either a NMEA2000 network or a SeatalkNG network (with power to it) to make it work.

If the picture you posted is a sister ship then I would see if the owner posted anything about it. I am not familiar with the specifics of your boat, but it appears to me that you will need to make a hole somewhere behind the wheel to give a place for the drive motor to go. If your question is about how to take the wheel off the castle nut will come off, once that is off you should see a metal block (the key) pull that out and the wheel will slide off the shaft.

Good luck!
 
  • Like
Likes: Ken13559

stm11

.
Aug 22, 2020
14
Hunter 336 Cocoa
Stan,

I am not sure I understand exactly what you are asking. I installed the ev100 on my 1983 Hunter. It is pretty easy , with the most difficult thing being getting the cables where they need to go. Some planning of that will help. You will need power to the computer and either a NMEA2000 network or a SeatalkNG network (with power to it) to make it work.

If the picture you posted is a sister ship then I would see if the owner posted anything about it. I am not familiar with the specifics of your boat, but it appears to me that you will need to make a hole somewhere behind the wheel to give a place for the drive motor to go. If your question is about how to take the wheel off the castle nut will come off, once that is off you should see a metal block (the key) pull that out and the wheel will slide off the shaft.

Good luck!
Okay. Thanks for your reply.
 
Mar 16, 2015
14
Hunter 310 Lake Norman
I owned a Hunter 310 with a similar pedestal and I installed a Raymarine wheel pilot myself. I agree with HMT2, follow the directions on manual but it is basically drilling a hole for the motor to be inserted into the pedestal and running the wiring. Getting the wires to the instruments, power source and sensing core (mine was called a compass) is not complicated but can be a bit time consuming.

Best of luck with the process!
 

stm11

.
Aug 22, 2020
14
Hunter 336 Cocoa
Thank you both MattieJo and Good Fortune for your responses. I have a short trip to Las Vegas tomorrow and then I will be back to accomplish this task. Thanks again.
 
Apr 20, 2009
12
Hunter 336 Winthrop, MA
There is a page on Facebook with just Hunter 336/ 340 owners. I suggest you join that page and ask your questions there. Very knowledgeable, and helpful owners own there who own our specific boat. 1996 Hunter 336
 
Nov 6, 2017
76
Catalina 30 5611 Stratford, Ct
The first problem you will have is the spud that normally mounts on an Edson pedestal. The spud mount is round to fit the pedestal and can not be mount on a flat surface. The spud keeps the drive wheel from rotating when the motor turns. I would get a bolt and a couple of nuts and drill a hole in the pedestal in the appropriate place. Put one nut on the bolt and put the bolt in the hole and tighten the other nut on the inside. Cut the head off the bolt so that it engages with the hole in the drive wheel. Once that is done you can locate and drill a larger hole for the motor. Be sure and leave some wiggle room around the motor as it does move a little bit in operation. I would also get a piece of small rubber hose and split it down one side lengthwise and glue it around the hole just to cover any rough edge. All that is left is mounting the computer and the compass and running the wiring.
I will also tell you that you need to purchase and install the rudder position sensor that Raymarine says is optional. Without the sensor, you will not be happy with the performance of the pilot. In anything other than calm seas and perfect sail trim, the pilot will hunt constantly which is not only annoying it will run your battery down. Ours was so bad that I found myself hand steering most of the time. After installing the rudder sensor the pilot works the way that you would expect and the constant hunting stops. Good Luck.
 

stm11

.
Aug 22, 2020
14
Hunter 336 Cocoa
The first problem you will have is the spud that normally mounts on an Edson pedestal. The spud mount is round to fit the pedestal and can not be mount on a flat surface. The spud keeps the drive wheel from rotating when the motor turns. I would get a bolt and a couple of nuts and drill a hole in the pedestal in the appropriate place. Put one nut on the bolt and put the bolt in the hole and tighten the other nut on the inside. Cut the head off the bolt so that it engages with the hole in the drive wheel. Once that is done you can locate and drill a larger hole for the motor. Be sure and leave some wiggle room around the motor as it does move a little bit in operation. I would also get a piece of small rubber hose and split it down one side lengthwise and glue it around the hole just to cover any rough edge. All that is left is mounting the computer and the compass and running the wiring.
I will also tell you that you need to purchase and install the rudder position sensor that Raymarine says is optional. Without the sensor, you will not be happy with the performance of the pilot. In anything other than calm seas and perfect sail trim, the pilot will hunt constantly which is not only annoying it will run your battery down. Ours was so bad that I found myself hand steering most of the time. After installing the rudder sensor the pilot works the way that you would expect and the constant hunting stops. Good Luck.
Thanks careened. How does the rudder sensor connect?
 

Sailm8

.
Feb 21, 2008
1,746
Hunter 29.5 Punta Gorda
Make sure the software is up to date. I'm almost sure yours will need an update or two. I mounted the compass against the forward inside of the pedestal and the "brain" on the starbord inside the pedestal. I through bolted the components to the walls of the pedestal. I was replaceing an older autohelm so I used the hole that was already there. The hole needed some enlargement. The new drive motor was longer than the old motor and required trimming the wooden "bulkhead" so it would fit. I use the unit as stand alone so I can't describe how to interface.

Warning, don't let the halves of the wheel separate which can happen during trial fitting. All of the ball bearnings fall out..
 
Nov 6, 2017
76
Catalina 30 5611 Stratford, Ct
Thanks careened. How does the rudder sensor connect?
Here is the way I installed it in our boat. I have to warn you that this thing has to be installed in a very specific way. The instructions on Raymarine's website explain it better than I can. Hopefully, you will have more room and better access to your steering quadrant than I did. This was not a fun job and it took an entire day to get it done. It is critical to get the thing centered on the rudder shaft and at the proper angle or when you turn the wheel you could force the sensor beyond its limit and break it. Your installation will be unique to your boat depending on where you have access to install it.
Here are some links that may be helpful:
https://www.hodgesmarine.com/amfile/file/download/file/16340/product/33404/ This is Raymarine's instruction sheet that comes with the sensor. If you look at the instruction sheet the Installation Checks (figure 1) shows the proper installation along with dimensions. The one tip I can pass on to you is to tape the sensor arm so that the alignment mark shown in the picture lines up with the mark on the base. Use strong tape to do this. The spring in the unit might overcome weak tape and allow the alignment marks to become misaligned. I for the life of me cannot understand why Raymarine did not put some kind of alignment pin in the sensor to hold it in position for installation purposes. For all the trouble of installing this, you will be happy that you did.
 

Attachments

  • Like
Likes: windsurfer

stm11

.
Aug 22, 2020
14
Hunter 336 Cocoa
Thanks cagreen75. I am glad you provided this info because honestly I did not know anything about the existence of a rudder sensor.
 

Ward H

.
Nov 7, 2011
3,651
Catalina 30 Mk II Barnegat, NJ
I'm very happy with my EV-100 setup without the rudder sensor.
I did spend about half of last season researching and trying various AP settings and was considering the rudder sensor.
Then I made one more change out of desperation and tried an "out of box" idea.
I set the Vessel Type to "Sail Catamaran" . That one change made a huge difference in AP performance. The other important thing is maintaining proper sail trim. At least on my boat, a wondering AP indicates poor sail trim.

stm11, sorry I can't help with installing on the system on your pedestal but it does appear you have gotten good advice about drilling the pedestal for the motor drive.
 

stm11

.
Aug 22, 2020
14
Hunter 336 Cocoa
I'm very happy with my EV-100 setup without the rudder sensor.
I did spend about half of last season researching and trying various AP settings and was considering the rudder sensor.
Then I made one more change out of desperation and tried an "out of box" idea.
I set the Vessel Type to "Sail Catamaran" . That one change made a huge difference in AP performance. The other important thing is maintaining proper sail trim. At least on my boat, a wondering AP indicates poor sail trim.

stm11, sorry I can't help with installing on the system on your pedestal but it does appear you have gotten good advice about drilling the pedestal for the motor drive.
Thanks Ward H... good info.
 
Nov 5, 2020
9
Hunter Legend 35.5 port charlotte
Thanks careened. How does the rudder sensor connect?
Here is the way I installed it in our boat. I have to warn you that this thing has to be installed in a very specific way. The instructions on Raymarine's website explain it better than I can. Hopefully, you will have more room and better access to your steering quadrant than I did. This was not a fun job and it took an entire day to get it done. It is critical to get the thing centered on the rudder shaft and at the proper angle or when you turn the wheel you could force the sensor beyond its limit and break it. Your installation will be unique to your boat depending on where you have access to install it.
Here are some links that may be helpful:
https://www.hodgesmarine.com/amfile/file/download/file/16340/product/33404/ This is Raymarine's instruction sheet that comes with the sensor. If you look at the instruction sheet the Installation Checks (figure 1) shows the proper installation along with dimensions. The one tip I can pass on to you is to tape the sensor arm so that the alignment mark shown in the picture lines up with the mark on the base. Use strong tape to do this. The spring in the unit might overcome weak tape and allow the alignment marks to become misaligned. I for the life of me cannot understand why Raymarine did not put some kind of alignment pin in the sensor to hold it in position for installation purposes. For all the trouble of installing this, you will be happy that you did.
Thank you for the beautiful picture! And the excellent tape advice.This looks almost exactly like my setup except I have more room thankfully. Two noob questions: 1. What is the white material and where do u get it? 2. Did u put any sort of sealant around or in the screw holes that screwed the rudder sensor to the base?
 
Nov 5, 2020
9
Hunter Legend 35.5 port charlotte
Question for y’all. Did u run the ACU thru your main power junction box? Seems that would be prudent, for battery drainage and fuse and battery switching concerns, but since everything is located at the back (depending on where u put the sensor), it would ease installation process to put the ACU in the stern too... what did y’all do?
 
Nov 6, 2017
76
Catalina 30 5611 Stratford, Ct
Thank you for the beautiful picture! And the excellent tape advice.This looks almost exactly like my setup except I have more room thankfully. Two noob questions: 1. What is the white material and where do u get it? 2. Did u put any sort of sealant around or in the screw holes that screwed the rudder sensor to the base?
So the white material is called Starboard or Kingboard. You can get it at Defender in Connecticut and many other boating supply houses and even eBay. It is basically plastic so it will never rot. I used Life Caulk to seal the screw holes.
[/QUOTE]
Question for y’all. Did u run the ACU thru your main power junction box? Seems that would be prudent, for battery drainage and fuse and battery switching concerns, but since everything is located at the back (depending on where u put the sensor), it would ease installation process to put the ACU in the stern too... what did y’all do?
The ACU is powered from the main control panel and is controlled by an on/off switch. There is an appropriately sized fuse close to the switch for circuit protection. The ACU is mounted in the stern of the boat about midway between the main panel where the switch is and the stern. The wires exit the cabin into the compartment where the P70 is mounted in the cockpit. The wheel actuator motor wire runs through a watertight connector in the cockpit floor. This is not the best way to run that wire because it is exposed and could potentially be damaged but that is the way our old pilot was installed so I left it that way. I would have run the wire through the Edson pedestal guard to a location near the wheel actuator motor which would better protect the wire from damage.
Another tip is to wrap the pin that holds the wheel drive from turning with electric tape to take up the excessive amount of clearance between the pin and the hole. Without the tape, the wheel drive slams back and forth in the hole, and that looseness can cause the pilot to continue to hunt back and forth due to the one or two degrees the wheel drive is allowed to move. Not only is the continuous hunting wasting battery power it is also annoying to listen to.