Companionway Hatch Boards

Status
Not open for further replies.
Jul 29, 2010
29
Irwin 25 NC
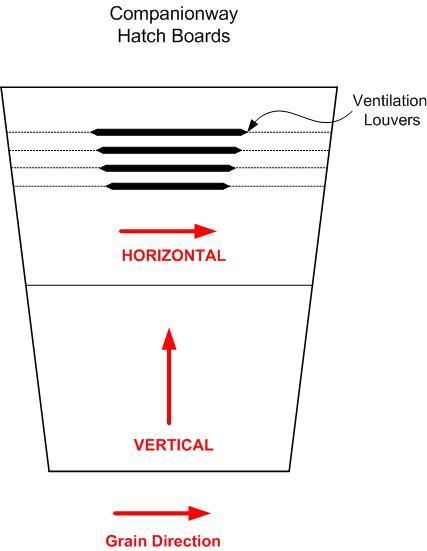
I am planning on building new hatch boards from milled 1/2" or 5/8" mahogany. My inclination is to build them with a vertical grain direction so wood movement would minimize warping. The plan would be to treat all end grain and long grain with epoxy and then varnish.

So many hatch boards I see are built with horizontal grain direction so I thought I would ask the groups opinion on grain orientation.

I am also looking for any opinions/advise/weblinks for building ventilation louvers into the hatch boards. I am currently leaning towards cutting the boards, angle routing the vents and then re-gluing the pieces. I have attached a diagram for reference. Any thoughts?

Thanks for any replies....a
 
Sep 25, 2008
544
Bristol 43.3 Perth Amboy
IMHO

I think that if the grain is vertical, they won't be as strong but others may feel different.

When I am at the mooring, the wind and current don't always agree and wind can drive rain from aft towards the companionway. If you build vents, I would add a rain hood on top. I have done this simply by drilling multiple holes with a hole saw in the board and then build a hood that extends over the holes. Screening stapled on the inside.
 
Dec 11, 2008
1,338
catalina C27 stillwater
Andrew-

Your first consideration is strength. In your image, you show two panels, but often we see hatch boards in greater numbers, 3 or 4 typically. For panels that are much longer with respect to width, it is best to have the grain the long direction. Otherwise it is easy to split an individual hatchboard whose grain runs 90 degrees from the long dimension. Long grain strong, short grain weak.

You mention running the grain vertical to minimize warping, but you are not minimizing it, you are only changing the orientation of the warp... A warping with the grain vertical is going to be more prone to leaking inside the boat; the horizontal mating surfaces between individual boards will not warp in a similar or consistent manner. You will have big gaps between each board at the vertical middle of the assembled hatch boards.

Based on your post, it sounds you have machinery and talent to glue up panels taking advantage of the woods strength based on application. I recommend you use a rabbet - dadoe combination to glue up three pieces of wood for each hatch board, with the outside edge pieces having grain oriented vertically to resist warping vertically. The orient the grain of the center of each board horizontally. This will provide strength to each board, and will minimize warping in the horizontal which will keep each board tight to the other.

See my attachment, showing strong and weak, with respective warping information. Notice the bottom image. This construction will give you strength and resistance to warping where you need it. Use mating dadoe cuts between boards to shed water.
 

Attachments

Dec 11, 2008
1,338
catalina C27 stillwater
On your ventilation scheme, I have a thought. My routers all will be too big to jig up an angled jig to mill the slots, but one of the smaller laminate trimmers, (really just a small router) will be easier to jig up. Consider using a small laminate trimmer with a small spiral cut router bit to just mill through... Build an angled base to attach to the bottom, and run the router along a guide laid prarllel to the long dimension...
 
Jul 29, 2010
29
Irwin 25 NC
Sorry I was not clear in my initial post or the diagram. The plan is for both panels to have the same grain orientation - either both vertical or both horizontal. Thanks for the input so far.

Good suggestions Ed - thank you
 
Aug 2, 2005
374
pearson ariel grand rapids
You can cut the angled ventilation slots in with a table saw

Set blade at angle desired, raise it to about 1/2 inch higher than thickness of wood and mark both sides of the blade on the fence. Mark wood where you want slot to start and end. Place wood so blade is in center of slot and slowly feed blade up to same height you made marks for and move wood till marks align.
Practice on scrap pieces first, and remember that in one direction the blade will be cutting 'up' and will try to lift the board, you can offset that tendency by clamping a 1x to the fence for the hatch board to slide under.

Since blade is a circle, the bottom face will have a longer slot than the top, how much longer depends on thickness of the wood, diameter of blade and how far it projects. So mark the slot length and position with that in mind. You can open up the slots by using a thin strip at the fence end, or moving fence an 1/8

Typical warnings and disclaimers apply of course

Agree that you want the grain to run the longest dimension for strength
 
Dec 1, 1999
2,391
Hunter 28.5 Chesapeake Bay
Companionway Board

I made some companionway boards for my old C&C out of 3/8" mahogany. That width was chosen to fit the slots in the sides of the companionway. I cut the boards horizontally. Since I had neither the skill nor the right cutting tools to cut ventilation slots in the boards, I simply cut out a 5"x9" rectangle in the second board from the top and installed a SS vented cabinet door louvre available from West Marine. This doesn't look as good as slots cut into the wood, but worked well. I put a piece of fiberglass screen over the hole before screwing in the louvre. Since I kept the rectangular cutout for the louvre, I screwed a common drawwer pull to the center of it and could seal the rectangular cutout from the inside if need be. Much to my surprise, I finished the mahogany with Cetol and it ended up looking like all the other teak on my boat.
 
Jun 7, 2007
515
Hunter 320 Williamsburg
Not to be contrary, but I replaced the Hunter heavy plexiglass with lighter 3/8-inch plywood, varnished. Much easier to wrestle into the lazerette and many fewer bad words whenever I drop on on my foot.
 
Dec 30, 2009
680
jeanneau 38 gin fizz sloop Summer- Keyport Yacht Club, Raritan Bay, NJ, Winter Viking Marina Verplanck, NY
Andrew, I would be careful about running the grain vertical.I work with exterior would every day, touching the end grains to the hull will be a problem. Look around your house, anywhere you see and endgrain on concrete or a roof, platform ect, it will wick up the waterlike a sponge. If you have to make sure you seal the ends,maybe even epoxy just the end grains, if you can keep them up slightly, even better. If its going to be white or beige use "AZEK". Ever notice those cute little pointed PVC hats they tack on the tops of piers, two fold protects the end grain from rotting, and Gulls..... Red
 

PaulK

.
Dec 1, 2009
1,353
Sabre 402 Southport, CT
If you look at wooden house doors (especially paneled doors)the directions of the grain are set up at right angles so as to counter warping tendencies. If you're not planning on paneling your hatch, you will probably want to set the grain up horizontally for the most strength. (That is why hinged doors on hatchways are not generally used: they're not as strong and hold up poorly to the errant wave that lands on them.) To help minimize warping issues you may want to make each horizontal hatchboard up out of perhaps four pieces, set up so that the first piece cups (has the inner rings) inboard and the next cups (has the inner rings) outboard, and so on. Big flat sections of wood, like rudders, are put together this way with drifts. It's one reason why plywood is often used instead, with a fine wood veneer over it if it's going to be for show.
 
Dec 20, 2010
294
Yankee Condore 21 Halifax
Hiee,

If I were going this route this is what I'd do. First look at the end of your board ie the butt. Try and find boards that the 'grain' runs perpendicular to the width. Now in joining them. I would use a simple tongue and groove running the full length. You can also dowl them and for that matter use a biscuit cutter and biscuits in the edge joint. I would run the boards vertically and use a bottom and top rail of 2'' width also tongue and grooved.

On my own boat I will be making a split door that is hinged on each side and probably made out of plexiglas to match the new side ports. I hate the idea of having to lift this hatch out and store it somewhere.

The 'Secret' is to make sure that the end grain runs perpendicular to the face ie width of the board. If you see semi circular annular rings it will surely warp.
 

caguy

.
Sep 22, 2006
4,004
Catalina, Luger C-27, Adventure 30 Marina del Rey
Here are some detailed pictures of the hatch boards from my C-27. The overcome the warping problem by running a boarder on the edge of the hatch to act as a stringers. They are t&g'd to the cross boards.
The louvers as mentioned above are angled. It look as if the ends were drilled first at an angle and then connecting slots cut at an angle.
It is made of 3 sections that are ship-lapped together. Each section is made of two boards t&g'd and glued together.
These are 30 years old and look like new with no warping what so ever.
 

Attachments

Jul 29, 2010
29
Irwin 25 NC
Thank you all for the excellent responses.

Caguy - your photos where a great help
 
Last edited:
Oct 26, 2008
6,240
Catalina 320 Barnegat, NJ
I made hatch boards from ash. I have a plentiful supply of hardwood from the trees we cut down to build our house so I use whatever I have for many boat projects. It's not nautical like teak, but I can stain it and varnish it and it all comes out looking great anyway! With the right finish, there has been and will be no warpage. One of my original teak hatch boards did warp slightly after many years of neglect by the P.O. I don't think there is much need to fuss too much over the details of the grain if you keep the finish in good shape. I'm not sure where you find boards wide enough if you want to run the grain vertically, unless you are joining boards together, which is counter-productive in my mind.

I used boards that I planed down to 3/4" thickness. they are plenty thick and they fit the slides perfectly. I used a router to overlap the horizontal edges and I took care to angle the top edge so that water doesn't sit there either.

As for the vent, you can buy a pre-made teak vent and drop it in the hole that you cut in your board. I did this and it looks great. The vent actually stands out from the face of the board in my case, which I like because it adds some relief. I also made a board with an acrylic window, with a 1/4" thick piece of acrylic for strength.

I figure that anything I make, I can make again with better ideas born from experience ... I have plenty of hardwood to play with and it's taking up space in my basement right now!
 
Nov 11, 2009
34
Ericson 31 Independence Lake Lanier
The drop boards on my Ericson Independence are constructed exactly like the ones in the photos posted by Caguy. Mine are made from teak and original to the boat (30 years old). They were in rough shape when I purchasesd the boat but because of their material and construction I was able to make them look like new.

There are three of them none with louvers, but I do have a seperate center panel that is framed with a screen insert that we use. I would not go less than 3/4" thick on wood and think horozintal grain is the way to go no matter how you decide to deal with the end grain.

Keiffer
 

kenn

.
Apr 18, 2009
1,271
CL Sandpiper 565 Toronto
Down the road, I may replace our 2-piece fiberglass companionway boards with something more yacht-y and wooden. I would most likely use marine plywood, maybe adding hardwood edging for that panelled look. I would probably buy or make a louvered insert.

Personally, I probably wouldn't use just linear wood, unless I fell across a source of free exotic hardwood.

Two years ago, I did make a lightweight screened companionway board using 3/16" plywood and bracing, and this is still going strong. There's a matching top hatch frame as well.So much better than velcro and netting...
 
Status
Not open for further replies.