Hi all,
Posting this mostly "for the record," although a couple of questions at the end.
We have a 1996 Hunter 376 with the original 1996 Adler Barbour refrigeration system (including the optional water pump). When we purchased the boat the system was mostly working, with two problems:
1. The water pump would not engage. The PO said that it stopped working after he added a second thermostat.
2. Once the batteries were anything less than topped off (even a .1 volts down) the compressor would "pump" and generally fail to start (I inquired about this last summer in this thread, but did not get a chance to address things until this weekend)
I could not find a manual for the system in the stack of manuals that came with the boat, I e-mailed Adler Barbour about a manual and they sent me a 2011 vintage document stating that the system was mostly unchanged. Spoiler alert: this weekend, when I dug in, I found out that while the compressor controller itself is similar, most of the rest of the wiring is completely different...of course,. I dug back through the binder of manuals that came with the boat and did eventually find a schematic type drawing tucked away inside one of the other books:
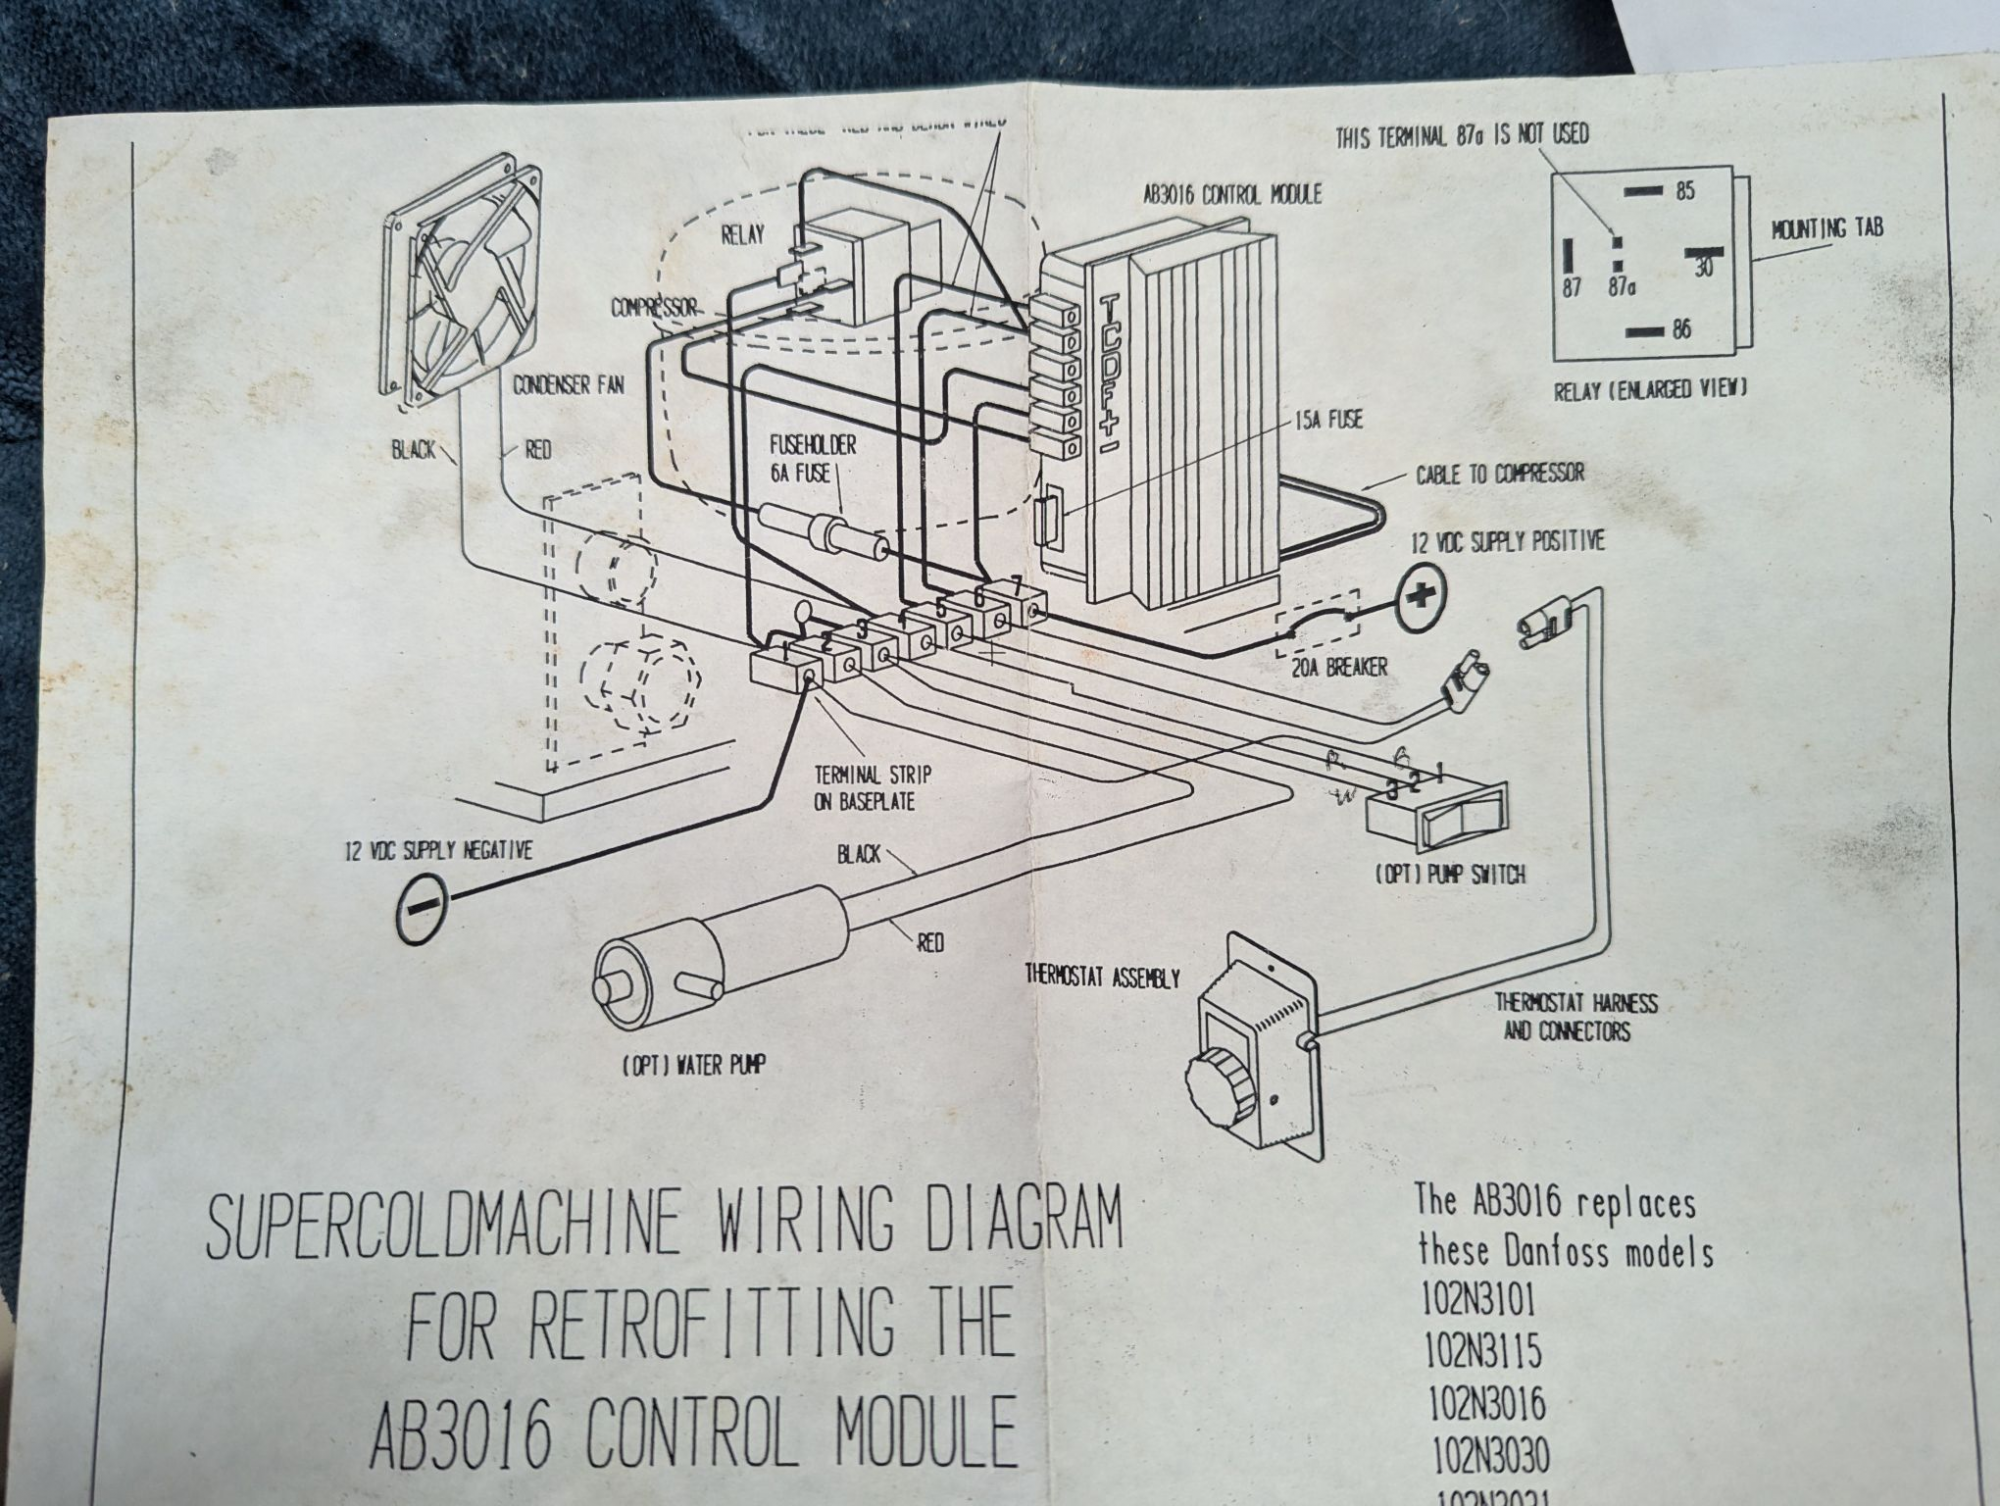
This got me a bit closer (I.E. there was no reference to an external relay in the 2011 version, as they seem to have integrated that into the controller). However, I was still having issues where the condenser fan and/or water pump were never engaging OR they were constantly engaged. In the end I had to move the relay wires (85 and 86) off of the Terminal 6 and Condenser F ports to Terminal 5 (Control T) and Terminal 1/2 (battery -). This engaged the relay when the thermostat called for the compressor and the ran the fan/pump.
My final wiring looks like this (which hopefully is legible):
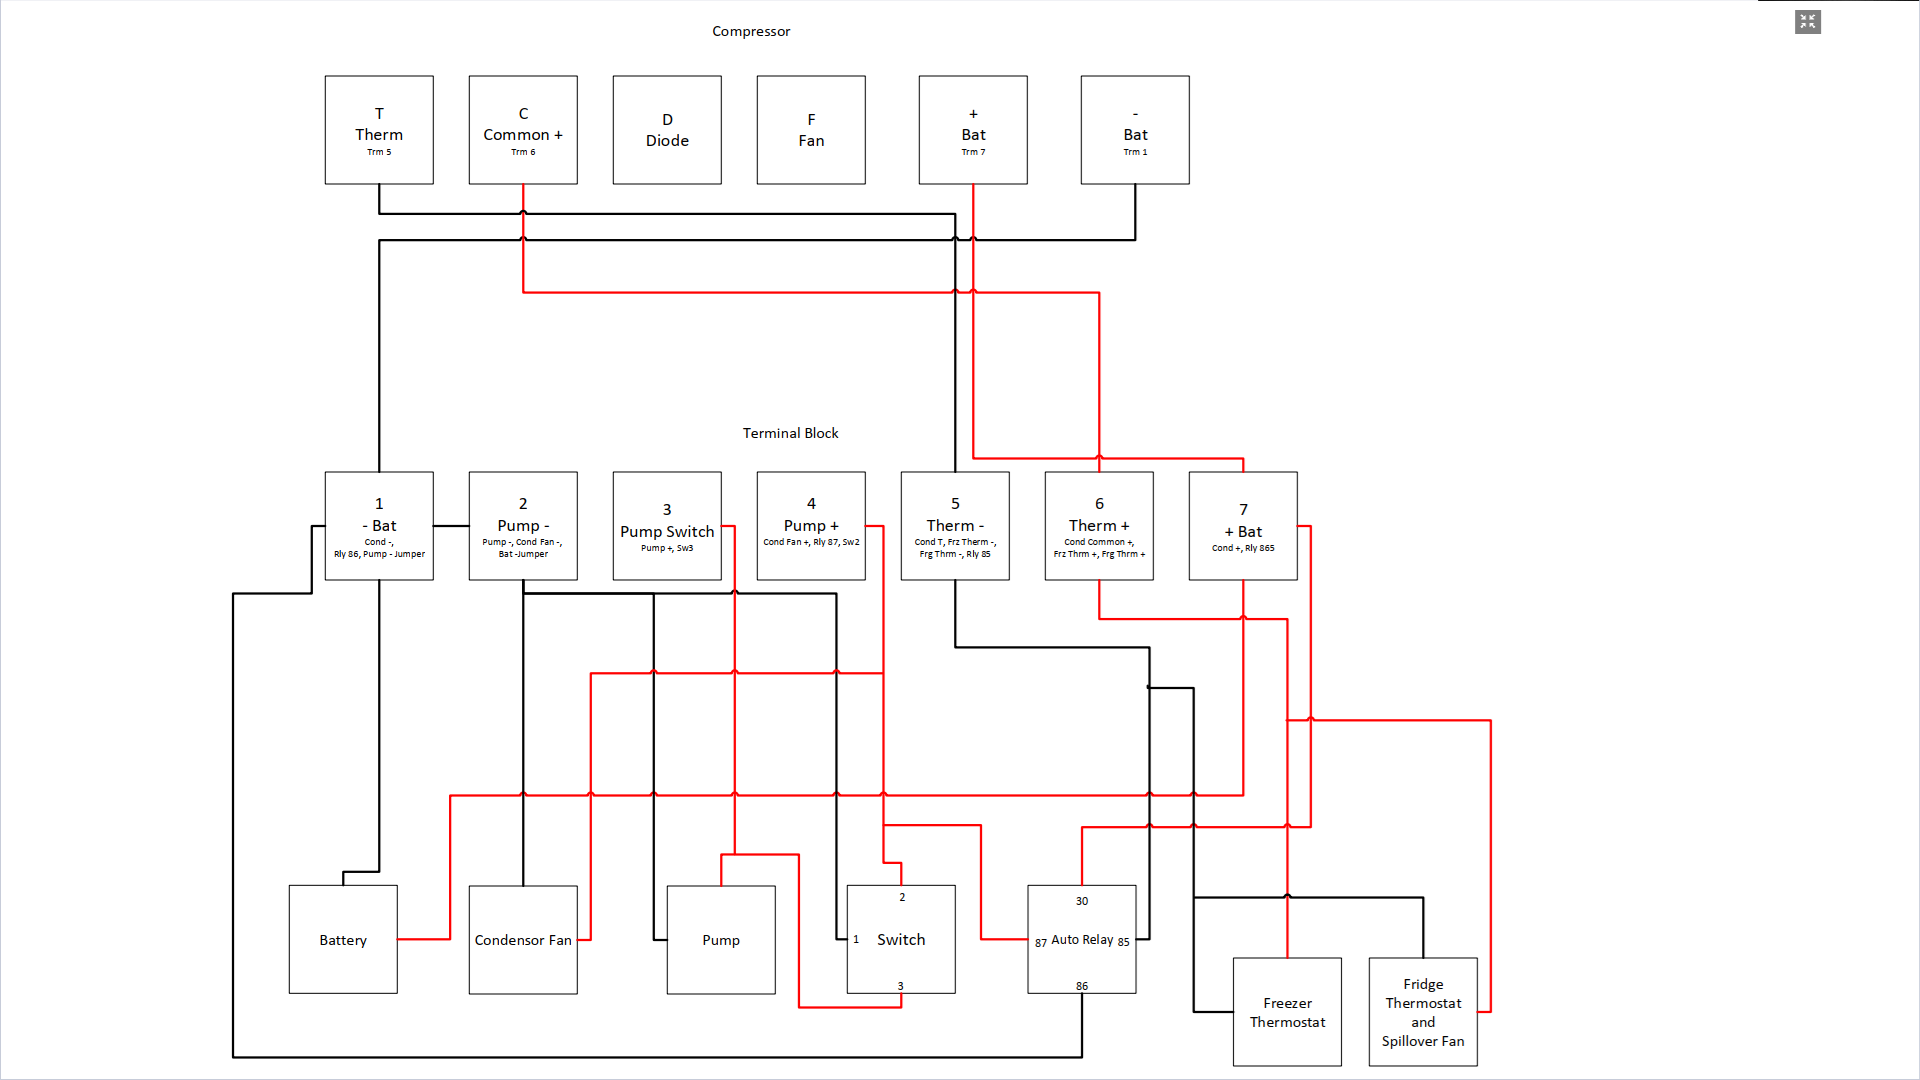
I'm wondering if the F connection on the controller (which presumably should internally go to ground when the compressor runs, engaging the fan) on my unit has failed, but I'm not completely sure...
Adding to the difficulty in this, the OEM terminal block is not very good. Between having to cram multiple wires in, it being mostly inaccessible to visually see things, and a mediocre screw system I often times struggled to actually get the wires to "catch." I may go back and splice some wires to reduce the number of elements going into each section, but wanted to give it some time to make sure that I didn't mis-wire or need to change anything.
My question for the group: in this configuration I have both thermostats engaging the compressor. The change the PO made was to add a spillover fan. However, he added that fan inline with the refrigerator thermostat, so it only runs when the refrigerator calls for cooling IF the freezer is NOT calling for cooling.
Putting aside the quality of his original wiring (I found the source of the "pumping" problem -- a combination of wrong wire sizes and poor crimps, including one butt splice that wasn't actually crimped at all...I'm actually little shocked that it was running period...) I noted that he had the refrigerator thermostat/fan combo tied from Therm + to Bat -. This meant that the when the refrigerator called for cooling it just engaged the spillover fan to move cool air from the freezer compartment, not engaging the compressor. The compressor would only engage when the freezer called for cooling. I'm not sure which is preferable....
My questions (looking for opinions):
Will the refrigerator calling for cooling run the compressor too often?
Is it better to let the freezer thermostat drive the cooling system and just have the fridge thermostat drive air movement (via the fan)?
In a different thread (google search after I got home Saturday) I read somewhere that Adler Barbour doesn't really support driving a fan off of the compressor system. This may be one more reason to move the fridge thermostat back to Therm +/Bat -. But I'm not sure (FWIW we never had issues with the system staying cool enough previously).
Interested in thoughts. With that, hopefully this info is useful for any other mid-90's Adler Barbour system owners.
Doug
Posting this mostly "for the record," although a couple of questions at the end.
We have a 1996 Hunter 376 with the original 1996 Adler Barbour refrigeration system (including the optional water pump). When we purchased the boat the system was mostly working, with two problems:
1. The water pump would not engage. The PO said that it stopped working after he added a second thermostat.
2. Once the batteries were anything less than topped off (even a .1 volts down) the compressor would "pump" and generally fail to start (I inquired about this last summer in this thread, but did not get a chance to address things until this weekend)
I could not find a manual for the system in the stack of manuals that came with the boat, I e-mailed Adler Barbour about a manual and they sent me a 2011 vintage document stating that the system was mostly unchanged. Spoiler alert: this weekend, when I dug in, I found out that while the compressor controller itself is similar, most of the rest of the wiring is completely different...of course,. I dug back through the binder of manuals that came with the boat and did eventually find a schematic type drawing tucked away inside one of the other books:
This got me a bit closer (I.E. there was no reference to an external relay in the 2011 version, as they seem to have integrated that into the controller). However, I was still having issues where the condenser fan and/or water pump were never engaging OR they were constantly engaged. In the end I had to move the relay wires (85 and 86) off of the Terminal 6 and Condenser F ports to Terminal 5 (Control T) and Terminal 1/2 (battery -). This engaged the relay when the thermostat called for the compressor and the ran the fan/pump.
My final wiring looks like this (which hopefully is legible):
I'm wondering if the F connection on the controller (which presumably should internally go to ground when the compressor runs, engaging the fan) on my unit has failed, but I'm not completely sure...
Adding to the difficulty in this, the OEM terminal block is not very good. Between having to cram multiple wires in, it being mostly inaccessible to visually see things, and a mediocre screw system I often times struggled to actually get the wires to "catch." I may go back and splice some wires to reduce the number of elements going into each section, but wanted to give it some time to make sure that I didn't mis-wire or need to change anything.
My question for the group: in this configuration I have both thermostats engaging the compressor. The change the PO made was to add a spillover fan. However, he added that fan inline with the refrigerator thermostat, so it only runs when the refrigerator calls for cooling IF the freezer is NOT calling for cooling.
Putting aside the quality of his original wiring (I found the source of the "pumping" problem -- a combination of wrong wire sizes and poor crimps, including one butt splice that wasn't actually crimped at all...I'm actually little shocked that it was running period...) I noted that he had the refrigerator thermostat/fan combo tied from Therm + to Bat -. This meant that the when the refrigerator called for cooling it just engaged the spillover fan to move cool air from the freezer compartment, not engaging the compressor. The compressor would only engage when the freezer called for cooling. I'm not sure which is preferable....
My questions (looking for opinions):
Will the refrigerator calling for cooling run the compressor too often?
Is it better to let the freezer thermostat drive the cooling system and just have the fridge thermostat drive air movement (via the fan)?
In a different thread (google search after I got home Saturday) I read somewhere that Adler Barbour doesn't really support driving a fan off of the compressor system. This may be one more reason to move the fridge thermostat back to Therm +/Bat -. But I'm not sure (FWIW we never had issues with the system staying cool enough previously).
Interested in thoughts. With that, hopefully this info is useful for any other mid-90's Adler Barbour system owners.
Doug
Last edited:

