

Not sure if this is the right section .... forum admins, please feel free to move it to a more appropriate section.

Background:
I was never happy with the temp range of our fridge compartment. Originally, we had a balmar compressor and large evaporator in the freezer and a spillover fan that was activated by a mechanical thermostat that was active only if the fridge compressor (condenser fan) was active. The bottom of the fridge would freeze, the top would be around 5-8 deg C.
The compressor/evaporator were replaced with a Nova Kool 3 plate / DB50 compressor. The freezer works great, can keep -12 to -18 C and uses much less power than the old Balmar.
Proof of concept:
The first iteration used a cheap $20 amazon thermostat (Inkbird) to activate the spillover fan when needed and an internal fridge compartment circulation fan to circulate cold air up when the fridge got too cold (below 1.5 deg C). This got us down to + - 0.5 deg C..... but, sometimes at the cost to the freezer compartment, which could reach -1 to -3 deg C in the top. This would soften the ice (kept near the top) and increased frost on the evaporator plates... thus slowly reducing the accuracy of the freezer thermostat and the efficiency of the system. (yes I know, ice cube trays / bags should be sealed to avoid inserting moisture in the compartment....)

so....
Final solution:
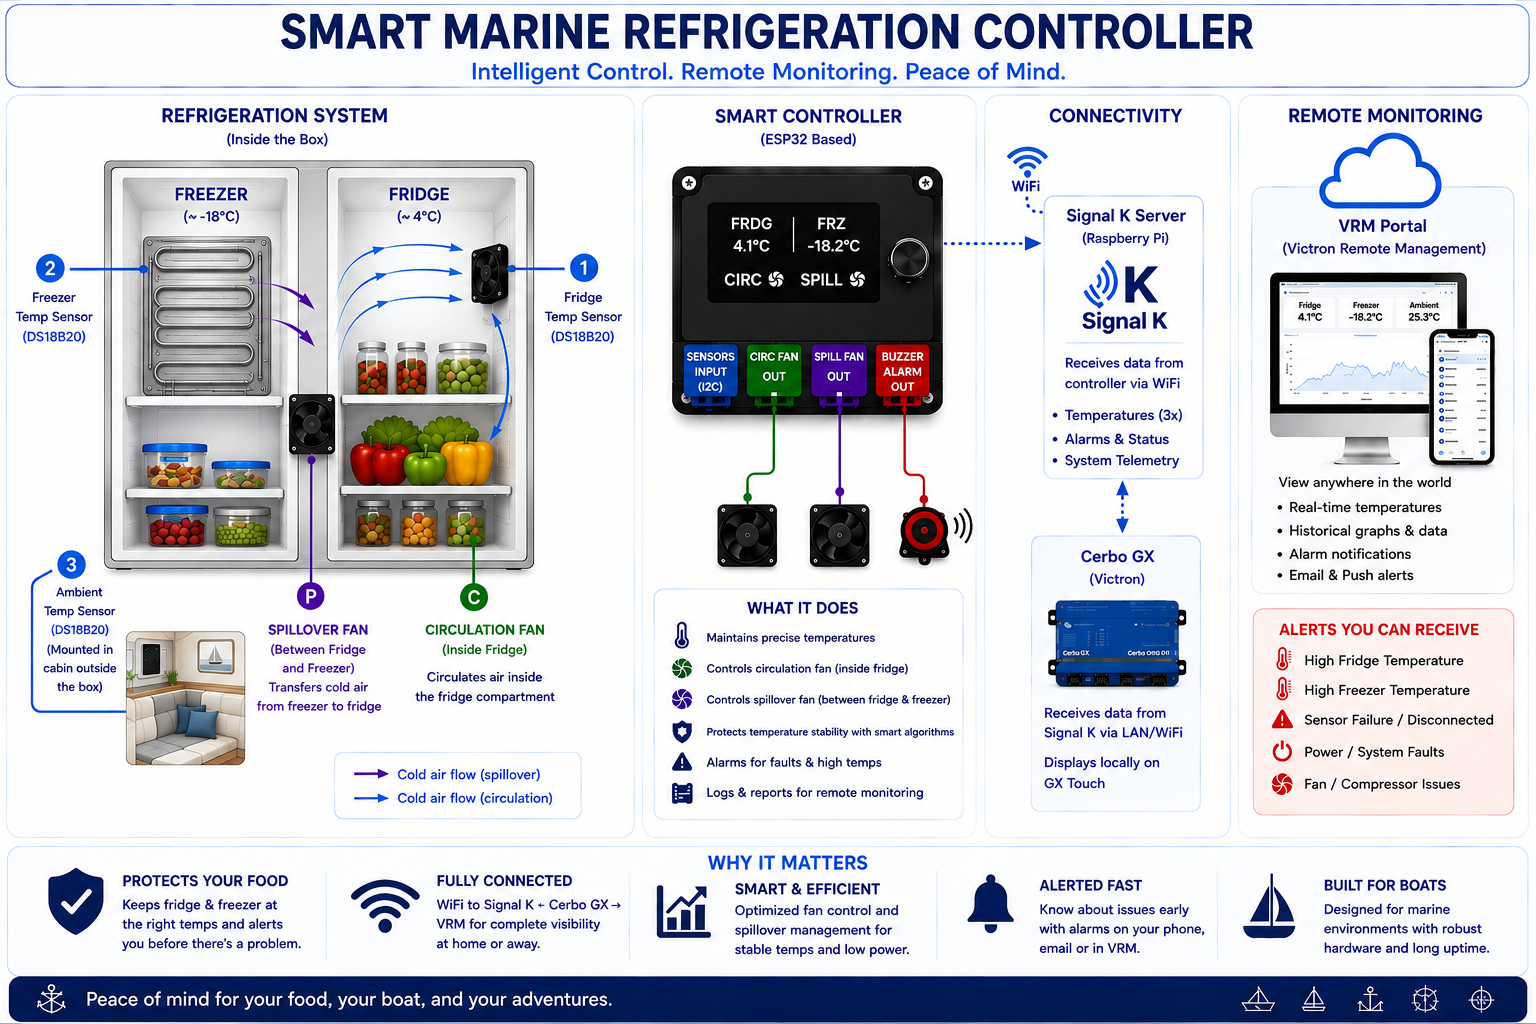
With a lot of assistance from Chat GPT and Claude AI (They each have different strengths), we now have a dedicated fan controller that considers: freezer temp, fridge temp. It can indepedantly control the spillover fan and the circulation fan. It maintains the fridge within temp limits, but there is a lockout if the freezer gets too warm. It uses small, cheap, waterproof DS18B20 temp sensors.
There are also alarms (visual and audio buzzer) if the freezer or fridge gets too warm (these are disabled during initial system startup / cooldown). The system connects to wifi and thus to Signalk (which can run on your CerboGX or Rasperri Pi) and sends key info (temps, errors)..... ultimately we'll have temps error states sent to VRM via the CerboGX so that we can be remotely advised of an issue....
Bench testing is complete, it's going in the boat next week.
The 3rd temp sensor monitors the compressor compartment (or ambient air temp), your choice. I did this to help identify if I have heat soak issues in that compartment.
Everything is open source. The code is available for hobby use (not commercial use) via github. The hardware is available from DFRobot and the code to generate a custom enclosure and 3D print it is on thingaverse

 github.com

 www.thingiverse.com
What you need:
- the hardware
- install VS Code (free) on your computer
- copy the code into VS Code
- build and send it to your ESP32 (USB)
- get a friend to 3d print the enclosure
- spend an hour wiring the kit together
- spend an hour pushing temp sensors to the freezer / fridge of your boat and pulling 12V from the refrigeration breaker (don't forget the 1A fuse)
- enjoy cold not frozen beer and milk that doesn't spoil in 3 hrs
Should the fridge temp sensors fail, there' s a manual overide to set a duty cycle for the spillover fan.
Setup can be done via webui (connect to the esp32 vs it's own wifi access point) or via the rotary encoder ( knob) right of the OLED screen. I was going to use a small touchscreen at first, the changing values would have been tricky as the touch areas would have been small and there'd be no tactile feedback. The screen can be set to sleep after x minutes but will wake if there's a new alarm trigerred.
SignalK can run on a CerboGX (install Venus OS Large) but there isn't a lot of overhead on the Cerbo when it's also connected to an NMEA2000 network. If the CerboGX is connected to N2K, a seperate instance of SignalK is preferred. A RaspberriPi 4 or 5 is very power efficient and (like a DC wifi router) can be left running 24/7, especially with a display off or used in headless mode.
The Open Marine Data Platform (can be installed on a PC, Raspberri Pi, CerboGX, etc...)
SensESP Home (this is the main code that runs on the ESP32 microcontroller that handles UI, wifi comms and messaging to /from SignalK).
After the device is installed on the boat and tested for a week, the next logical step is to try to skip SignalK as an intermediary. If we can send the temps to Node-Red, Node-Red can run on the CerboGX (it's much lighter on the CPU) and send the data natively to the CerboGX.
Background:
I was never happy with the temp range of our fridge compartment. Originally, we had a balmar compressor and large evaporator in the freezer and a spillover fan that was activated by a mechanical thermostat that was active only if the fridge compressor (condenser fan) was active. The bottom of the fridge would freeze, the top would be around 5-8 deg C.
The compressor/evaporator were replaced with a Nova Kool 3 plate / DB50 compressor. The freezer works great, can keep -12 to -18 C and uses much less power than the old Balmar.
Proof of concept:
The first iteration used a cheap $20 amazon thermostat (Inkbird) to activate the spillover fan when needed and an internal fridge compartment circulation fan to circulate cold air up when the fridge got too cold (below 1.5 deg C). This got us down to + - 0.5 deg C..... but, sometimes at the cost to the freezer compartment, which could reach -1 to -3 deg C in the top. This would soften the ice (kept near the top) and increased frost on the evaporator plates... thus slowly reducing the accuracy of the freezer thermostat and the efficiency of the system. (yes I know, ice cube trays / bags should be sealed to avoid inserting moisture in the compartment....)
so....
Final solution:
With a lot of assistance from Chat GPT and Claude AI (They each have different strengths), we now have a dedicated fan controller that considers: freezer temp, fridge temp. It can indepedantly control the spillover fan and the circulation fan. It maintains the fridge within temp limits, but there is a lockout if the freezer gets too warm. It uses small, cheap, waterproof DS18B20 temp sensors.
There are also alarms (visual and audio buzzer) if the freezer or fridge gets too warm (these are disabled during initial system startup / cooldown). The system connects to wifi and thus to Signalk (which can run on your CerboGX or Rasperri Pi) and sends key info (temps, errors)..... ultimately we'll have temps error states sent to VRM via the CerboGX so that we can be remotely advised of an issue....
Bench testing is complete, it's going in the boat next week.
The 3rd temp sensor monitors the compressor compartment (or ambient air temp), your choice. I did this to help identify if I have heat soak issues in that compartment.
Everything is open source. The code is available for hobby use (not commercial use) via github. The hardware is available from DFRobot and the code to generate a custom enclosure and 3D print it is on thingaverse
GitHub - cram001/ESP32-Fridge-thermostat: An ESP32 thermostat control for a marine spillover fan ice box
An ESP32 thermostat control for a marine spillover fan ice box - cram001/ESP32-Fridge-thermostat
github.com
Enclosure for ESP 32 / OLED / rotary encoder by marcham007
A simple parametric enclosure to house an ESP32 (Firebeetle 2 mounted on DFR0923 terminal block board, with openings for OLE and rotary encoder.Printed in PLA, 15 pct infill. Use the LATEST NIGHTLY build of OpenScad !Options for cable entry side, top or bottom lid, vent slots, mounting bosses...
www.thingiverse.com
What you need:
- the hardware
- install VS Code (free) on your computer
- copy the code into VS Code
- build and send it to your ESP32 (USB)
- get a friend to 3d print the enclosure
- spend an hour wiring the kit together
- spend an hour pushing temp sensors to the freezer / fridge of your boat and pulling 12V from the refrigeration breaker (don't forget the 1A fuse)
- enjoy cold not frozen beer and milk that doesn't spoil in 3 hrs
Should the fridge temp sensors fail, there' s a manual overide to set a duty cycle for the spillover fan.
Setup can be done via webui (connect to the esp32 vs it's own wifi access point) or via the rotary encoder ( knob) right of the OLED screen. I was going to use a small touchscreen at first, the changing values would have been tricky as the touch areas would have been small and there'd be no tactile feedback. The screen can be set to sleep after x minutes but will wake if there's a new alarm trigerred.
SignalK can run on a CerboGX (install Venus OS Large) but there isn't a lot of overhead on the Cerbo when it's also connected to an NMEA2000 network. If the CerboGX is connected to N2K, a seperate instance of SignalK is preferred. A RaspberriPi 4 or 5 is very power efficient and (like a DC wifi router) can be left running 24/7, especially with a display off or used in headless mode.
The Open Marine Data Platform (can be installed on a PC, Raspberri Pi, CerboGX, etc...)
SensESP Home (this is the main code that runs on the ESP32 microcontroller that handles UI, wifi comms and messaging to /from SignalK).
After the device is installed on the boat and tested for a week, the next logical step is to try to skip SignalK as an intermediary. If we can send the temps to Node-Red, Node-Red can run on the CerboGX (it's much lighter on the CPU) and send the data natively to the CerboGX.
Last edited:

