I have installed a watermaker in my 2005 41 DS. I now need to run lines to my two 50 gallon water tanks so I can fill them. I wondering if anyone has done this I am not sure how I should connect to the tank. Should I drill a small hole in each tank, connect to the hose coming down front the deck fill fitting, or connect under the sink to the water hoses from each tank before the pump? I any thoughts and pictures would help.
Installing a watermaker
- Thread starter Joe Wienecke
- Start date
That's an interesting topic. I'd like to know more about the watermaker, and why you decided to get one. I assume you're cruising?
My initial intuition is that a new, small inlet into one of the tanks would do. Why both tanks? Do they communicate, otherwise?
My initial intuition is that a new, small inlet into one of the tanks would do. Why both tanks? Do they communicate, otherwise?
First, I would install a line from the water maker to a sink.
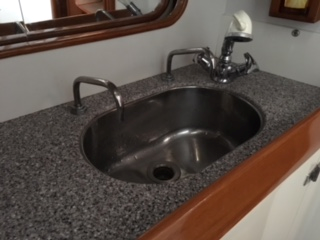
(On our boat, there are two spigots, one for the footpumped fresh water; and the second one, for the watermaker in the aft head's sink.)
This is allow you verify by taste and smell that you want to put what's coming out of the watermaker into you tanks. Also, it allows you take this water out and use it as part of the servicing of the tank (purifying, etc.) -- but that's a different subject.
Below the sink we put three valves which tee-off the line from the watermaker, This allows you, by creating a simple manifold with hardware store parts to i) use the sink, ii) put water in one or the other tanks.

We never turn-off the tank to the sink line. If the tank(s) are full, then the water once again comes out of the sink. I wouldn't every "block" the discharge line from the water maker. I was told that creates unacceptable back pressures in the water maker.
Once you commission a water maker, you need to continually and regularly use it; or, service it. You can't just drain it, let it freeze, or not flush it regularly. You need to keep it with a biocide in non-chlorinated water; except when you put the biocide in potable antifreeze, if you keep it winterized. Etc., etc., etc.
YOU NEED TO CHECK THE WATER COMING OUT OF IT BEFORE YOU PUT IN YOUR TANKS.
Water seeks it's own "level". You can cut new holes in your tank (which I wouldn't do; or you can run the lines from the water maker (manifold described above) and tee-them into lines that are from the tanks to your y-valve.
(On our boat, there are two spigots, one for the footpumped fresh water; and the second one, for the watermaker in the aft head's sink.)
This is allow you verify by taste and smell that you want to put what's coming out of the watermaker into you tanks. Also, it allows you take this water out and use it as part of the servicing of the tank (purifying, etc.) -- but that's a different subject.
Below the sink we put three valves which tee-off the line from the watermaker, This allows you, by creating a simple manifold with hardware store parts to i) use the sink, ii) put water in one or the other tanks.
We never turn-off the tank to the sink line. If the tank(s) are full, then the water once again comes out of the sink. I wouldn't every "block" the discharge line from the water maker. I was told that creates unacceptable back pressures in the water maker.
Once you commission a water maker, you need to continually and regularly use it; or, service it. You can't just drain it, let it freeze, or not flush it regularly. You need to keep it with a biocide in non-chlorinated water; except when you put the biocide in potable antifreeze, if you keep it winterized. Etc., etc., etc.
YOU NEED TO CHECK THE WATER COMING OUT OF IT BEFORE YOU PUT IN YOUR TANKS.
Water seeks it's own "level". You can cut new holes in your tank (which I wouldn't do; or you can run the lines from the water maker (manifold described above) and tee-them into lines that are from the tanks to your y-valve.
Last edited:
That might work -- however, I'd suggest that you need to make sure that the line from the watermaker is "down hill" -- or you can "trap" water. With "trapped" water, i) you might have the "Gooh of Life" growing in the non-chlorinated water; and, or in the winter, and/or ii) you can have a freeze issue.
Depending on how high your water maker's discharge of fresh water is located, and the route from the water maker toward the tanks (which are usually well forward of the water maker), I think I'd keep the "tees" lower and lower as you move toward the tanks.
Once you get a water maker, its not a install-it and forget-it.
I have been tending mine for almost 19 seasons. I wouldn't recommend it unless you really are going to be using the boat in overseas places or longer ocean passages. (e.g., an occasional trip from the East Coast to and from Bermuda wouldn't normally justify it.). Unfortunately, I probably shouldn't have installed one. ;^))).

Thanks for the feedback. I actually like both the manifold and the direct to the tank suggestions. I just need to think it thru. The watermaker out put line will be pretty much level to the tanks or under the sink. I plan for now to have a tee with a valve under the sink to test the water and pickle the unit. I will more than likely put in an outlet in the counter near the sink but for now I just open the door under the sink and pull out the line to test and pickle.
Why we purchased one? We do extended (2 months hoping for 3 months) cruising to the Bahama's with plans to go down island. Because we travel with a dog that loves to play in the sand and water. And because my wife refuses to take sponge baths a water maker was the way to go. We purchased a Rainman system which is portable but can be installed. On our first cruise last year I just pulled it out and made water filling from the deck openings. My unit can fill one of my 50 gallon tanks in about 1 hour 15 minutes. I am doing a soft install so that I can make water while underway. I already had a spare through hole so plumbing to the tanks is really all I need. In about 20 minutes I can totally remove the unit and with a Honda generator (I have two for Hurricane prep). I can make water anywhere just about.
I found on last years cruise I was not worried about water like my buddy boat. While water in the Bahamas is everywhere for about .35 cents a gallon if you on the hook most of the time you have to get it to the boat or the boat to the water. With the water maker I just did not worry about it at all. I filled one of my two 50 gallon tanks about every 3 days just to keep the system running smooth. Even wasted down the boat once to get the salt off. So for us the watermaker took looking for water off the plate. Being about to make it underway will mean I do not have to run the generator for hours in an anchorage making water bothering everyone.
Thanks again for the suggestion, now to decide.
That's impressive. Can you please give the model number of that system? How much power does it consume?My unit can fill one of my 50 gallon tanks in about 1 hour 15 minutes.
Thanks,
jv
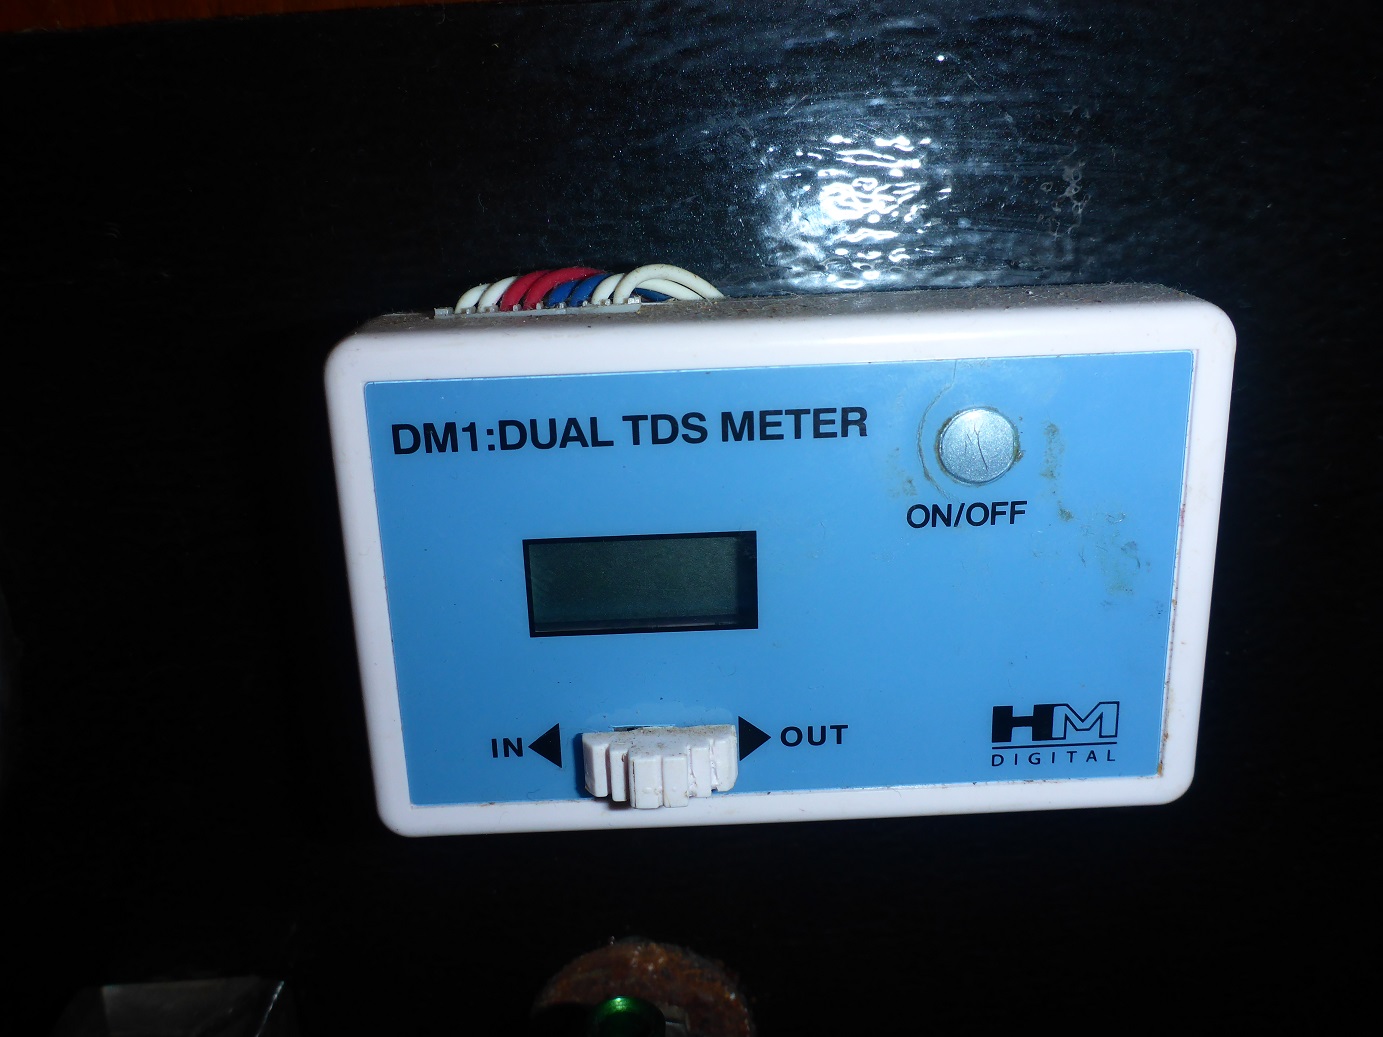
Mentioned above is the water testing. When I was designing our system I was just not interested in turning valves or pulling out hoses just to test the TDS of my water with a portable tester. I also wanted to monitor the water fairly often while the unit was operating, which would be a pain with a hand held tester. A quick search of the web (and I'm terrible at that) and I found this little beauty for about $25.00 that would install in the fresh water output line before the tank distribution manifold, and I can simply push a button to get my TDS reading, anytime. Attached to the panel w/velcro to change the battery which has had to be changed once in 7 years. And best of all, it has two probes, which means a spare should one fail: just slip it into the pex fitting.
Also, I used the proper size pex tube and fittings, color coded (normally green for sea water and blue for potable water) for all low pressure lines. They are fantastic IMO, zero maintenance and super easy to assemble or take apart if need be.
Also, I used the proper size pex tube and fittings, color coded (normally green for sea water and blue for potable water) for all low pressure lines. They are fantastic IMO, zero maintenance and super easy to assemble or take apart if need be.
I have a 110 volt unit which is nominally rated at 25 gal/hour. It’s a Village Marine (now Parker) unit. 50 gal in 90 minutes is a lot. (Neglecting the initial “start up flushing” of a while and the final “fresh water” flishbto put it away.
PICKLING has never been by trying backwash through the product discharge line. I have never heard of that. We have always run the solution through the system from the “raw” side in the boreal direction.??? I’m not sure that would work.
PICKLING has never been by trying backwash through the product discharge line. I have never heard of that. We have always run the solution through the system from the “raw” side in the boreal direction.??? I’m not sure that would work.
Mentioned above is the water testing. When I was designing our system I was just not interested in turning valves or pulling out hoses just to test the TDS of my water with a portable tester. I also wanted to monitor the water fairly often while the unit was operating, which would be a pain with a hand held tester.
Most "package" units that I've seen have a read-out of the product water salt content included which give you an indication.
Keep in mind that doesn't deal with the "stale" smell (often sulfur dioxide like) or taste. That's why the nose and "taste" test is necessary, in my opinion.
When fresh-water flushing (after using the system) to "put it away" for a few days -- i.e., when you aren't pickling the watermaker for a longer inactive period -- be careful not use chlorinated water. Chlorine is very harmful to the RO filters.
You can collect water from the sink "sampling" spigot, which will be chlorine free from the RO unit; or use a BLOCK style carbon chlorine filter from your tank as the source for the fresh water flush. I had a friend that was told that his failure to replace his carbon chlorine filter had mucked-up his RO filter.
I think, if you don't use a fresh water flush, you need to plan to use your system every couple of days, or so. I've found (in New England waters, which has relatively cool ambient temps) if you back-flush, you can go 3-5 days without pickling. (The result of not pickling BUT having fresh water flushed AND leaving the fresh water in there, is to delay the gooh of life starting to restablish itself.) If aren't going to run your system for more than a week or more, then I'd pickle the unit.
With our system and valves and a "jug" that I set-up, you can pickle the unit in about 5 minutes. We have fitting and valve on the raw water side, I put a "winterizing" 5 gallon plastic jug with solution into that fitting and simply run the solution into the pre-filter, filter, and unit. When the five-gallon jug gets to "end", I shut the unit off and close things up so I can use the unit again. I use this same set-up to winterize the unit, except I use potable anti-freeze with the pickling solution in it. 5 gallons of anitfreeze and two tablespoons of pickling powder, and I'm done until Spring.
===============
It's not that hard to do all of these things. BUT you have to do it periodically and be careful to treat the RO watermaker system with "purpose" and diligence.
Last edited:
I like this inline TDS. I have the hand held version now. The Rainman system I have is the High Output unit. Twice on our cruise last year to the Abaco I exceeded the 32 GPH. The TSD test was around 150 PPT each time. I run it with the Generator on through the inverter. It draws a lot of power but I can keep the Frig, Freezer, rans (6) on while it runs. I might be able to run more but not sure. The generator is a 6 kw. See cut and past
TWO 40" REVERSE OSMOSIS MEMBRANES IN A CASE
Our highest output RO system is compatible with either the petrol (gasoline) or electric pressure supply units.
TWO 40" REVERSE OSMOSIS MEMBRANES IN A CASE
Our highest output RO system is compatible with either the petrol (gasoline) or electric pressure supply units.
- Two 40" Dow Filmtec RO membranes will produce 100 to 140 litres per hour (23 to 32 gph) with our pressure supply unit, depending on water temperature.
- All salt water plumbing is 316 stainless steel.
- Quality fluid filled pressure gauge.
- 316 stainless steel pressure valve for long life.
- Rugged polyethylene case.
- Sturdy handle to ensure ease of carrying.
- 5 metre (16 ft) input hose with quick fit connector for connection to pressure supply unit, won't mark your deck.
- 3 metre (10 ft) food grade polyurethane fresh water delivery hose.
- 10 metre (33 ft) food grade polyurethane extension hose for reaching your forward water tank.
- 3 metre (10 ft) brine waste hose.
- Dimensions: Length 1,180mm (46.5"), Width 130mm (5.1"), Height 250mm (9.8").
- Weight: 23.5kg (52lb).
- This is effectively an elongated version of the 21" Compact RO Case.
- Note: These photographs represent the current version of the product. Photos elsewhere on website may be of previous product version.
- New: For customers wishing to install the membrane unit without using the external case, we now offer a "Rainman Naked" option that includes all the internals of this RO option without the case.