26S centerboard control

walt

.
Jun 1, 2007
3,511
Macgregor 26S Hobie TI Ridgway Colorado
For the last few years I have been trying to keep the weight of my 26S as low as possible, keep "heavier stuff" forward, fluffy light stuff (like the bed) aft. I just put on a new 110 jib. All this was done to try and get the most performance out of the 26S but with it still "as comfortable as possible". Note.. the one really fast 26D I know of has just about everything inside the hull stripped out including any wire to keep the weight low.. I still want a somewhat comfortable camping boat.. And.. Ive ended up with a reasonably fast boat for how easy it is to launch and trailer.

I single hand almost all the time with this boat and one thing Im missing out on for performance is being able to raise the centerboard for down wind runs. Definitely a little faster with the centerboard up downwind where its only contribution is drag. I do this sometimes now but have to go down into the cockpit to do this (two trips to raise than again lower).

Bob Hussey who sometimes visit this forum had modified his 26S to lead the centerboard control to the cockput and Sumner put what he did here http://purplesagetradingpost.com/sumner/macgregor-other-people/other-people-mods-4.html Sumner copied it and modified what Bob did, I think you can find Sumners modified setup on his web site. edit - here is Sumners version http://purplesagetradingpost.com/sumner/macgregor2/rigging-19.html

Also Bobs picture album here https://picasaweb.google.com/husseybob/Watermark9126S?authkey=YdzPd_9lrDs#

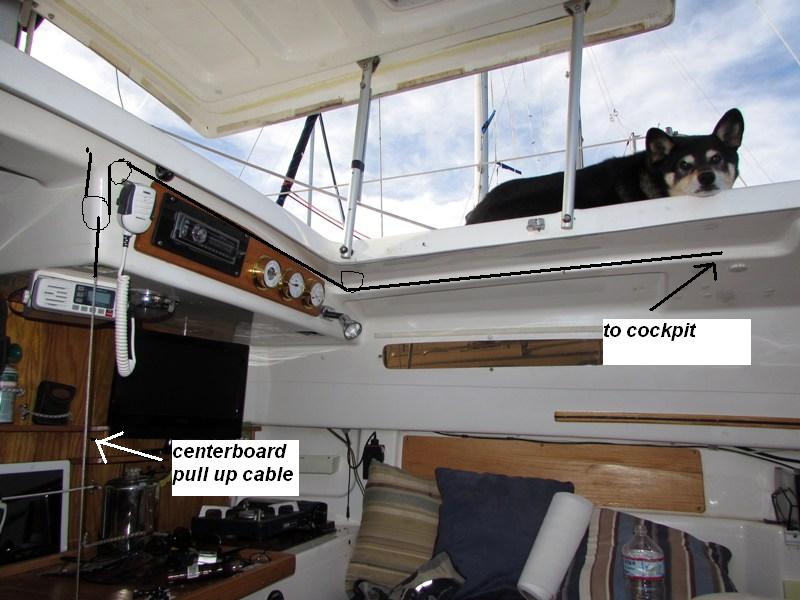
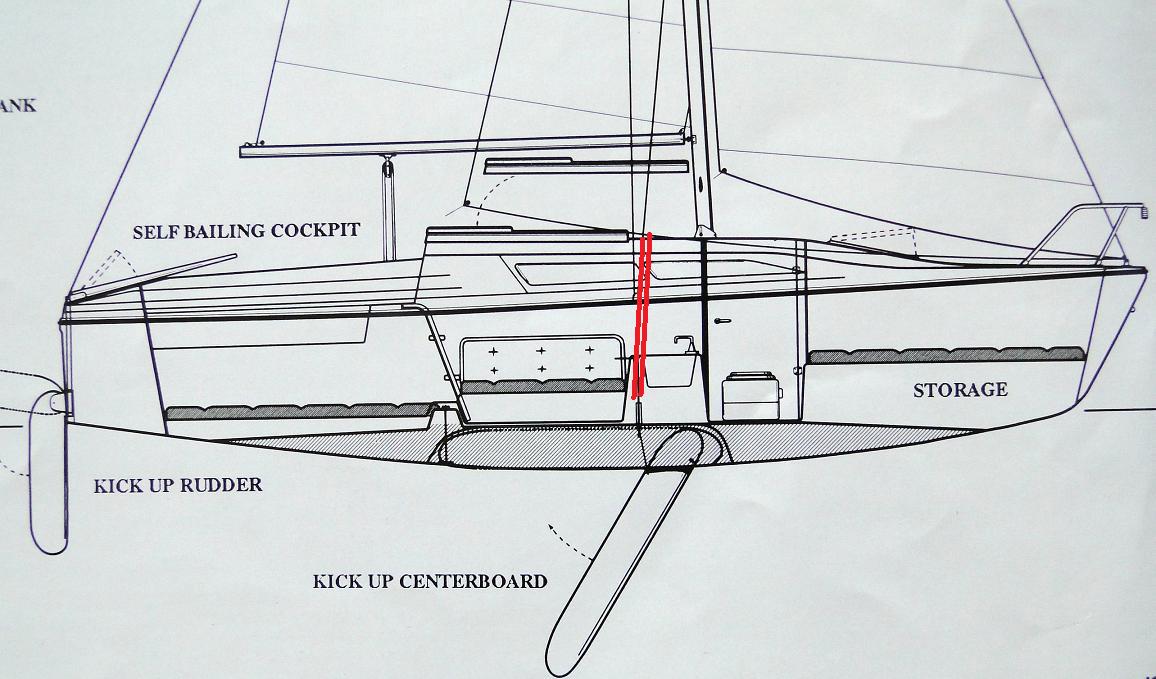
So.. Im thinking about this myself but years ago I also heard about another guy who put some sort of tube directly from the centerboard pull up access, through the cabin (in the area where the D centerboard trunk is) with access to the top of the hull. He then has a couple fairly simple blocks to get the control line over to the cockpit. The pipe he put in was water tight so that any rain water that entered through the access hole on the deck just went straight down to the trunk hole.. no problem. The picture below shows about where this new tube/pipe would go.

Keeping in mind that the whole point of this is downwind performance so it needs to be very usable and I think have way less blocks with all sorts of direction changes would be less drag, more reliable.. but dont know.

At one time I thought I has seen a picture in a member here "Fibroxie" picture album of a pipe like I just described.. but cant find the picture.

Im just thinking about this.. but I think being able to raise the centerboard on a light 26S easily from cockpit would make it a fairly fast down wind boat.

centerboard1.jpg
 
Last edited:
  • Like
Likes: My Mistress

Sumner

.
Jan 31, 2009
5,254
Macgregor & Endeavour 26S and 37 Utah's Canyon Country
Don't see why it wouldn't work but a couple things to think about.

You might be able to lift it ok but I found out that without the 2:1 advantage I put in with the extra blocks Ruth had a hard time lifting it and I also like the advantage. You could still add it up on top I guess if you wanted to.

Are you thinking of adding extra blocks up on top of the boat to take the line back along the sides of the pop-top? If so then you might still end up with close to the same number of blocks.

How do you plan on sealing the tube coming out the top of the boat and later if you want to revert you would have to close the hole off, but probably not a big deal.

One thing I like about the S over the D is that the sink area is open and not closed in and confined by the dagger board. Putting the tube where the dagger board trunk is on the D is going to kind of mess up the openness the S has in the sink area but maybe not a concern to you guys. I like it open as I put the stove in the area between the sink and the port-side hull storage unit.

Maybe consider trading the S for a D if you want to go faster ;) or if minimal weight is a goal the dog might have to stay home :wahwah::wahwah:;).

I do like being able to control the CB from the cockpit, especially single-handing, so it has been a good mod and have been very happy with how it currently is and wouldn't change it,

Sumner
==================================================
1300 miles to The Bahamas and Back in the Mac...
Endeavour 37 Mods...
MacGregor 26-S Mods...
Mac Trips to Utah, Idaho, Canada, Florida, Bahamas
 
  • Like
Likes: My Mistress

walt

.
Jun 1, 2007
3,511
Macgregor 26S Hobie TI Ridgway Colorado
I have about 10 pounds weight at the end of my centerboard and currently have just the 1:1 leverage. Its a bit of a pull and I would go to 2:1 but the leverage would be on the top of the deck. Im not sure I will do this at all since any way to do it ends up being a little on the complicated side with pulleys and line all over the place (its hard to beat the simplicity of the way it is now) but at least using the tube reduces the blocks and 90 degree turns by about 1/2. If I do it all all, I would tend towards the tube.. but that is still a big decision.. I know at least one person did the tube, anyone else with pictures?

That trunk on the D would not bother me at all but the swing center board that doesnt need to be locked down (since it doesnt affect righting moment and its not heavy enough to damage anything if it swings into the trunk in a knockdown) is one thing I really like about the S.. In the last few months Ive hit the centerboard on something at least three or four times and all that happens is that some of the bottom paint there gets scraped a little. I probably could have avoided smacking stuff with the centerboard if it were important (as in damage) but.. its nice to not really worry about it. The 26S is a good boat for how and where I sail. I havent look at a D in detail but Im guessing that you can rig them so that its easy to raise and lower the dagger board from the cockpit - which I like but cant do now.
 
Last edited:
  • Like
Likes: My Mistress

Doug J

.
May 2, 2005
1,192
Hunter 26 Oceanside, CA
I followed Bob Hussey's lead and did the mod to my 26S. It really wasn't that difficult. I think it would be a better solution than running a line out the cabin top. Here's a link to my post on Macgregorsailors site.

http://www.macgregorsailors.com/modt/index.php?view=1369
There's a link to photobucket there, but it's old and does not seem to work the way it did. Look for Centerboard Control folder in library.
 
Last edited:
  • Like
Likes: My Mistress

walt

.
Jun 1, 2007
3,511
Macgregor 26S Hobie TI Ridgway Colorado
Doug, thanks. I remember your photo bucket album, lots of great ideas in there and you also did nice clean work. For some reason I couldn't find it - but its worth looking at.

All the ideas posted have been very useful to me and Im going to try a different method. The original setup on the 26S is 1:1 leverage and uses two blocks total. What Bob did is 1:1 and uses 4 blocks. What Sumner did is 2:1 and uses 4 blocks plus one block for the 2:1.

What Im already into is best shown with pictures but it will have a very direct 2:1 leverage and also only use 2 blocks plus one block for the 2:1 leverage. There is NO hole through the deck. Its really set up around sailing utility.. the question that remains is can I make it look somewhat nice..

Picture below - the cable that connects directly to the CB will come straight up and connect to a block that will give it the 2:1 leverage. This is the position of the cable with the CB all the way down. Since Im not cutting a hole in the deck, I dont need the tube. I plan to have no tube and I think being able to see exactly where the CB is based on the position of the 2:1 pulley (easy to see while sailing) will be at least a little bit useful.

cb_uphaul1.JPG


Picture below. The pull up will NOT go through the hull of the boat. Instead, there will be a block attached to the "ceiling" in the area shown in the picture below. When the CB is all the way up, the 2:1 block goes almost up to the ceiling block so also must go through the square hole shown.
cb_uphaul2.JPG


Picture below - I will route the line through the inside hull liner like Bob and Doug did. In order to do this, I will have to cut an access plate just below where the block goes. Bob didnt need to do this since his pulley is in the head area. This line then just has a straight shot to the outside cockpit cleat - same as where Bob and Dougs opening is.
cb_uphaul3.JPG
 
Last edited:

Doug J

.
May 2, 2005
1,192
Hunter 26 Oceanside, CA
I like it! When I did mine I applied a couple variations to Bob's idea. You have come up with yet another variation. I think the 2:1 leverage is a great idea, since you have added weight to your CB. Being able to see the block position certainly will give you the ability to know where the CB is at a glance. Perhaps to address the look nice aspect, you could simply just trim out the holes and call it done. You will really appreciate having the CB control in the cockpit.
 
  • Like
Likes: My Mistress

walt

.
Jun 1, 2007
3,511
Macgregor 26S Hobie TI Ridgway Colorado
Pretty much done and so far I like this. The boat is in a slip so Im able to drop and raise the centerboard..


All the holes were pre-drilled in the AL peice - made getting this installed easier. This the main lifting pulley. Six screws total keep this in place.. might replace the screws later with something stronger. This is in the full up position.
cup_holder10.JPG

below - second pulley sends the line through the hull liner "channel"
cup_holder9.JPG


bellow.. centerboard in the full down position.
cup_holder8.JPG


below.. centerboard in the full up position.
cup_holder7.JPG


cup_holder6.JPG

Cleat for the centerboard control is just under the jib cleat. This is where the hull liner "channel
places things but its not a bad spot..
cup_holder5.JPG
 
  • Like
Likes: My Mistress

walt

.
Jun 1, 2007
3,511
Macgregor 26S Hobie TI Ridgway Colorado
Pretty much done with this now and I put it all in this link

http://analogengineering.com/sail/mac/centerboard.html

I tested it out yesterday including a beaching (attached picture) and overall think I will like it. I use a whisker pole on the jib for downwind and I think with a fully retracted CB, this boat should slide downwind easily. Being able to see the position of the CB by looking at the position of the 2:1 block was very useful since the CB doesnt alway drop easilly. I found you needed to pretty much have no load on the CB and still be going slow (like under 1 knot) to get it to drop and even then it best dropped from the full up position.. It pulls up much better. You still could not pull the CB up with a good sailing load on it (the lift jams it in a fixed position in the trunk) but you could for example pull it up going downwind at a fairly good clip.

cb_test.JPG
 
Dec 17, 2015
46
Macgregor 26 Classic, Swing Keel (26-S) Dog River, AL
On our 26S, one of the previous owners did a mod for the swing keel. I have to say that I like the simplicity of what he did...but the execution left a lot to be desired. Where the through deck pulley was mounted it was covered with a piece of innertube and lots of silicone in an attempt to keep water out. Didn't work! Today, I put the final coat of varnish on a topside wood fitting I made to eliminate this problem. Before doing this, I had added a small block on the deck for a 2/1 purchase...since raising the centerboard was very difficult unless you were sitting still! The way all of this was positioned, it did not create any issue or walking clutter on the deck. I will be installing this tomorrow and will take some pictures/video showing what I have done. It may be another option for future projects...which always seem to be on the drawing board! :)
 
  • Like
Likes: My Mistress

walt

.
Jun 1, 2007
3,511
Macgregor 26S Hobie TI Ridgway Colorado
FYI, here is another diagram from Paul Brinkley who used to post here. This is 2:1 but keeps the same pull point.


walt

.
Jun 1, 2007
3,511
Macgregor 26S Hobie TI Ridgway Colorado
Posting pictures is a little too easy. You can link to another web site that is hosting the picture already using the "image" icon. The real nice thing about this forum is that this one also will host pictures and to do that (at least how I have been doing it) you use the blue "upload a file" button, then "choose a file". You can then chose a file off your hard drive. The max image size is 3000 x 3000 pixels but you dont need this large and probably also should keep them smaller (see below). Wait for the image to show up at the bottom of your message then select the "full image" blue button and the image will show up in your post.

You should also re-size any image before you upload it. I just open the picture in some editor and re size to the range of 1024x760 (slightly large) to 800 x 600 (just slightly small). The picture below is 780 x 600 pixels. This picture was taken a few hours after the one a couple posts back where I had beached the boat.

I think this is the very easiest sailing forum to post pictures.. and is well worth supporting!!!

gromit1.JPG
 
Last edited:
Nov 30, 2015
217
MacGregor 26S Lakehills, Tx
Would there be any significant advantages/disadvantages to simply exiting the centerboard uphaul in the area where the handmike is hanging in this photo? It seems like it would lessen drag by eliminating 1 turning block, and still be easily accessed. What is the size of the block for the 2:1 advantage?

James


Sumner

.
Jan 31, 2009
5,254
Macgregor & Endeavour 26S and 37 Utah's Canyon Country
Would there be any significant advantages/disadvantages to simply exiting the centerboard uphaul in the area where the handmike is hanging in this photo? It seems like it would lessen drag by eliminating 1 turning block, and still be easily accessed. What is the size of the block for the 2:1 advantage?

James


I personally don't think there is a right way or wrong way to do this and having it is a big plus, especially single handing. I think it mainly comes down to if you want the lines exposed or not and if so will they be in the way considering how you use your boat.

I had considered at first running them like what Bob did through the head area but ....


.... since that was no longer there and I had storage shelving there that complicated that path. I also decided I wanted them exposed so that I could easily service anything if needed (haven't had too) and wanted them out of the way as much as possible so I ended up with two more turning blocks vs. the stock arrangement and the picture at the top of this post.


http://purplesagetradingpost.com/sumner/macgregor2/rigging-19.html

With the 2:1 purchase that I wanted there is no problem with pulling the board up with the two additional blocks and it is still way easier than what was there stock. I did make it where I could easily/quickly remove the lines if needed if they proved to be in the way but have never done it as they have been far enough out of the way to not cause any problems.

As I mentioned earlier since I spend weeks at a time on the boat and fix meals and clean up 2-3 times a day I wanted to not run lines in the area of the sink and passageway to the berth. If that isn't the case for you then running them like above in the sink area will cut down on the expense of a couple blocks ($30.00-$40.00 probably).

This is a good mod so I'd for sure recommend it and there are a number of ways to accomplish it. Study them all and think about how "you" will use the boat and go with the one that is best for you,

Sumner
=========================================================
1300 miles to The Bahamas and Back in the Mac...
Endeavour 37 Mods...
MacGregor 26-S Mods...
Mac Trips to Utah, Idaho, Canada, Florida, Bahamas
 
  • Like
Likes: My Mistress

walt

.
Jun 1, 2007
3,511
Macgregor 26S Hobie TI Ridgway Colorado
I like what you did overall. I had a line running inside ceiling of the cabin in the past where you have yours and if that lines is loose at all, its annoying when you sit under it (which is where I usually sit). It looks like you also added some sort of "hanger" to prevent that - as I had done also. So running the line inside the hull liner like Bob did was important to me plus the cosmetics (and I can see the block from the campanion way while sailing so have a very easy way to tell just where the centerboard is). The layout in that "kitchen" area is important as you mention.. most important to me is access to the stove (which mostly just gets used to make coffee or boil water) and where I have the cable actually works best for this. But I can see how where you have the line would also work depending on how everything else is setup. Many good ways to do this..
 
  • Like
Likes: My Mistress

walt

.
Jun 1, 2007
3,511
Macgregor 26S Hobie TI Ridgway Colorado
Would there be any significant advantages/disadvantages to simply exiting the centerboard uphaul in the area where the handmike is hanging in this photo? It seems like it would lessen drag by eliminating 1 turning block, and still be easily accessed. What is the size of the block for the 2:1 advantage?
I like the simplicity of that but you still need to cleat that line. I guess you could cleat it near where it exits but releasing that cleat from the cockpit might be slightly difficult. Other than that, it would be about as simple and direct as you can get (and that is a good thing). The blocks I used for the lifting and routing are Harken 29mm. The 2:1 block is Harken 22mm. The line I used is a little small to be real comfortable on the hands (I always wear gloves so no issue) but it also is smooth and the less block you have, the less issue you have with the line twisting..

FYI, I think the later model 26S had the centerboard uphaul line coming out from the sink area on the opposite side from where it is on the 1990 model. This is better access but you still have to go "down below" to get to the control. Where the control on the 1990 model is not a real good spot for access but it also never gave me any problem.
 
Last edited:
Oct 26, 2013
16
Oday 37 cc Spanish On.
This is the only pic I have. The vertical chrome tube at the corner of the galley is connected with a piece of tubing to the fibreglass connection where the cable goes down to the rudder. It goes up and the cable only, exits thru the deck via a block turning the line to port to a deck organizer and back to a cam cleat. Some people have mentioned adding more blocks to increase the advantage. I don't think it is necessary. After I douse the sails the engine is running and I retract the keel while going forward, this helps getting it started, after that it's easy. To keep the rain out I designed a clamshell as I couldn't find one the right size. I simply shaped a block of styrofoam as a male mold, waxed it as a release agent and layered 3 layers of fibreglass, smoothed the surface with Bondo and painted it. The whole thing makes sense and works great.
Hope this helps !
 

Attachments

  • Like
Likes: My Mistress
Dec 17, 2015
46
Macgregor 26 Classic, Swing Keel (26-S) Dog River, AL
Below is a video of the wood deck fitting I made to stop the flow of water through the roof. While I like what the previous owner did, as far as his plan...his execution was terrible! I also will be replacing all lines on the boat with the new sails!
 
  • Like
Likes: My Mistress

walt

.
Jun 1, 2007
3,511
Macgregor 26S Hobie TI Ridgway Colorado
Cool that some other ways of doing this are being shown!!!!

I went sailing today and tried this out. First picture is downwind with a whisker pole and the CB fully retracted.. Second picture shows how I can see where the CB is looking through the companionway. This is with the CB all the way down.

What the CB does should be about the same for all these methods but I turned the boat downwind and easilly raised the CB up into the trunk. This does help with downwind speed. When you decide to turn back upwind, getting the CB to drop back down is not so easy (even with the just under 10 pounds of lead I have at the deep end of the CB). However, it is easy to ge the CB to drop about 1/3. But to go from 1/3 to all the way down requires almost stopping the boat or a couple of tacks. Getting the CB to drop back down is the one downside since it has to rely on gravity and sometimes takes a little too long.

I like this!!!!

1_20_cb1.JPG

Picture below - you can see where the CB is by looking at the location of the 2:1 block.
1_20_cb2.JPG
 

walt

.
Jun 1, 2007
3,511
Macgregor 26S Hobie TI Ridgway Colorado
I took the boat out today with a waterproof camera to see where the CB is for different control positions. I put all this in the link http://analogengineering.com/sail/mac/centerboard.html

Some pictures from that link..

Set 1 below. It is easy to get the CB to go UP but not so easy to get it back down. When the CB has been all the way up for a down wind run and you just have turned up wind and release the CB control, the CB will easily go part way down but to get past this point requires the almost slowing the boat to a stop or a couple tacks. This set shows the CB in the easy to get to down position coming from all the way retracted.


Picture below is for the control position in the picture above


Set 2 below. This is with the pulled all the way in and the CB fully retracted for beaching or down wind.

Picture below is for the control position in the picture above


Set 4. This with the CB control all the way out and the CB max down.


Picture below is for the control position in the picture above