
Hi everyone. This is my first post to this forum and I'm not sure it will be useful to anyone, but it sure has helped me a bunch.I purchased hull number 763 (boat had no name) in June of 2016 from Redbud Marina located in Claremore OK. This Capri (now called Satori) had been up for sale for some time and left exposed to the weather and was pretty dirty topside, but it had a lot of extras (sails, trailer, motor) and I felt that with some work and money (much more than I realized while standing at the marina), it could be a fun sailboat to single handle. After getting the boat back to Colorado Springs, work began with cleaning the hull above the waterline and deck (wet sanding 320 to 1500 grit – then polishing and waxing) and wiring the mast (wiring/lighting had been removed to lighten the mast – not acceptable as the Coast Guard sees it). The trailer had been a hydraulic brake rig, but the system was completely rusted out, so I replaced wheels/tires, bearings, axles, wiring and made it an electrical brake system.
The boat had been used as a weekend racer and featured all the stuff that comes from Catalina when commissioned that way. Due to my job and working on another sailboat at the time (a 1980, S2 – 7.2), I never got the Capri in the water. However, the following summer (2017) I splashed it and managed to sail it a few times and must say that it was a good deal quicker than my previous Capri 18. But much work remained to be completed. Winter came all to quickly so it was hauled out and parked close so I could work on it when the weather turned nice…which here in the Rocky Mountains can be a real guessing game. I continued to buy small accessory items to upgrade or replace things that had been neglected…like a new set of stations and shrouds…I basically just sunk money into it in the anticipation of sailing the following summer.
However, while I enjoyed the boat very much that first year, I had a number where interactions with the cabin interior where I clocked my head against the interior bolts used to fasten the tracks, cams and winches to the topside of the deck. On a particularly windy day, I went below and opened my scalp pretty good and my wife was not pleased. After so much work on the boat, those interior bolts/nuts were a big nuisance and I felt there just had to be a better way of mounting deck gear. It got to be quite a “thing” with me and I spent many long hours searching the internet for what I believed would provide a much cleaner interior cabin while reducing the chances of further injuries.
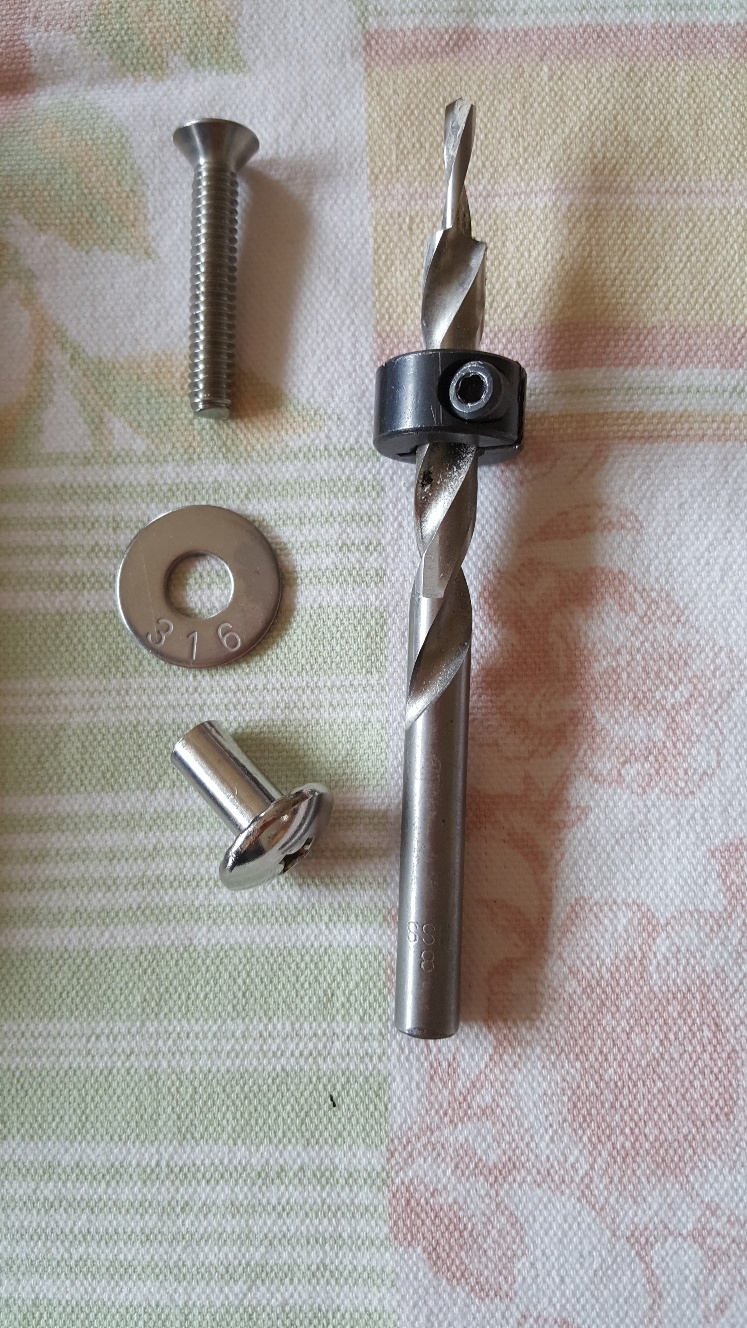
The answer wasn’t completely obvious at first, but I eventually found something called a “barrel nut” (didn’t know they existed) and was able to source a few from a company called “Green Boat Stuff” (GreenBoatStuff.com: Online Shopping for Environmentally Friendly Boating Supplies, Marine Grade Hardware & Fasteners, Natural Material Items, Household Accessories & More - part numbers below). I ordered a handful of ¼”-20 stainless barrel nuts, 5/16” washers and 1 ¼” long, ¼”-20 Phillips head stainless machine screws. They arrived quickly and I was anxious to try them, but I had not taken into consideration that when inserting the barrel nut from inside the cabin, the shank part of the barrel nut is 5/16” in diameter and 5/8” in length. So not wanting to risk using various size drills to open the hole to accept the barrel nut, another search was on to find a “stepped” drill bit that would allow me to use a pilot drill to enter the existing ¼”. keeping things centered, then have a larger part of the drill open the hole to allow the barrel nut to be inserted. Again, searching the web, I finally found what I needed, but I could only find them in metric sizes and from China…least at a price I was willing to pay. Regardless, I ordered a set and a few weeks later they arrived. The stepped drill shown in the image (8mm x 4mm) did what I needed to do without ruining the glass liner or balsa core. The process is easy to do…easier with a helper on deck, but you start by removing the existing screw, boar the new hole from inside the cabin, insert the barrel nut into the 7/8” diameter stainless washer and insert into the interior cabin side hole. Then with a helper on the deck, insert the new 1 ¼”, ¼-20 stainless screw with some sealant applied to the screw and thread the two together.

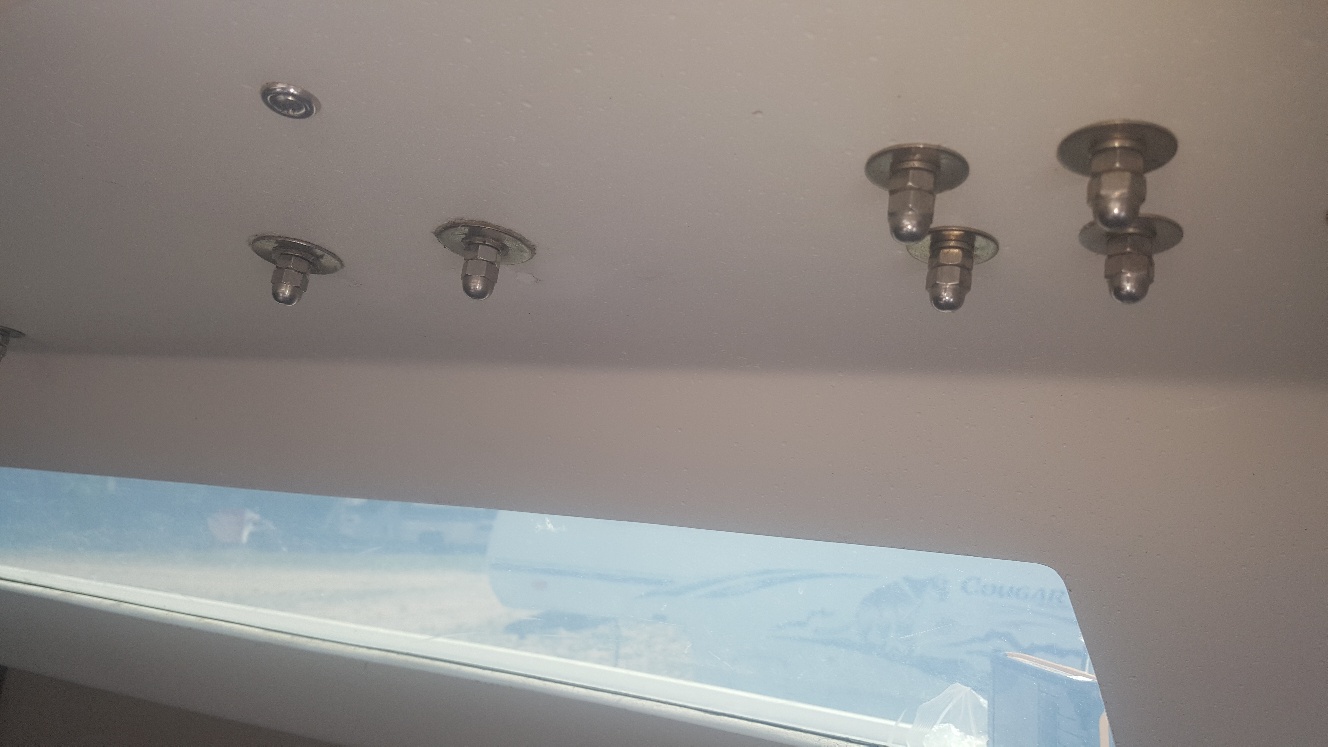
The image shows the first barrel nut installation that I installed to prove the idea next to the existing acorn nut. Quite the improvement! Based on this result, I ordered additional barrel nuts, washers and various lengths of ¼”-20 machine screws as the tracks, winches and cam block require different thread lengths. I even ordered a set of 10-32 screws, washers and barrel nuts to use for my spinnaker down haul block attachment on the foredeck.
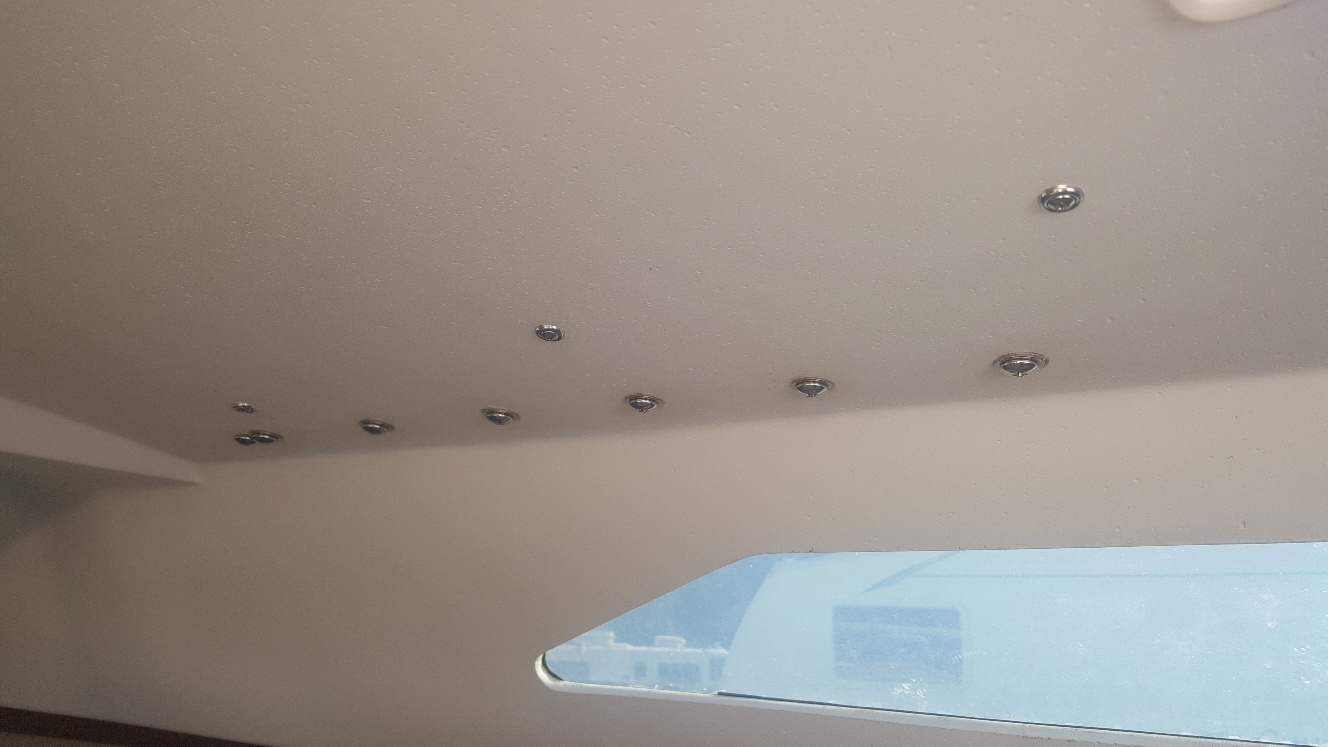
This is how the port side looked when completed. Depending on the size of your boat and the thickness of the cabin deck and how many long screws you have, but I think I spent just north of a $125 including domestic shipping for the hardware used. The drill set was about $45 (I was able to use PayPal), including international postal shipping (took over 3 weeks to arrive). However, I believe it’s a cleaner, more secure mounting system and in the long run is going to be cheaper than a trip to the ER for stitches to my beanie.
Green Boat Stuff PN:
¼”-20 Stainless Steel Barrel Nut – PN: FA-268-2963
5/15” Stainless Flat Washer – PN: FA 268-1400
¼”-20 x 1 ¼” Stainless Phillips Head Machine Screws – PN: FA-268-799
Comments, suggestions, give me a shout.
Mike Fritz
“Satori” - Colorado Springs, CO
The boat had been used as a weekend racer and featured all the stuff that comes from Catalina when commissioned that way. Due to my job and working on another sailboat at the time (a 1980, S2 – 7.2), I never got the Capri in the water. However, the following summer (2017) I splashed it and managed to sail it a few times and must say that it was a good deal quicker than my previous Capri 18. But much work remained to be completed. Winter came all to quickly so it was hauled out and parked close so I could work on it when the weather turned nice…which here in the Rocky Mountains can be a real guessing game. I continued to buy small accessory items to upgrade or replace things that had been neglected…like a new set of stations and shrouds…I basically just sunk money into it in the anticipation of sailing the following summer.
However, while I enjoyed the boat very much that first year, I had a number where interactions with the cabin interior where I clocked my head against the interior bolts used to fasten the tracks, cams and winches to the topside of the deck. On a particularly windy day, I went below and opened my scalp pretty good and my wife was not pleased. After so much work on the boat, those interior bolts/nuts were a big nuisance and I felt there just had to be a better way of mounting deck gear. It got to be quite a “thing” with me and I spent many long hours searching the internet for what I believed would provide a much cleaner interior cabin while reducing the chances of further injuries.
The answer wasn’t completely obvious at first, but I eventually found something called a “barrel nut” (didn’t know they existed) and was able to source a few from a company called “Green Boat Stuff” (GreenBoatStuff.com: Online Shopping for Environmentally Friendly Boating Supplies, Marine Grade Hardware & Fasteners, Natural Material Items, Household Accessories & More - part numbers below). I ordered a handful of ¼”-20 stainless barrel nuts, 5/16” washers and 1 ¼” long, ¼”-20 Phillips head stainless machine screws. They arrived quickly and I was anxious to try them, but I had not taken into consideration that when inserting the barrel nut from inside the cabin, the shank part of the barrel nut is 5/16” in diameter and 5/8” in length. So not wanting to risk using various size drills to open the hole to accept the barrel nut, another search was on to find a “stepped” drill bit that would allow me to use a pilot drill to enter the existing ¼”. keeping things centered, then have a larger part of the drill open the hole to allow the barrel nut to be inserted. Again, searching the web, I finally found what I needed, but I could only find them in metric sizes and from China…least at a price I was willing to pay. Regardless, I ordered a set and a few weeks later they arrived. The stepped drill shown in the image (8mm x 4mm) did what I needed to do without ruining the glass liner or balsa core. The process is easy to do…easier with a helper on deck, but you start by removing the existing screw, boar the new hole from inside the cabin, insert the barrel nut into the 7/8” diameter stainless washer and insert into the interior cabin side hole. Then with a helper on the deck, insert the new 1 ¼”, ¼-20 stainless screw with some sealant applied to the screw and thread the two together.
The image shows the first barrel nut installation that I installed to prove the idea next to the existing acorn nut. Quite the improvement! Based on this result, I ordered additional barrel nuts, washers and various lengths of ¼”-20 machine screws as the tracks, winches and cam block require different thread lengths. I even ordered a set of 10-32 screws, washers and barrel nuts to use for my spinnaker down haul block attachment on the foredeck.
This is how the port side looked when completed. Depending on the size of your boat and the thickness of the cabin deck and how many long screws you have, but I think I spent just north of a $125 including domestic shipping for the hardware used. The drill set was about $45 (I was able to use PayPal), including international postal shipping (took over 3 weeks to arrive). However, I believe it’s a cleaner, more secure mounting system and in the long run is going to be cheaper than a trip to the ER for stitches to my beanie.
Green Boat Stuff PN:
¼”-20 Stainless Steel Barrel Nut – PN: FA-268-2963
5/15” Stainless Flat Washer – PN: FA 268-1400
¼”-20 x 1 ¼” Stainless Phillips Head Machine Screws – PN: FA-268-799
Comments, suggestions, give me a shout.
Mike Fritz
“Satori” - Colorado Springs, CO
