
when something little turns in to something more
- Thread starter hawk232
- Start date
What a great looking boat there! Looks like you sprung for the new ruddercraft rudder. It's hard to tell in the pic and viewing it on my phone, but did you get the mast support with it? Can you share some impressions from using it? Does it telescope and how tall is it when down all the way? Will it interfere with getting into the boat using the swim ladder? Sorry for all the questions, but inquiring minds and all?
The ruddercraft rudder was left over from my other sailboat. I sold it so cheap I was keeping the rudder LOL.
I got some measurements from CaptDon and found out that the rudder itself was the same deminsions. I did some slight modifications (tiller was too high and angle was wrong) and made some stainless steel mounts for the crutch to rest in. the mast support is not from ruddercraft, I am not sure where it came from but it telescopes and is a nice piece.
will give a full report after the weather cooperates and I get to splash it but I have an idea of what I am in for. my last boats helm was much lighter than the stock C22... adding the ruddercraft to THAT boat was like adding power steering, I can only imagine what it will be like on the c22! also, that boat would "round up" at about 25* heel, the ruddercraft bumped that up to just over 30* (never got a good look since im am to busy pulling the seat into my rearend!!)
started on some wiring finally. one of my pet peeves among all of my boats is forgetting to turn the dang battery off and having to climb back in and get the boat dirty (usually still wet from being washed) to turn the battery off!! on the flip side, having to do the same to charge the battery!! I had a realization a year or two ago that has reshaped the way I think about ALOT of stuff. quite simple actually... "if its inconvenient, it wont be used or done"
i am mounting the battery in the vberth to help with weight distribution. i ran 8ga wire back to the stbd lazerette where i mounted my battery switch as far aft and as high as possible (in hopes of being able to reach it from behind the boat. next, i didn't want to have to crawl forward and drag cords in the cabin to charge the battery before a trip so i mounted two terminals right next to the battery switch

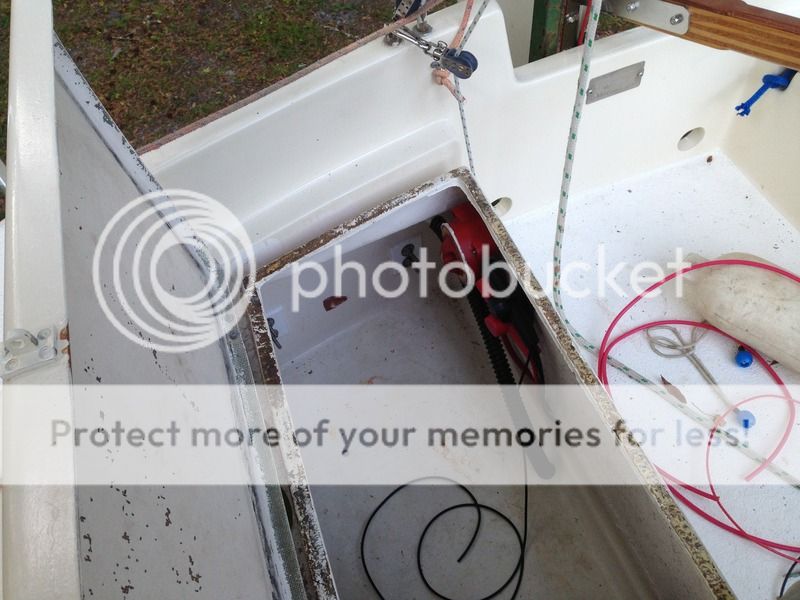
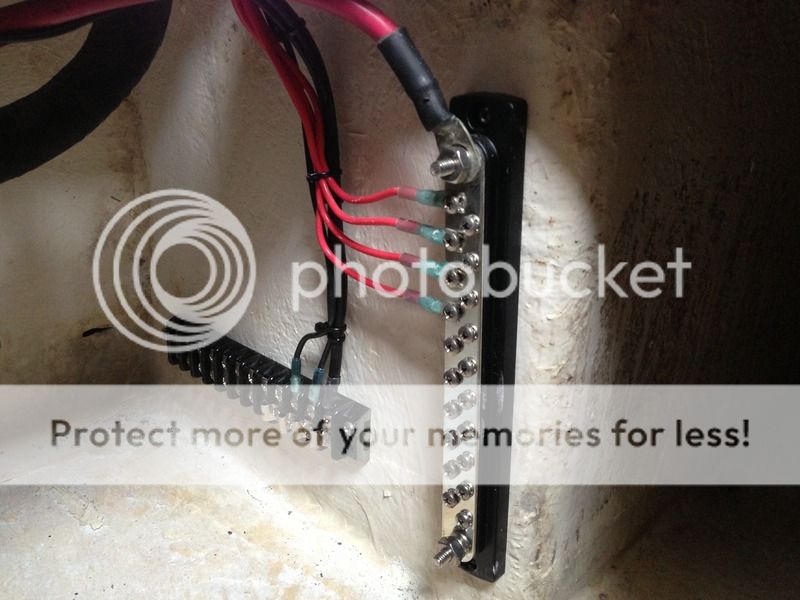
then ran the wire back forward to the factory area where it will go to two buss bars.

i will not be mounting the switches in the factory location. i feel its to easy to kick them there. i will be cutting out the side of the "filler" piece behind the aft dinette seat. i will then mount a piece of starboard to the filler piece and that will be my switch panel. i am also using breakers instead of fuses. I am only going to have 3 switches (nav lights, bilge pump and accessory plugs) and 4 breakers (same as switches with the addition of a 10A breaker for the tillerpilot.
sundays forecast is calling for 10-15mph with only a 20% chance of rain, lets hope it holds out!
i am mounting the battery in the vberth to help with weight distribution. i ran 8ga wire back to the stbd lazerette where i mounted my battery switch as far aft and as high as possible (in hopes of being able to reach it from behind the boat. next, i didn't want to have to crawl forward and drag cords in the cabin to charge the battery before a trip so i mounted two terminals right next to the battery switch


then ran the wire back forward to the factory area where it will go to two buss bars.

i will not be mounting the switches in the factory location. i feel its to easy to kick them there. i will be cutting out the side of the "filler" piece behind the aft dinette seat. i will then mount a piece of starboard to the filler piece and that will be my switch panel. i am also using breakers instead of fuses. I am only going to have 3 switches (nav lights, bilge pump and accessory plugs) and 4 breakers (same as switches with the addition of a 10A breaker for the tillerpilot.
sundays forecast is calling for 10-15mph with only a 20% chance of rain, lets hope it holds out!
Hawk, our sunday forcast is looking great now to, so maybe the 2 of us can get new pics and videos
Hawk, this is some meat and potatoes stuff I'm really interested in seeing, thanks for posting. I'd love to see what switches and breakers you buy and how you assemble them. I've been looking at switch panels from various sources and it is pretty unbelievable for what a six switch/breaker panel costs!
2 years ago I built a custom chopper that has a simple 12V wire harness. Only has 3 circuits; Ignition/Coils/lights plus a switch for high/lo beam and a brake light actuator switch. I figured that set up simply by taking one circuit at a time and it wasn't nearly as hard as I thought it would be. The hard part is hiding all the wires and doing a neat looking job... most of my wires are actually run inside of the frame tubes. Anyway, that was awhile ago and since then I find myself thinking "Oh crap, I don't think I remember anything I learned from before!" I think electrical work is a perishable skill if you don't flex your brain on it very often!
2 years ago I built a custom chopper that has a simple 12V wire harness. Only has 3 circuits; Ignition/Coils/lights plus a switch for high/lo beam and a brake light actuator switch. I figured that set up simply by taking one circuit at a time and it wasn't nearly as hard as I thought it would be. The hard part is hiding all the wires and doing a neat looking job... most of my wires are actually run inside of the frame tubes. Anyway, that was awhile ago and since then I find myself thinking "Oh crap, I don't think I remember anything I learned from before!" I think electrical work is a perishable skill if you don't flex your brain on it very often!
Yea you’re right Cloud; I need a lot of how to help to get some of my wiring looking better and not in a wad of yellow screw on connectors and tape.
Hawk you mentioned 2 buss bars, I only have one. I think it is for positive wires and the neg ones are the biggest part of the wad I’m talking about. Should both + & - be run to buss bars?
Your idea of putting the selector switch and charger connect lugs aft and reachable is really forward thinking. I'm going to do that...
And I read some have gone to 6 volt bats 2 in parallel (I think that was it) to give 12 v. They say it makes the charge up and discharge more even. Some talk about having 2 banks like that, 4 6 V bats. Do you think that is worth the effort / expense? What about the weight on a 22?
I want to go with solar panel charge & controller. Because I spend days at a time on board and plan even longer stays.
James
Luke- i kept all of these switches and breakers (brand new never used) from another boat project that i sold off, so i figured might as well use them.
James- i am going for a minimalist approach to the electrical system. i will only have 2-12v sockets, nav lights, GPS, tiller pilot and bilge pump hooked up to the batt. my cabin lights are the stick on push to turn on leds. for an anchor light i will hang an led lantern from the backstay (i don't want wires in the mast). I am using a grp 27 marine deep cycle. i have a 50w renogy solar panel rated at 2.8A peak ( have only been able to get 2.65 to 2.7 peak out of it). all i plan to use with any regularity are the GPS (.7A) and the tillerpilot (1.5A under max load). that's 2.2A/hr. i am hoping that my panel will be able to keep up, or at least close to it, with my draw.
2-6v batts will offer a tremendous gain in reserve capacity over 1 12v batt. it really comes down to your anticipated power consumption and your plans for replenishment. 2-6v would be a good idea if you aren't going to have much solar or alternator power. in my situation, with my anticipated draw, i think it would be a lot of extra weight for no real gain.
oh and as far as the buss bars... it may be flawed thinking on my part but i wanted each item to have its own ground. if a jumper type setup is used, if one terminal becomes corroded, all items downstream do not work. with the buss bar setup, the bilge can be corroded but nav lights will still work. that's my logic... (plus i had the buss bars sitting around also)

I had considered the use of two Trojan 6V batteries hooked up in series for 12V. Yes, a great amount of amp hours there, but super heavy and very expensive to boot. I can get an Interstate Group SM27 for about $125 locally. Oddly enough I found a source where I can get the 6V Trojan T105 (225 AH) for the same price, but I have to drive an hour and a half to get them. the chandleries around here charge double that price to buy them.
Of course I would have to buy 2 of the 6V, but with a 12V I can buy one now and get another down the road. I really doubt I will need that much reserve power, and I'm not sure the taller batteries will fit in the space I want to put them in. I have the Seavolt group 27 (West Marine label) that came with my boat, but I don't think its any good. It charges up to 12.3 V and that's it, I thought it was supposed to go up to about 14V?
Anyway, plenty of time to think about it and many other things to do before I get to that part. The first thing I need to do is figure out the switches (if any) I will need near the compression post if I decide to put on a steaming/foredeck combo light on the mast, and if I'm still going to leave off the all-round anchor light. I need to get the thru deck fitting complete so I can close up that part of the deck for paint and non-skid.
I have a Fry's electronics store here which is a great place to get switches & breakers, but none of this stuff is 'Marine Grade'... but I doubt that is necessary.
Go Sailing !!! Damn the torpedoes!
And on second though (er, my original thought), leave off the anchor light and just use a center off 3 way switch for a steaming/foredeck combo light.
If I can't figure that out, I'll just go with a single steaming light with no switch in the cabin roof at all, just the switch at panel which will turn on all Nav lights.
I doubt I will really have a need for a foredeck light, just nice to have I guess.
12v batt should hold 12.8v when new after resting fwiw
Gene, y'all going tomorrow too? Or maybe tomorrow is better than Sunday now. Hmmmm
Gene, y'all going tomorrow too? Or maybe tomorrow is better than Sunday now. Hmmmm
I think we'll stay out all weekend. Saturday night's forecast is 71F, winds 10-15 MPH, precip 20%. Can't ask for any better than that!! :dance:
It's 1:15 pm on the west coast, so y'all should be done work by now and eyeballs deep in provisioning and boat preps to sail all weekend. Get off the interwebs! LOL
i know what you mean James!

Luke, these are the breakers i am using

Today i got most of the wiring done, made my switch panel and got it mounted and installed the breakers and switches. every single connection is either a heat shrink connector or i used heat shrink, the wire is all tinned marine grade too.
after i got to a forced stopping point (ran out of primary wire) i moved on to mounting the tillerpilot parts (tiller pin and the gunwhale mount). then i moved on to the transducer and got it 4200ed to the hull (in hull transducer). with any luck, tomorrow i will get the gps and the tillerpilot wired, then build my gps mount so that it will all be working for SUNDAY'S MAIDEN VOYAGE!!!!


I don't know if it makes me a sick man or what, but that nice neat wiring is just BEAUTIFUL if you ask me. Now I know who's gonna help me with mine when the time comes!!
Good looking work, Hawk232
One point that I haven't seen anyone bring up in this wiring discussion is color coding. Mostly it's not a big deal unless you're a recovering perfectionist like I am, but it does become practically important if you intend to add shore power to your boat. In that case, black AC wires and black DC wires don't play well together and make circuit tracing a nightmare. For that reason, the ABYC color code for negative DC conductors is yellow.
I don't intend to wire my boat for shore power but I decided to go ABYC while I was at it and I'm glad I did. The black wires you see below are from cables where I didn't have a choice and from the original nav light wiring.
For more installation tips and pics, see Complete rewiring on my blog.