Replacing a cutlass bearing is not a tough project but does require some thought. On some boats the bearing is inside the dead wood making replacement more of a task than when it's mounted in a strut. These instructions deal with replacing a strut mounted cutlass bearing with the prop shaft already removed.
While there are some commercial tools designed for cutlass bearing removal they are generally expensive for a one-time DIY use. The set screws are not the means of holding the bearing into the strut they are there as back up. The press fit is what holds the bearing in place and the set screws are simply a means of back up.
Often times when a bearing has been installed for a while they can become frozen or corroded in place. Using a press, either hydraulic or mechanical, for removal, can potentially distort the bearing. Nine times out of ten though they work well.
While many folks have had luck with presses they are as I mentioned expensive to buy but can be a potential cost saver when you factor in dropping a rudder or buying a new coupling and having it fitted and faced..

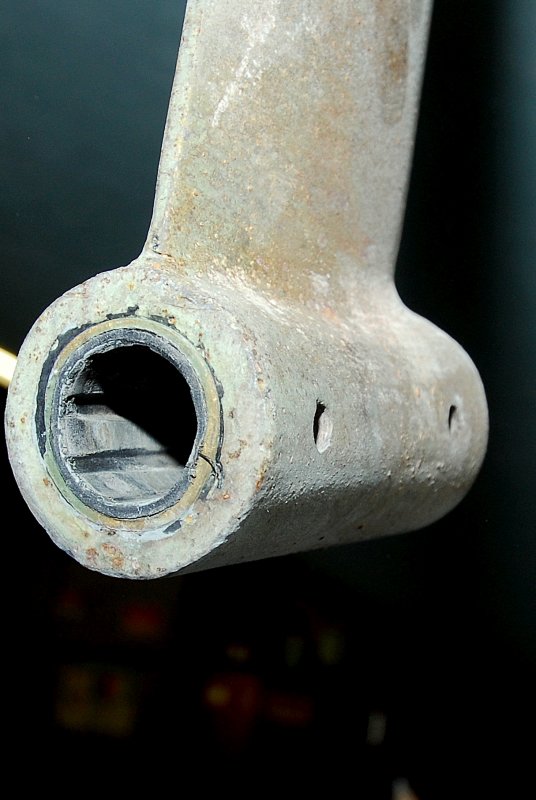
The first step is to remove the set screws. Often times they are filled with crud and growth and must be cleaned before you can get an allen wrench in there. I find a nail or coat hanger a good tool for cleaning out the allen heads. You may also want to hit the set screws with some P.B. Blaster before attempting to remove them. If you see what looks like red or blue Loc-Tite you may want to heat the set screws with a heat gun before trying to remove them. This will avoid the potential stripping of the allen heads.
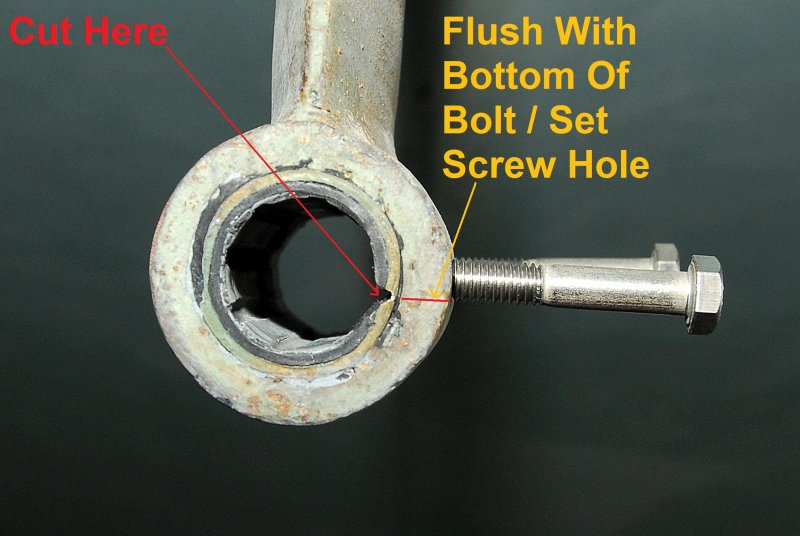
In this photo you can see I have already made the cut through the bearing. The location of this cut is critical if your strut uses set screws. Some boats do not use set screws so the cut location is not as critical but on struts with set screws it's far easier to utilize the set screw tappings to aid in breaking free the bearing.
The location of the cut should be opposite either the top or bottom of the set screw tappings so that the bolts are pushing right at the cut to split it inward. the picture denotes the optimum cut location of you have set screws.
Making the cut can be done two ways: #1 Cut it by hand with a hack saw #2 Cut it mechanically with a Sawzall.
I DO NOT recommend using a Sawzall if you are not experienced in its use and you have the skill finesse it for exacting use. If using a hack saw you simply remove the bade and insert it throught eh bearing then re-assemble the saw around the strut. Some folks say to install the blade upside down but I honestly find it more accurate and easier to be holding the handle in its proper hack saw orientation.
When making the cut DO NOT cut all the way through the bearing and DO cut evenly. Applying more pressure on one end of the bearing than the other will result in an uneven cut. The saw blade MUST have 100% even pressure to make an even cut. You want both ends of the bearing to become paper thin at the exact same time. If you do cut all the way through and score the inner surface of the strut it's not a huge deal, but, if you do this every time you change a cutlass it will get bad over time.
In this photo you can see that I have cut the bearing paper thin and not scored the strut in the process. I used a Sawzall with a very fine tooth metal cutting blade. I have lots of experience with recriprocating saws and feel quite comfortable with them. You'll have to make that decision on your own. If you are in the least bit questioning your skill please use a hack saw with a good quality blade like a Lennox.
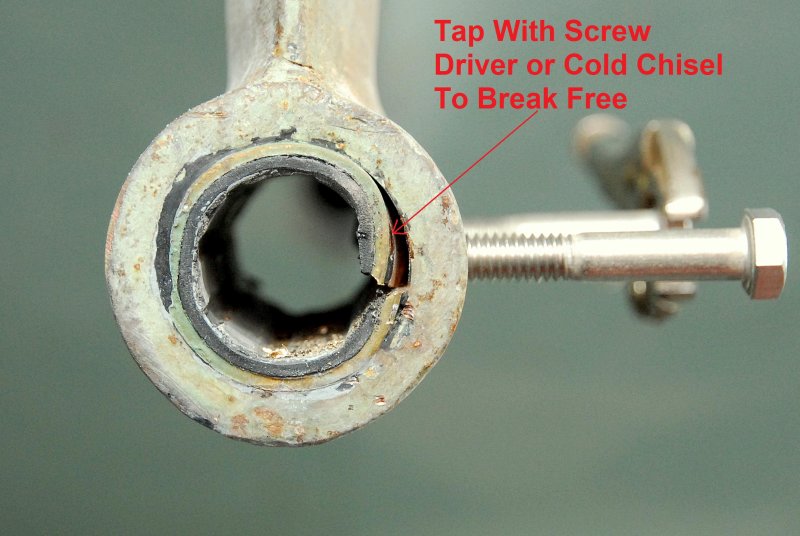
With the bearing cut paper thin I use a cold chisel and dead blow hammer to make the first split of the bearing by setting it on the edge and pounding inward. Be careful not to damage the strut when doing this. This will start the ripping of the very thin surface left in the cutlass bearing. Once you've started the rip simply insert some hex head bolts into the set screw holes and tighten them evenly and you'll collapse the cutlass inward relieving the matting surface pressure in the process.
If you do not have set screws your next move is to use a maple dowel or piece of thin fiberglass pounded between the strut and the bearing to split it along its entire length. Please do not use a screw driver or metallic object to pound and split the bearing. A metallic object could quite easily score the inside of the strut as it may be a harder metal. Use an object that is softer in composition than the strut.
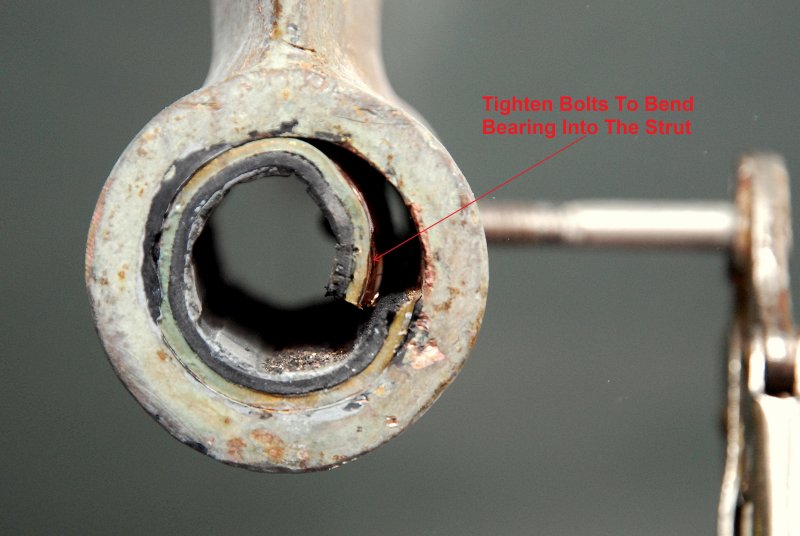
In this photo I've tightened the bolts and collapsed the cutlass bearing relieving its press fit pressure from the strut. You can achieve the same results with a maple dowel pounded between the bearing and strut after initially bending it with a cold chisel & hammer to get the dowel started.
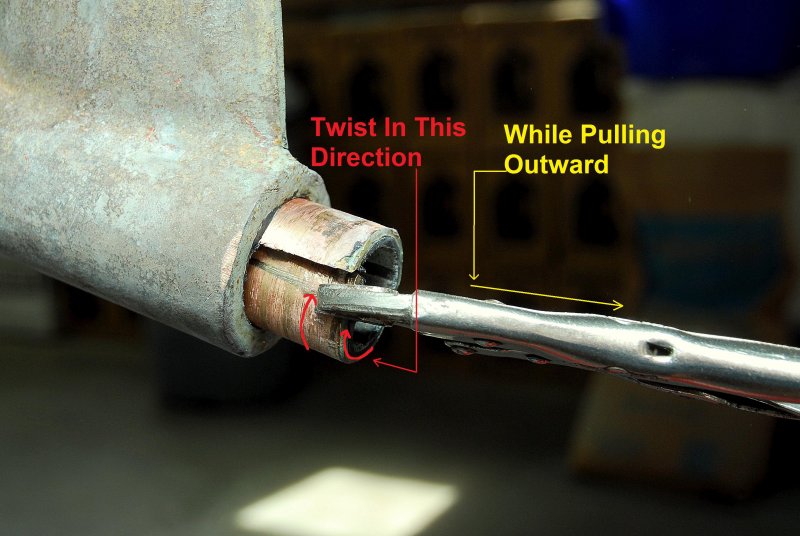
Once you have collapsed the bearing inward simply grip it at the bend with a pair of Vise Grip pliers and twist with the direction of the bend, as shown, while pulling at the same time.
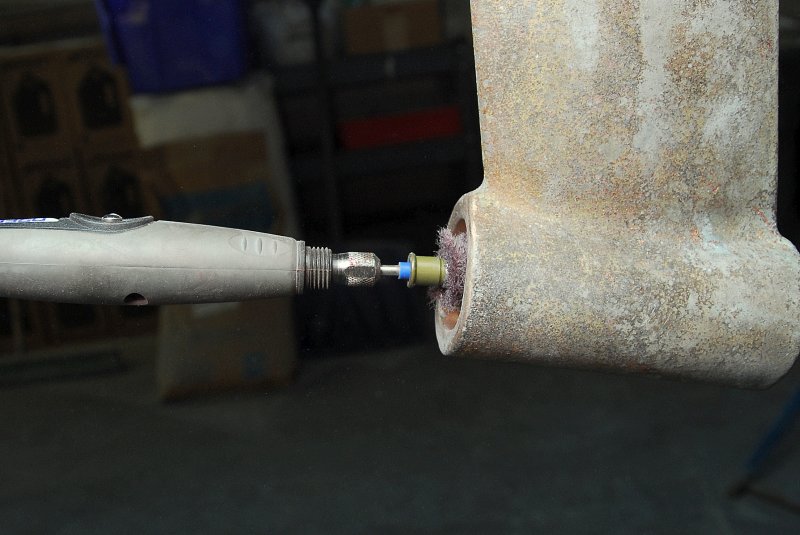
The next step is fairly simple but you must be careful not to remove too much of the struts surface when cleaning it. To clean the bearings mating surface I use a Dremel with the Magic Wand attachment and the burgundy Scotch Brite/abrasive wheel product# 512E. Using the Dremel this cleaning task takes all of about 30 seconds. The burgundy abrasive wheel is a 320 grit equivalent. If you do this by hand use a 320 wet sand paper, or close to it, so you do not damage or remove too much surface area.
If you remove to much of the strut when cleaning you can literally destroy the tolerances and press fit nature of the bearing in the strut. Remember this is simply a cleaning of the bearings mating surface not a sanding.
Installing the bearing is actually quite easy. It requires some threaded rod, use at least 1/2", about four nuts, and some large and thick washers. You may also need some Ivory hand soap.
The most difficult part is actually getting the bearing started. You want it to go in perfectly straight so care must be taken to get it perfectly straight before beginning to tighten the threaded rod. If it goes in crooked it will bind and yo can ruin the bearing.
You may want to lube the inside of the strut and the outside of the cutlass with regular Ivory soap in bar form. Once the soap gets wet it dissipates and unlike grease or other lubes will not compromise the press fit of the bearing in the strut.
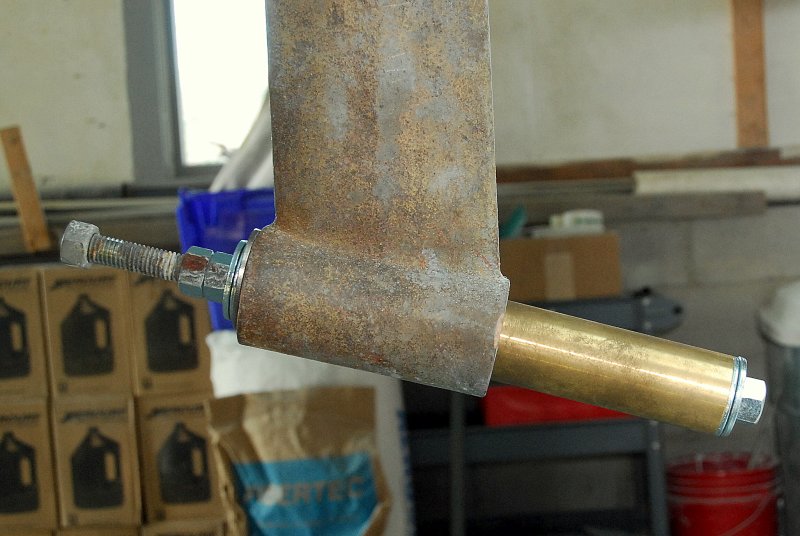
A couple of tips from this photo. I use a spark plug wrench to slide over the threaded rod and a deep drive socket on the other end. There is tremendous force required to press the bearing into the strut so I use two heavy duty washers with the smooth sides facing each other. Most all washers have a smooth side and a rough side..
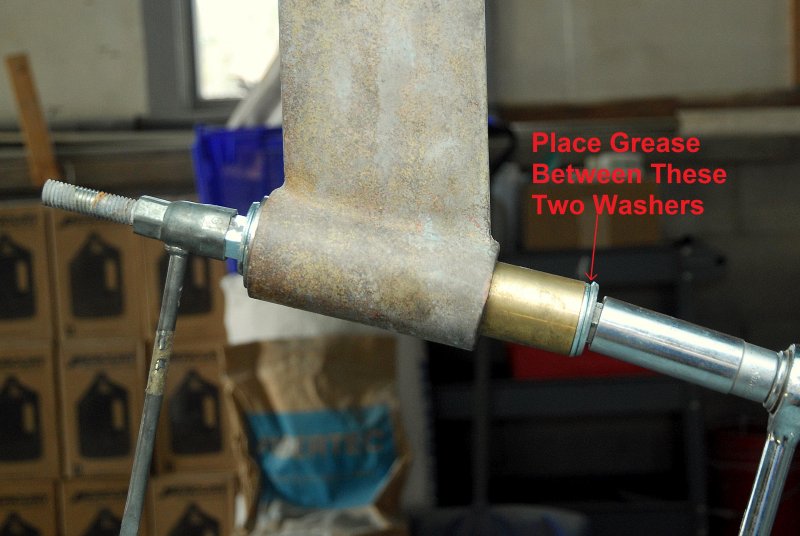
Between these two washers I apply some wheel grease so they rotate on each other easily. This prevents the washer from wanting to turn on the face of the cutlass bearing and really makes it much easier to tighten and press the cutlass into the strut.
Please do yourself a favor and use THICK washers and multiples if you need to. Thin washers will bend or dish and can destroy the cutlass bearing by flaring the end. Also remember to use at least 1/2" threaded rod. This is not a job for wimpy threaded rod.
The finished product! Press it in until flush with the end of the strut, re-install the set screws with blue Loc-Tite, and you're done.
Unless you own a hydraulic or mechanical press, and know how to use it, the easiest and most reliable way to replace a cutlass is to do it with the shaft out. I would recommend replacing a cutlass any time you have the shaft out as they are cheap insurance.
This entire job start to finish, after the shaft was already removed, even with taking these photos, was about 30 minutes.

While there are some commercial tools designed for cutlass bearing removal they are generally expensive for a one-time DIY use. The set screws are not the means of holding the bearing into the strut they are there as back up. The press fit is what holds the bearing in place and the set screws are simply a means of back up.
Often times when a bearing has been installed for a while they can become frozen or corroded in place. Using a press, either hydraulic or mechanical, for removal, can potentially distort the bearing. Nine times out of ten though they work well.
While many folks have had luck with presses they are as I mentioned expensive to buy but can be a potential cost saver when you factor in dropping a rudder or buying a new coupling and having it fitted and faced..
The first step is to remove the set screws. Often times they are filled with crud and growth and must be cleaned before you can get an allen wrench in there. I find a nail or coat hanger a good tool for cleaning out the allen heads. You may also want to hit the set screws with some P.B. Blaster before attempting to remove them. If you see what looks like red or blue Loc-Tite you may want to heat the set screws with a heat gun before trying to remove them. This will avoid the potential stripping of the allen heads.
In this photo you can see I have already made the cut through the bearing. The location of this cut is critical if your strut uses set screws. Some boats do not use set screws so the cut location is not as critical but on struts with set screws it's far easier to utilize the set screw tappings to aid in breaking free the bearing.
The location of the cut should be opposite either the top or bottom of the set screw tappings so that the bolts are pushing right at the cut to split it inward. the picture denotes the optimum cut location of you have set screws.
Making the cut can be done two ways: #1 Cut it by hand with a hack saw #2 Cut it mechanically with a Sawzall.
I DO NOT recommend using a Sawzall if you are not experienced in its use and you have the skill finesse it for exacting use. If using a hack saw you simply remove the bade and insert it throught eh bearing then re-assemble the saw around the strut. Some folks say to install the blade upside down but I honestly find it more accurate and easier to be holding the handle in its proper hack saw orientation.
When making the cut DO NOT cut all the way through the bearing and DO cut evenly. Applying more pressure on one end of the bearing than the other will result in an uneven cut. The saw blade MUST have 100% even pressure to make an even cut. You want both ends of the bearing to become paper thin at the exact same time. If you do cut all the way through and score the inner surface of the strut it's not a huge deal, but, if you do this every time you change a cutlass it will get bad over time.
In this photo you can see that I have cut the bearing paper thin and not scored the strut in the process. I used a Sawzall with a very fine tooth metal cutting blade. I have lots of experience with recriprocating saws and feel quite comfortable with them. You'll have to make that decision on your own. If you are in the least bit questioning your skill please use a hack saw with a good quality blade like a Lennox.
With the bearing cut paper thin I use a cold chisel and dead blow hammer to make the first split of the bearing by setting it on the edge and pounding inward. Be careful not to damage the strut when doing this. This will start the ripping of the very thin surface left in the cutlass bearing. Once you've started the rip simply insert some hex head bolts into the set screw holes and tighten them evenly and you'll collapse the cutlass inward relieving the matting surface pressure in the process.
If you do not have set screws your next move is to use a maple dowel or piece of thin fiberglass pounded between the strut and the bearing to split it along its entire length. Please do not use a screw driver or metallic object to pound and split the bearing. A metallic object could quite easily score the inside of the strut as it may be a harder metal. Use an object that is softer in composition than the strut.
In this photo I've tightened the bolts and collapsed the cutlass bearing relieving its press fit pressure from the strut. You can achieve the same results with a maple dowel pounded between the bearing and strut after initially bending it with a cold chisel & hammer to get the dowel started.
Once you have collapsed the bearing inward simply grip it at the bend with a pair of Vise Grip pliers and twist with the direction of the bend, as shown, while pulling at the same time.
The next step is fairly simple but you must be careful not to remove too much of the struts surface when cleaning it. To clean the bearings mating surface I use a Dremel with the Magic Wand attachment and the burgundy Scotch Brite/abrasive wheel product# 512E. Using the Dremel this cleaning task takes all of about 30 seconds. The burgundy abrasive wheel is a 320 grit equivalent. If you do this by hand use a 320 wet sand paper, or close to it, so you do not damage or remove too much surface area.
If you remove to much of the strut when cleaning you can literally destroy the tolerances and press fit nature of the bearing in the strut. Remember this is simply a cleaning of the bearings mating surface not a sanding.
Installing the bearing is actually quite easy. It requires some threaded rod, use at least 1/2", about four nuts, and some large and thick washers. You may also need some Ivory hand soap.
The most difficult part is actually getting the bearing started. You want it to go in perfectly straight so care must be taken to get it perfectly straight before beginning to tighten the threaded rod. If it goes in crooked it will bind and yo can ruin the bearing.
You may want to lube the inside of the strut and the outside of the cutlass with regular Ivory soap in bar form. Once the soap gets wet it dissipates and unlike grease or other lubes will not compromise the press fit of the bearing in the strut.
A couple of tips from this photo. I use a spark plug wrench to slide over the threaded rod and a deep drive socket on the other end. There is tremendous force required to press the bearing into the strut so I use two heavy duty washers with the smooth sides facing each other. Most all washers have a smooth side and a rough side..
Between these two washers I apply some wheel grease so they rotate on each other easily. This prevents the washer from wanting to turn on the face of the cutlass bearing and really makes it much easier to tighten and press the cutlass into the strut.
Please do yourself a favor and use THICK washers and multiples if you need to. Thin washers will bend or dish and can destroy the cutlass bearing by flaring the end. Also remember to use at least 1/2" threaded rod. This is not a job for wimpy threaded rod.
The finished product! Press it in until flush with the end of the strut, re-install the set screws with blue Loc-Tite, and you're done.
Unless you own a hydraulic or mechanical press, and know how to use it, the easiest and most reliable way to replace a cutlass is to do it with the shaft out. I would recommend replacing a cutlass any time you have the shaft out as they are cheap insurance.
This entire job start to finish, after the shaft was already removed, even with taking these photos, was about 30 minutes.
") bravo...
bravo...