I only had access to about half of the backside of the patch panel so I was able to reinforce the joint there. For the remaining areas all I could do was the tabs. I cleaned and roughed up all the areas accessible then glued and clamped the tabs with West 6-10 (better mechanical bond than epoxy resin alone). Even though 10 layers, the patch panel was less than half the hull thickness and I ground a bevel well beyond the 12:1 recommended. There's a lot of contact area for the overlying glass layers. I'm confident these areas have as much strength as if I could've bonded the full perimeter. I probably have pics of the beveled areas, I'll look.The name and port graphics look great.
I have one question. How did you tie in the patch for the big hole shown in post #46? You said that the patch panel was 10 layers thick and that is glassed onto tabs attached to the inside of the hull. The last photo that I saw of that patch was just after you glassed it to the tabbing. I am assuming that you ground a bevel into the hull to tie the patch to the hull, but did you do anything to tie in the first 10 layers of the patch base?
Repairing Hunter 40 damage from Hurricane Matthew
- Thread starter B757Captain
- Start date
Correct and correct. There's a double meaning with "Escape" tooOr 6 knots...or so. Or even slower. Dang that’s a great name!

I've often thought the dinghy should be named "Orbital Velocity".
Absolutely. Orbital Velocity is perfect. I read about an owner who named his boat “Under Dog.” He named his dingy “Sweet Polly Purebred.” If we had a dingy I’m pretty sure we would name it “Crescent Moon.” Alas, we have no need for a dingy.Correct and correct. There's a double meaning with "Escape" too
I've often thought the dinghy should be named "Orbital Velocity".
Exactly. That’s why I didn’t refer to it as a double entendres. It could be a gajillion entendres.I like to think of the name as escaping the high-speed velocity of everyday life demands.
You absolutely must name the dinghy "Orbital Velocity."
That's one of the best boat names I've ever heard... May need to borrow it if I ever get a new boat.
That's one of the best boat names I've ever heard... May need to borrow it if I ever get a new boat.
If my math is correct, only 24 people have achieved actual escape velocity. (Not counting human remains launched to Pluto or anywhere else.) That’s part of what adds so many entendres to the name. (Eventually I’ll quit replying to y’all’s comments. I’m pretty smitten with the name of Mark’s boat.)Something like 25,020 mph or something like that
Please don't mind me interrupting the discussion of the boat name - I really like that you guys get it!! Press on to your hearts content, I'll add to the discussion at times as well. But for tonight's addition:
Stanchions and cool tools:
I'm kinda bouncing around the boat for a few days, tidying up and finishing up some projects in progress. One is remounting the stanchions and replacing the lifelines. I had two broken stanchions that I had to replace and took the opportunity to upgrade to the gate-style since the boat, though it had gates on both sides, never had the reinforced stanchions. I got these mounted and reshuffled the other good ones to the open locations. However, the impact from the other boat had compromised the mounts in a few locations, so I had to check the bolt holes for integrity. After running a tap through all the holes I found 5 that needed some work. Three of the holes just needed to be enlarged from 1/4" screws to 5/16" screws but for one stanchion location both mounting holes were essentially destroyed. I ground those out and filled with epoxy/cabosil and will redrill and tap those holes. The rest of the stanchion locations are ready to go, but there is one thing about the way the factory did things that I never liked and now is the time to rectify that:

As you can see, the stanchion feet sit directly on the corners of the non-skid. I think this is sloppy, so I decided to sand the non-skid back and paint the areas under the feet. As I continue re-doing the non-skid I'll mask so the corners are beveled. So, non-skid removed and ready for paint:

I got one coat of paint on yesterday and the second on this afternoon. Should be ready to remount the stanchions tomorrow. After that I can measure for new lifelines.
Another project that has been percolating is some design ideas for the interior. One of the things I want to incorporate for the cabinet corners is a large radius cornerpiece. I do not like sharp corners in boat interiors! Previously I had just used 1/2" quarter-rounds or 3/4" half-rounds, but I want something - for lack of a better term - "softer". So I started looking for large diameter router bits and came up with these:

One is a 1" radius, the other is a 1 1/4" radius. That's a quarter in the pic for reference. They're pretty big!
Turns out they are a little too big to fit in my table:

I don't have a proper router table, that's just an addition for my table saw, but for now it will do the job. I grabbed a chunk of 2x4 from the wood pile and started experimenting:
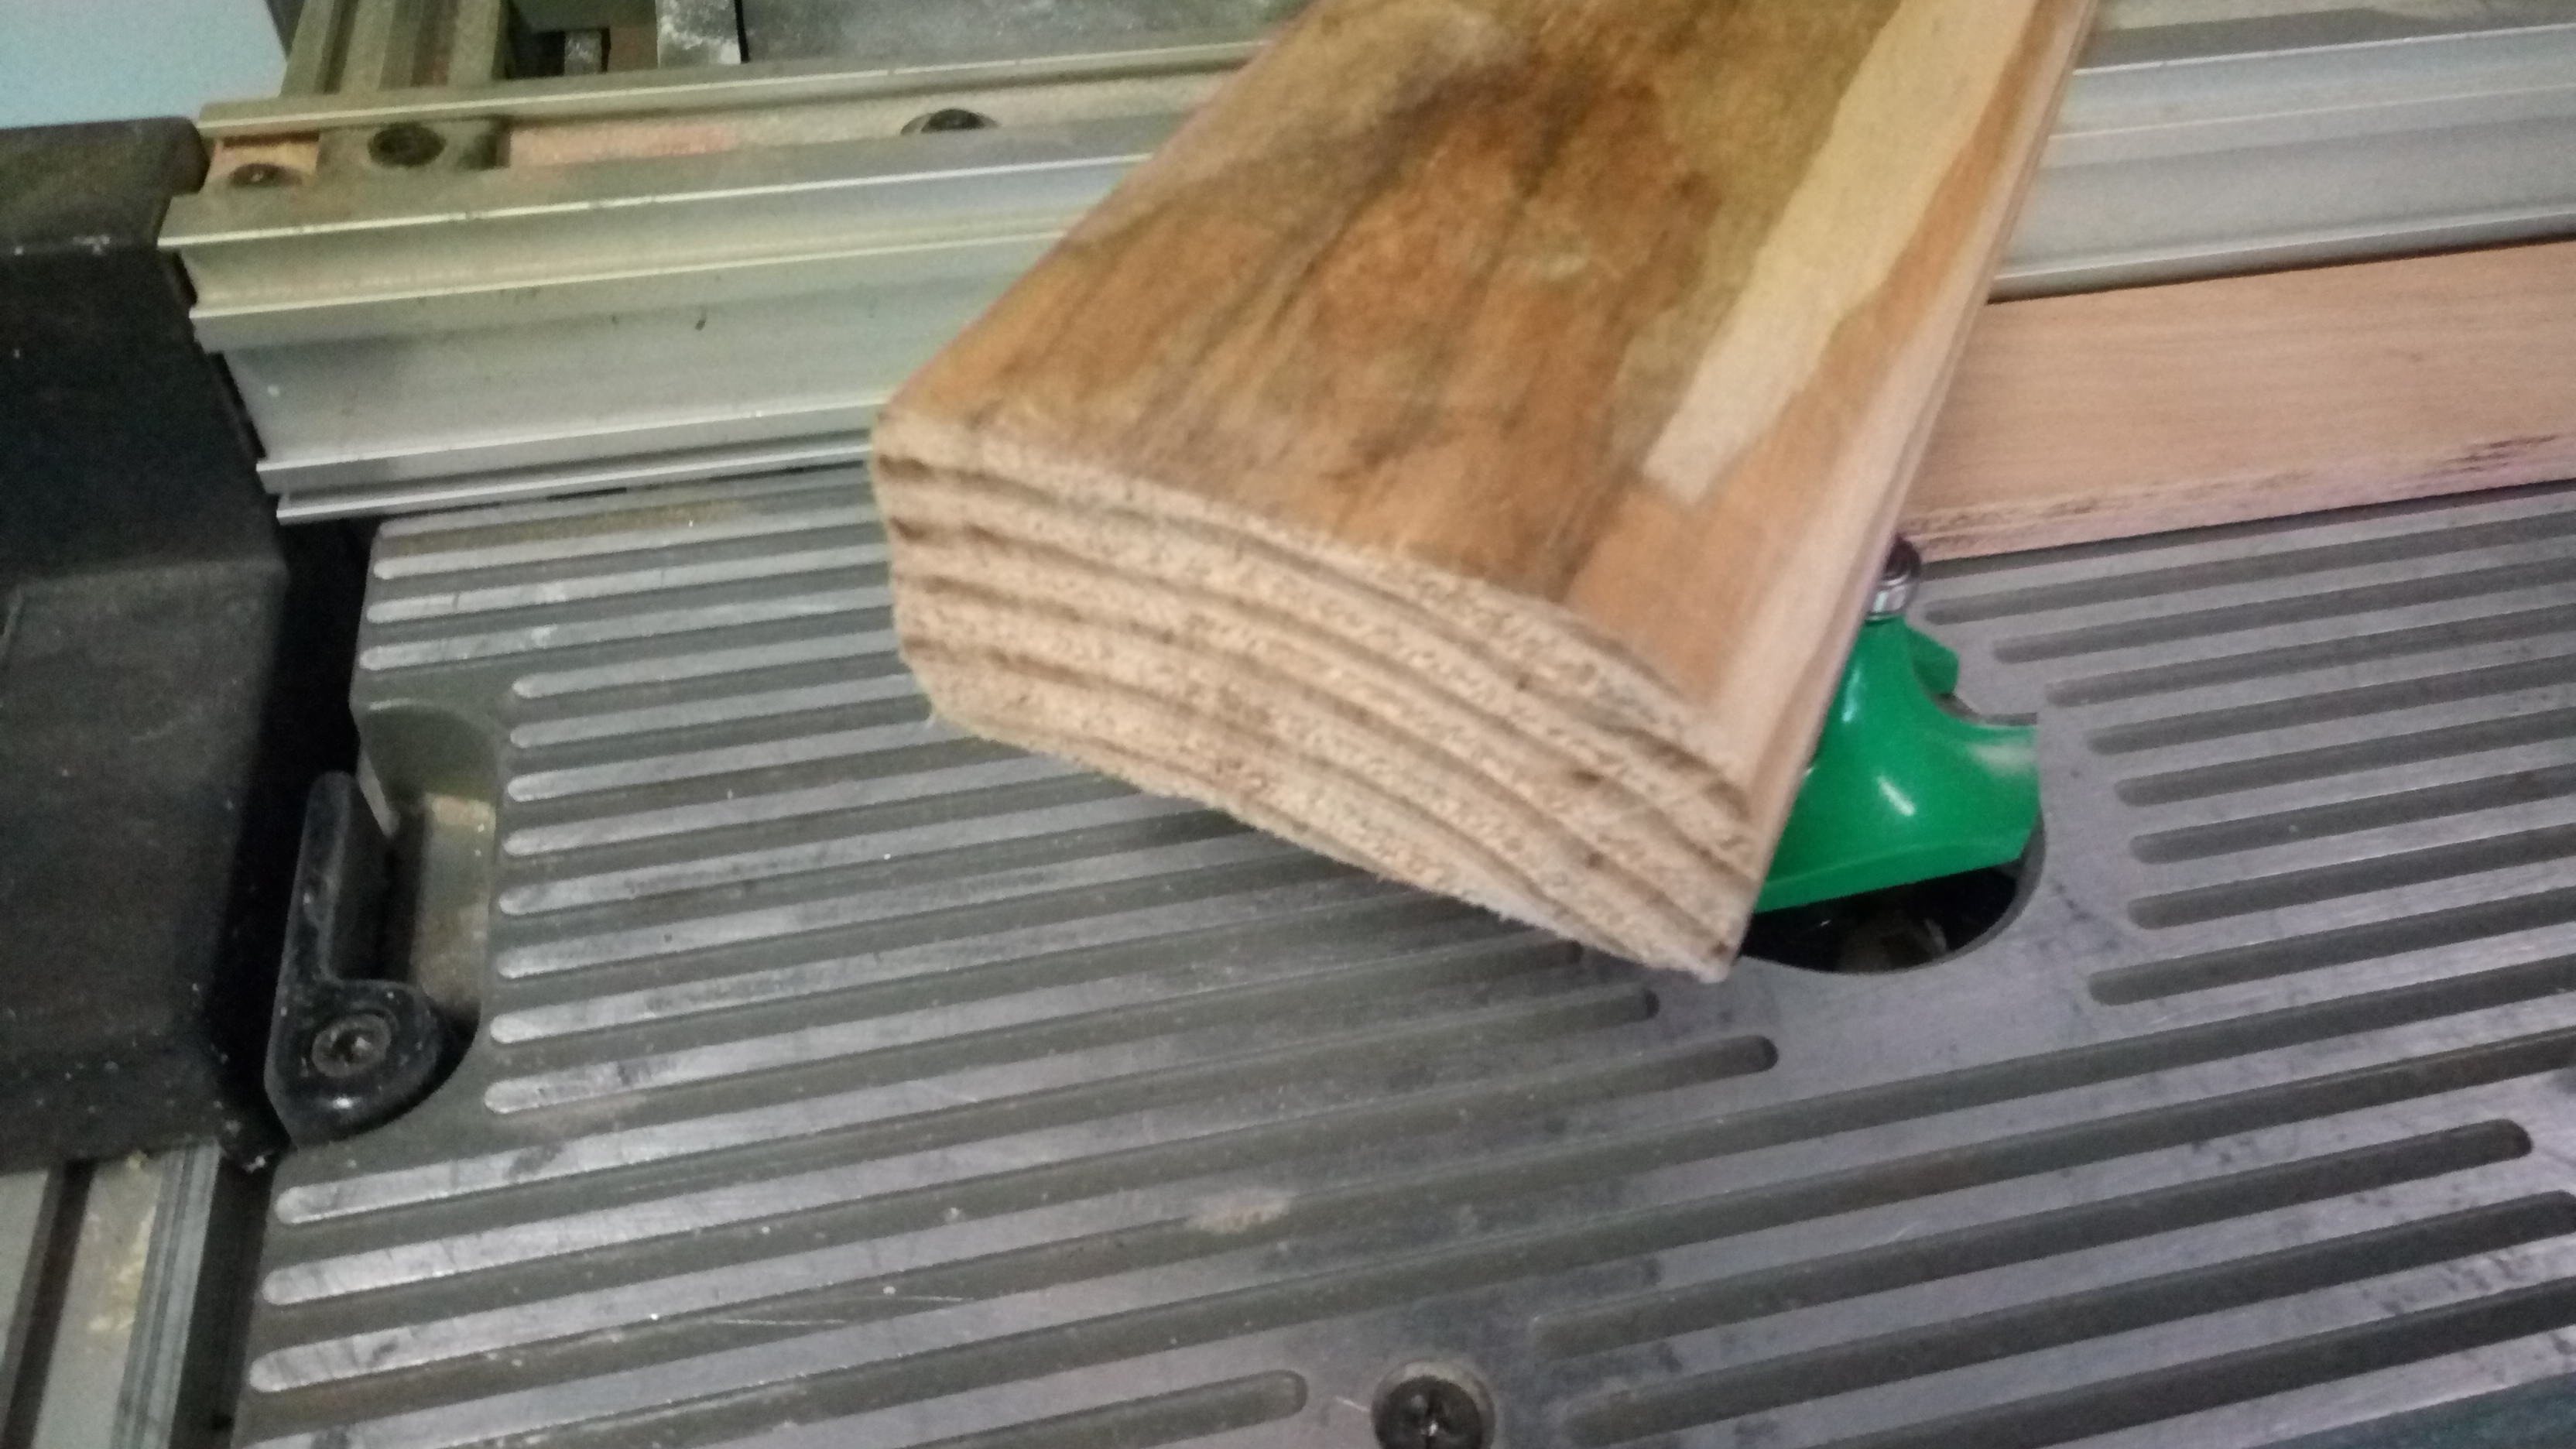
Then I cut version 1 of the corner piece:

And screwed some scrap 3/4" ply to simulate a corner:
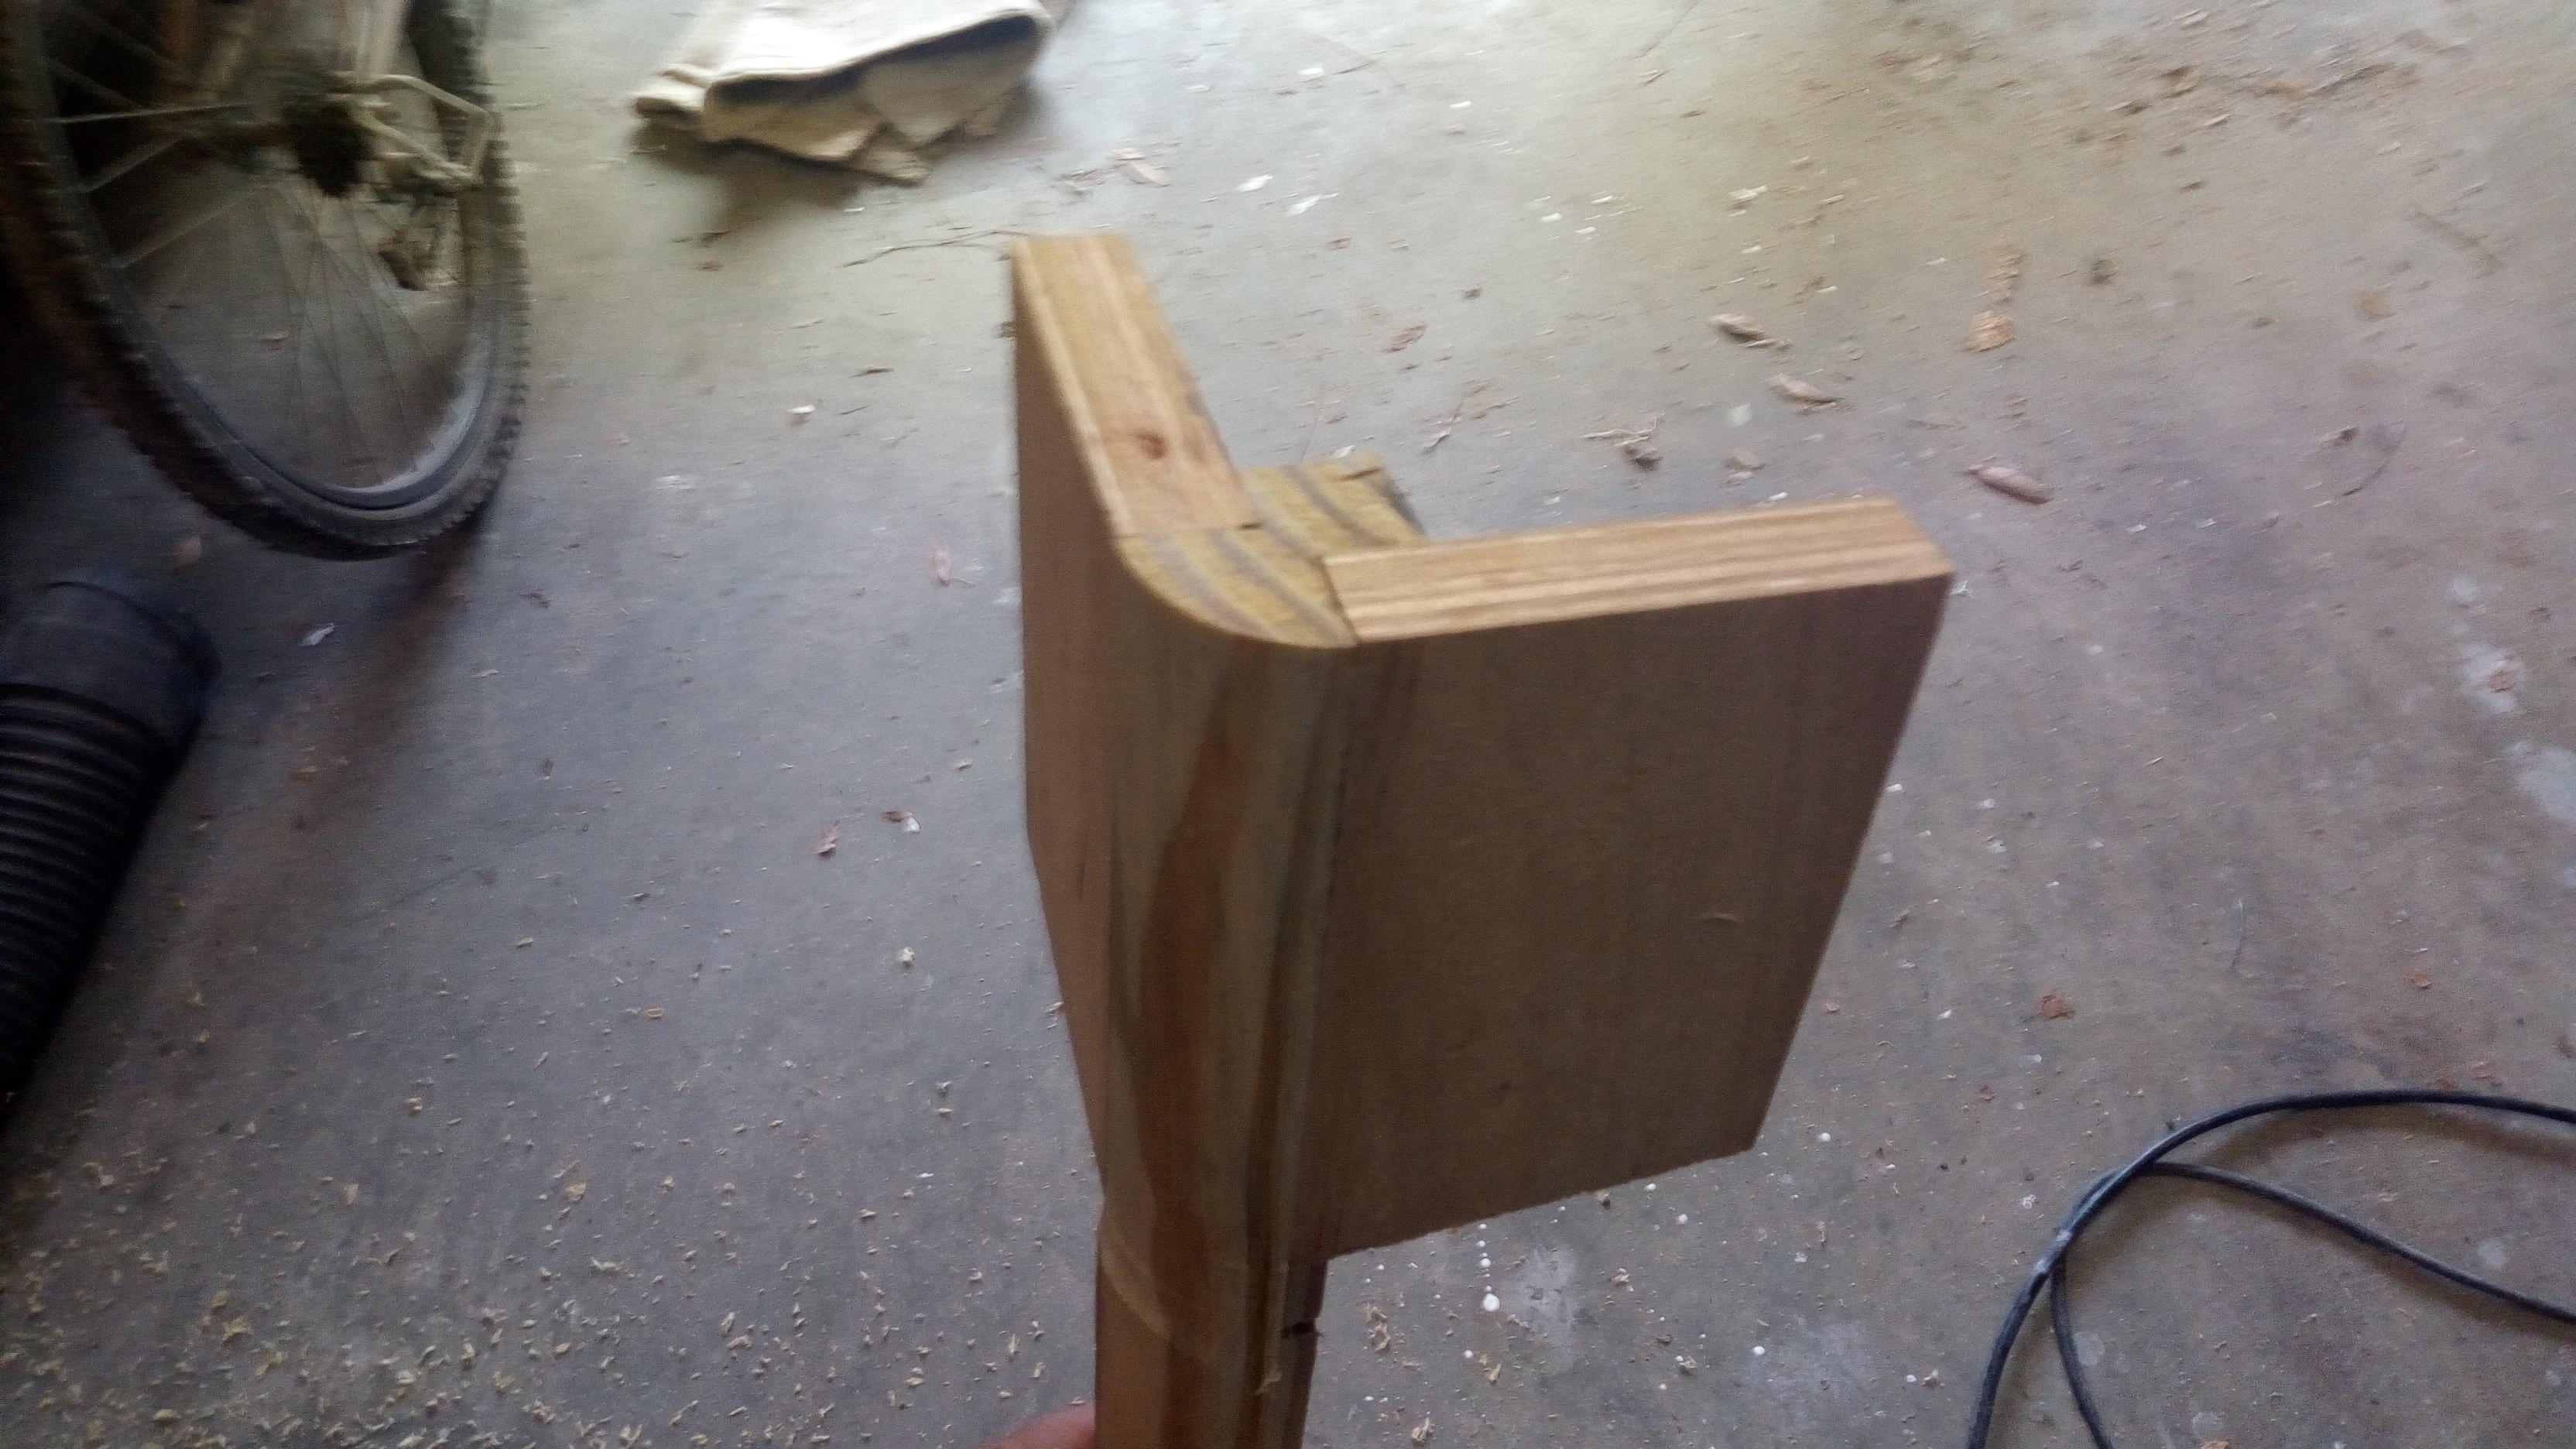
This is the 1" bit. I'm going to work on a better mounting system (version 2) and crank out a corner with the 1 1/4" bit and compare the two. I need to decide on this before I get the trim wood - the overall corner radius will determine what size lumber to start with.
Why worry about this now? Well, after climbing up and down the companionway for the last year on a collapsible ladder, I'm thinking that building the doghouse and companionway steps should be the first piece to go in!
Cheers,
Mark
Stanchions and cool tools:
I'm kinda bouncing around the boat for a few days, tidying up and finishing up some projects in progress. One is remounting the stanchions and replacing the lifelines. I had two broken stanchions that I had to replace and took the opportunity to upgrade to the gate-style since the boat, though it had gates on both sides, never had the reinforced stanchions. I got these mounted and reshuffled the other good ones to the open locations. However, the impact from the other boat had compromised the mounts in a few locations, so I had to check the bolt holes for integrity. After running a tap through all the holes I found 5 that needed some work. Three of the holes just needed to be enlarged from 1/4" screws to 5/16" screws but for one stanchion location both mounting holes were essentially destroyed. I ground those out and filled with epoxy/cabosil and will redrill and tap those holes. The rest of the stanchion locations are ready to go, but there is one thing about the way the factory did things that I never liked and now is the time to rectify that:
As you can see, the stanchion feet sit directly on the corners of the non-skid. I think this is sloppy, so I decided to sand the non-skid back and paint the areas under the feet. As I continue re-doing the non-skid I'll mask so the corners are beveled. So, non-skid removed and ready for paint:
I got one coat of paint on yesterday and the second on this afternoon. Should be ready to remount the stanchions tomorrow. After that I can measure for new lifelines.
Another project that has been percolating is some design ideas for the interior. One of the things I want to incorporate for the cabinet corners is a large radius cornerpiece. I do not like sharp corners in boat interiors! Previously I had just used 1/2" quarter-rounds or 3/4" half-rounds, but I want something - for lack of a better term - "softer". So I started looking for large diameter router bits and came up with these:
One is a 1" radius, the other is a 1 1/4" radius. That's a quarter in the pic for reference. They're pretty big!
Turns out they are a little too big to fit in my table:
I don't have a proper router table, that's just an addition for my table saw, but for now it will do the job. I grabbed a chunk of 2x4 from the wood pile and started experimenting:
Then I cut version 1 of the corner piece:
And screwed some scrap 3/4" ply to simulate a corner:
This is the 1" bit. I'm going to work on a better mounting system (version 2) and crank out a corner with the 1 1/4" bit and compare the two. I need to decide on this before I get the trim wood - the overall corner radius will determine what size lumber to start with.
Why worry about this now? Well, after climbing up and down the companionway for the last year on a collapsible ladder, I'm thinking that building the doghouse and companionway steps should be the first piece to go in!
Cheers,
Mark
raise it high and use a 1/4" ply sacrificial base with a large hole, double sided tape to fix it to your table saw wing!
Or get a friend with a shaper!
I guess grizzly is better than harbor freight, but still!
No Freud?
Or get a friend with a shaper!
I guess grizzly is better than harbor freight, but still!
No Freud?
Mark, as a structural engineer, I like your corner detail. It provides a lot of contact surface with no end-grain connection. Are you planning on gluing the panels to the corner piece? My only concern about this detail is the throat depth between the rabbits. With a 1” bullnose and ¾” ply you will have 3/8” as your minimum thickness which will be the weakest point of the connection given cross-grain bending. If you use the 1¼” bullnose this will increase to ¾”. (See attached)
The problem with the 1¼” bullnose is that you will only have ¼” overlap with the plywood if you use 1½” stock so it would be better to use 1¾ - 2”.
The problem with the 1¼” bullnose is that you will only have ¼” overlap with the plywood if you use 1½” stock so it would be better to use 1¾ - 2”.
Attachments
-
7.4 KB Views: 181
I like Hayden's dimensional analysis of the corner joint. I have a similar vintage H34 and a photo of one of my corner joints. It looks like Hunter only used 1/2" stock for the side panels and backed the corner with a double mitered piece screwed in. I don't know the radius, but just wanted to share the detail I somehow miraculously had a picture of.

Yep, that's the plan for the table. No one around here that I know has a shaper so I'm on my own.raise it high and use a 1/4" ply sacrificial base with a large hole, double sided tape to fix it to your table saw wing!
Or get a friend with a shaper!
I guess grizzly is better than harbor freight, but still!
No Freud?
The Grizzly bits should do ok for the amount of cutting I need to do. I just had a hard time justifying triple the price for the really good stuff!
You're right on the money on everything. I'm not convinced my version 1 is repeatable and variable enough to do all the corners I need. I will be using both 3/4 and 1/2 ply so what I come up with has to be adaptable for that plus odd angles (it is a boat after all!). I don't plan on gluing the joints - glue adds a permanence that can make maintenance and repairs harder. I ran across that almost from the first when I needed to do something to the original interior - pre-built cabinetry is great when installing the interior into a new boat when the deck hasn't been set on yet but really sucks when you can't take the cabinet apart without destroying it.Mark, as a structural engineer, I like your corner detail. It provides a lot of contact surface with no end-grain connection. Are you planning on gluing the panels to the corner piece? My only concern about this detail is the throat depth between the rabbits. With a 1” bullnose and ¾” ply you will have 3/8” as your minimum thickness which will be the weakest point of the connection given cross-grain bending. If you use the 1¼” bullnose this will increase to ¾”. (See attached)
The problem with the 1¼” bullnose is that you will only have ¼” overlap with the plywood if you use 1½” stock so it would be better to use 1¾ - 2”.
My Version 2 might look similar to that! We'll see how the testing goes.I like Hayden's dimensional analysis of the corner joint. I have a similar vintage H34 and a photo of one of my corner joints. It looks like Hunter only used 1/2" stock for the side panels and backed the corner with a double mitered piece screwed in. I don't know the radius, but just wanted to share the detail I somehow miraculously had a picture of.
View attachment 143393
Thanks! First on the list of requirements for all the cabinetry is to make sure that when a system behind the cabinet needs attention, it's accessible without having to disassemble half the boat to get to it! Then in no particular order, ease of construction, ease of assembly. functionality, looks, ergonomics, etc.i see much thinner plywood in Allan12210 picture. That would be lighter and would also provide for a wider supporting structure on the corner. Great analysis folks. I am positive with the work displayed thus far Mark is already on it.
No boat progress today, car repairs instead. The other day I had to take the bow pulpit to the machine shop for straightening, so like normal I went out and dropped the top on the convertible. Unfortunately I experienced a combination of too cold temps and too old canvas top. Halfway down it went pop! and the back window separated from the top! Oops. Couldn't re-glue it on the car so I removed the top. Two spots on the canvas that were questionable let go in the process and ripped. Oops again. So today I got to put a new top on. Back to boat stuff tomorrow.
Cheers,
Mark
never rains, but it pours!Thanks! First on the list of requirements for all the cabinetry is to make sure that when a system behind the cabinet needs attention, it's accessible without having to disassemble half the boat to get to it! Then in no particular order, ease of construction, ease of assembly. functionality, looks, ergonomics, etc.
No boat progress today, car repairs instead. The other day I had to take the bow pulpit to the machine shop for straightening, so like normal I went out and dropped the top on the convertible. Unfortunately I experienced a combination of too cold temps and too old canvas top. Halfway down it went pop! and the back window separated from the top! Oops. Couldn't re-glue it on the car so I removed the top. Two spots on the canvas that were questionable let go in the process and ripped. Oops again. So today I got to put a new top on. Back to boat stuff tomorrow.
Cheers,
Mark
Question not gluing the corners.Surprised you didn't just lay up a new top out of glass.
Perhaps you could considers gluing one half, and screwing the other half?9
Also, the interior cuts are all degrees.
Any way of putting on small internal & external radius? I think it might be slightly less prone to cracking.
Just my canadian 2 cents worth
I would suggest that while that corner may seem interlocked, there is probably not a lot of strength between the outside section and the inside section, due to the fact of which way the grain is going. Blocking the corners from the inside with is valid, but using that to hold the outside in place is not likely to hold. I agree with the point about gluing one side. That will help to prevent the outside corner from braking off, even though you are gluing to end grain.
As far as getting everything even and true, that is what a sander is for. Once its fully assembled, you can sand off anything that doesn't match up perfectly.
If I were doing this, I would not bother sectioning off the square out of the corner strip. It just makes your life more difficult. Just use a 1x1 in the corner and pocket screw the plywood panels to the corner piece. If you are not familiar with a pocket screw jig, Menard sells a Criag Jig. An internet search will show you how to use it. I've built tons of cabinets, and a pocket screw jig is the way to go.