I just came from a customers boat doing a winterizing and noticed the anode (zinc in this case) on the $3500.00 prop was not connected to anything, other than by friction. Sadly I see this far too often. With this fresh on my mind it caused me to gather some photos from my hard drive and write a quick blurb on best practices for anode installation.
When installing anodes, anodes can be zinc, aluminum or magnesium, I always make sure to de-oxidize the surface where it will mate to the prop or shaft. For shaft mounted anodes I use a Dremel or 1000 Grit wet sandpaper.
The anode half on the left has been prepped the half on the right is untouched:

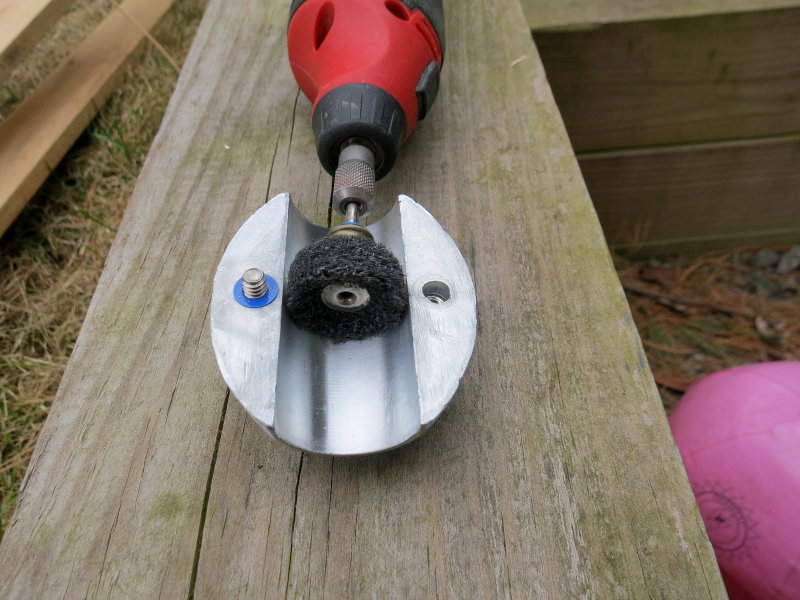
This is the Dremel brush, which I often use for shaft anodes. Please don't over do it, you just want to remove enough surface oxidation to get back to get bright metal:
Once you've cleaned the mating side/sides of the anode you will then want prep/clean the shaft. For the shaft I usually use 1000 grit wet sand paper. When installing the shaft anode, clean oxidation free surfaces are the best practice.
Once the surfaces are clean and the anode is on and torqued, you will want to tap the anode to properly seat it to the shaft, rudder etc. then re-torque it once again. This tap is NOT a hard hit it is a light tap. I use a brass hammer..
Getting the shaft clean & bright:

One of the best things you can do, in order to ensure your anode stays put, is to apply a liberal coating of Tef-Gel to the entire SS bolt that passes through the anode and also to coat the anode surfaces where the bolt passes through it and where the bolt comes into direct contact with the anode. If your anode has a recessed removable nut, do the same for the nut.
The practice of applying an insulating compound creates a spot where the stainless bolt or machine screw will be galvanically isolated, as best that it can be, from the anodic metal.
Stainless steel is near the top of the galvanic scale and zinc, magnesium or aluminum, the common anodic metals, are at the bottom. Coating the anode and stainless bolt or bolts is really not optional, if you want the best anodic protection & performance.
Here we can see a zinc from a feathering prop that had the stainless bolt and inside of the zinc liberally coated with Tef-Gel during the installation process. The anodic material around the stainless bolt was completely unaffected, as it should be, and the asnode is eroding very evenly, where it should be. This image was captured exactly as the anode came off the boat.

Another alternative some choose is to coat the stainless machine screw with nail-polish, as well as the anode mating surfaces. I find Tef-Gel to perform considerably better than nail-polish but nail-polish is certainly better than nothing at all, as can be seen farther down.

When you are spending $3000.00 - $6000.00 on a feathering propeller you really don't want your vessel coming out of the water looking like this:


A few minutes with some sand paper and a bit of Tef-Gel can go a long way toward better better anodic protection, more even wear & better anode longevity..
When installing anodes, anodes can be zinc, aluminum or magnesium, I always make sure to de-oxidize the surface where it will mate to the prop or shaft. For shaft mounted anodes I use a Dremel or 1000 Grit wet sandpaper.
The anode half on the left has been prepped the half on the right is untouched:
This is the Dremel brush, which I often use for shaft anodes. Please don't over do it, you just want to remove enough surface oxidation to get back to get bright metal:
Once you've cleaned the mating side/sides of the anode you will then want prep/clean the shaft. For the shaft I usually use 1000 grit wet sand paper. When installing the shaft anode, clean oxidation free surfaces are the best practice.
Once the surfaces are clean and the anode is on and torqued, you will want to tap the anode to properly seat it to the shaft, rudder etc. then re-torque it once again. This tap is NOT a hard hit it is a light tap. I use a brass hammer..
Getting the shaft clean & bright:
One of the best things you can do, in order to ensure your anode stays put, is to apply a liberal coating of Tef-Gel to the entire SS bolt that passes through the anode and also to coat the anode surfaces where the bolt passes through it and where the bolt comes into direct contact with the anode. If your anode has a recessed removable nut, do the same for the nut.
The practice of applying an insulating compound creates a spot where the stainless bolt or machine screw will be galvanically isolated, as best that it can be, from the anodic metal.
Stainless steel is near the top of the galvanic scale and zinc, magnesium or aluminum, the common anodic metals, are at the bottom. Coating the anode and stainless bolt or bolts is really not optional, if you want the best anodic protection & performance.
Here we can see a zinc from a feathering prop that had the stainless bolt and inside of the zinc liberally coated with Tef-Gel during the installation process. The anodic material around the stainless bolt was completely unaffected, as it should be, and the asnode is eroding very evenly, where it should be. This image was captured exactly as the anode came off the boat.
Another alternative some choose is to coat the stainless machine screw with nail-polish, as well as the anode mating surfaces. I find Tef-Gel to perform considerably better than nail-polish but nail-polish is certainly better than nothing at all, as can be seen farther down.
When you are spending $3000.00 - $6000.00 on a feathering propeller you really don't want your vessel coming out of the water looking like this:
A few minutes with some sand paper and a bit of Tef-Gel can go a long way toward better better anodic protection, more even wear & better anode longevity..

