Modifications, that worked.

TomY

Alden Forum Moderator
Jun 22, 2004
2,759
Alden 38' Challenger yawl Rockport Harbor
Soon after buying this boat I decided it needed better access to the engine, primarily to service the starter and install a 6 gallon water heater. Short of removing the galley counter - a big job - it was nearly impossible to reach the starter.

I measured up an area of countertop where the galley sink was mounted, that could be cut out and still be structurally sound.

This cut out had to be big enough to fit the water heater through.

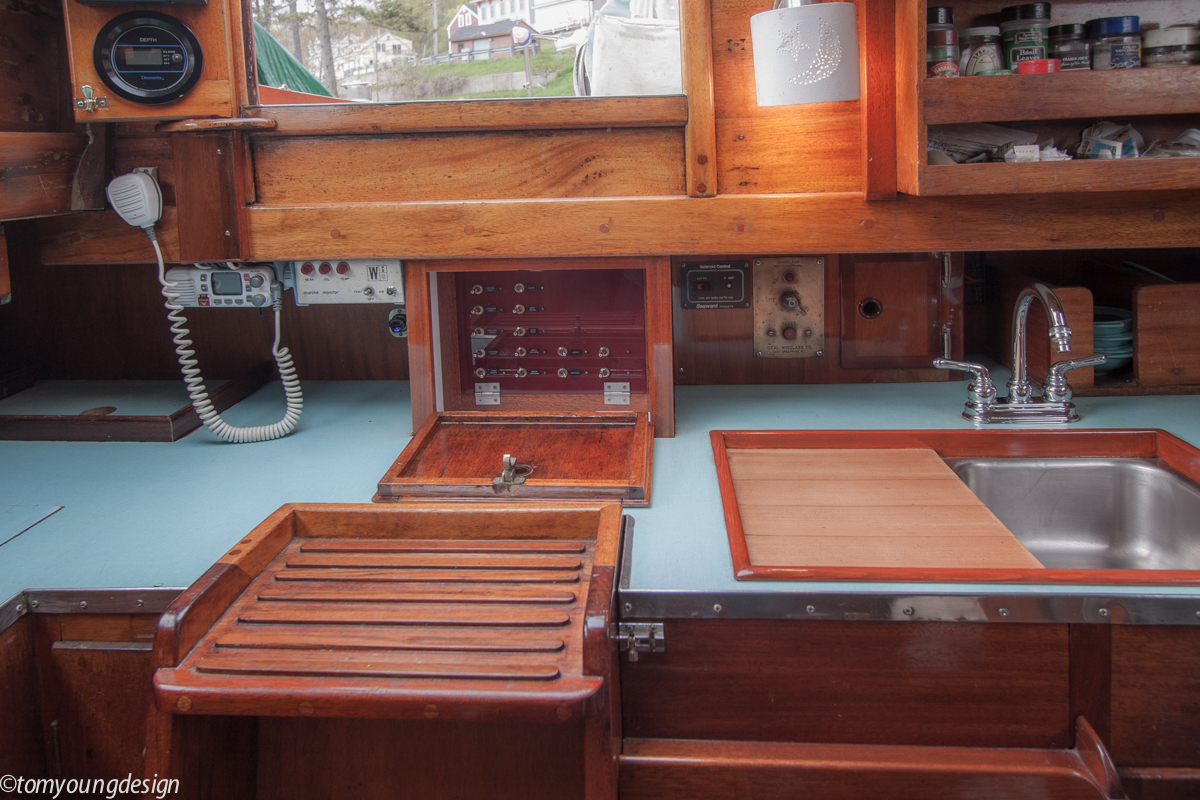
The cut out made, I designed a 'sink board' that would improve the galley sink. Simply, the old sink was cut into the new 3/4" marine ply filler piece.

Next I traced around the sinks rim, removed the sink from the plywood, and cut a gain (with a router) into the plywood so the rim of the sink would fit flush to the top surface of the 3/4" plywood.

Next a piece of L shaped trim (Fir) was milled and mounted around the perimeter of the sink board. This inverted L shaped trim forms the ledge that the sink board hangs in the cut out in the countertop.

Then inside the trim, I fit re-sawed some Fir T&G flooring (about 1/2" thick) and fastened from the underside of the sink board.

Trim and flooring were bedded in something (I can't recall what it was).

I thought of this as a mock up to try out for a few years, not thinking it would last. Surely something other than wood, would hold up better in this wet application. Corian perhaps?

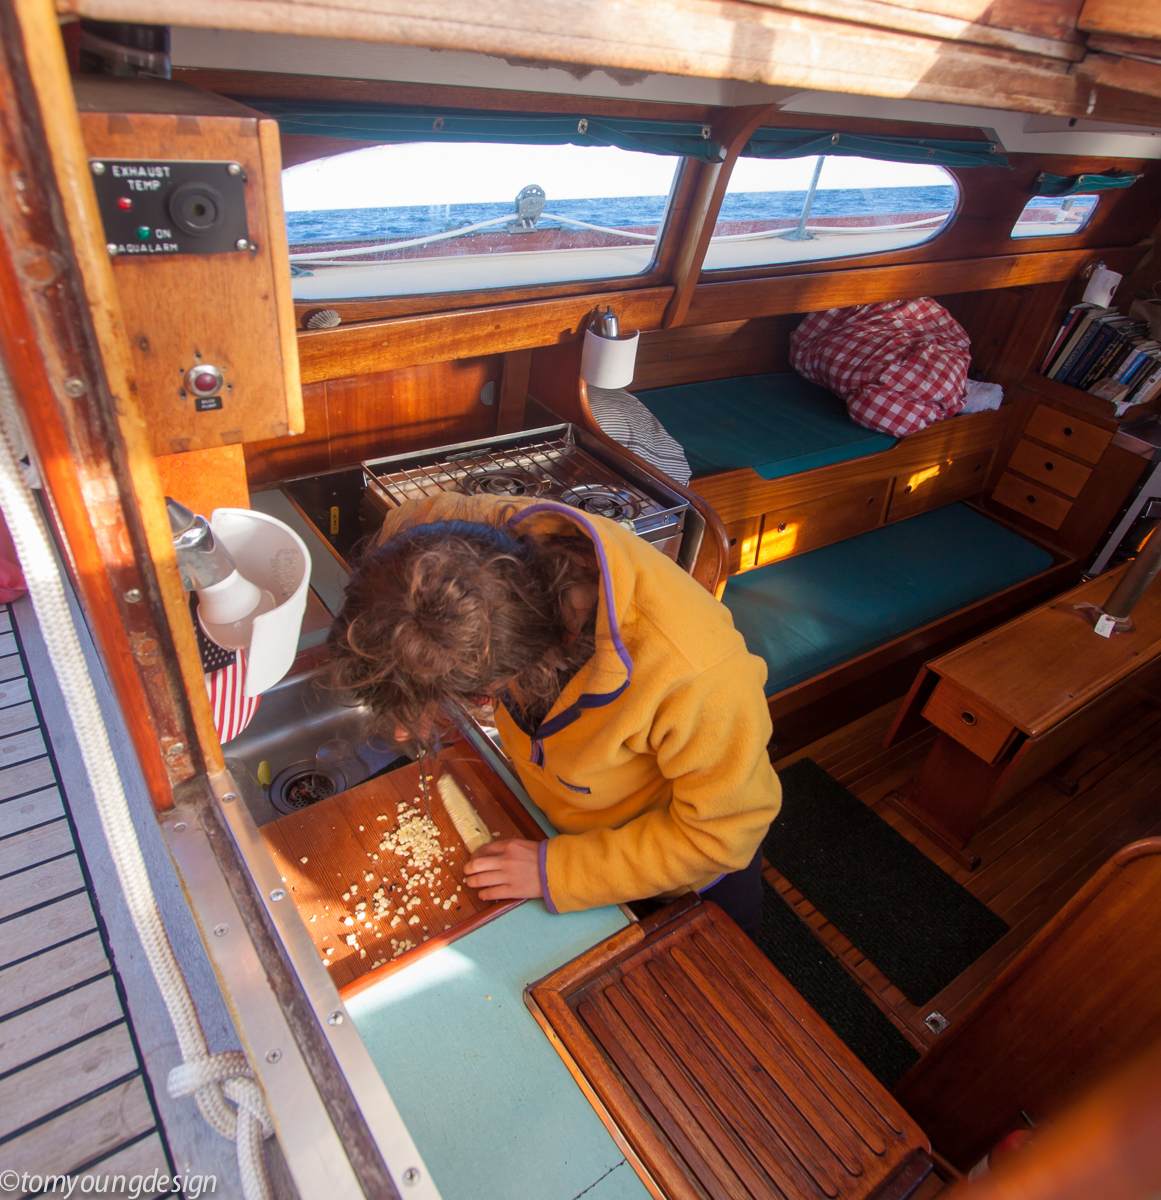
So it got used heavily in the galley as a cutting board to slice and dice, a fiddled work area that was very handy underway, constantly. Another benefit was this gave us a deeper more useful sink as the whole sink board is a sink of sorts.

MJ kneads dough 1000.jpg


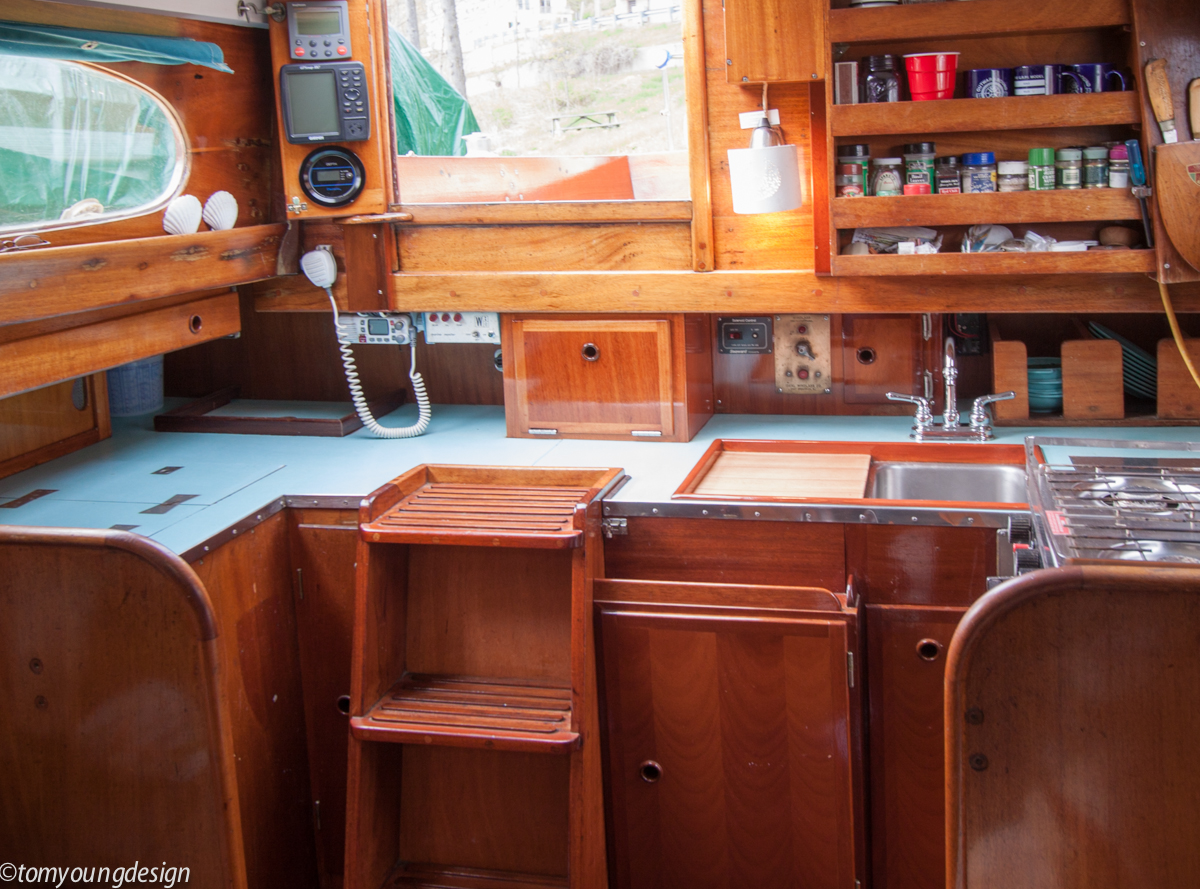
As it's primary function, access, I've used it constantly. All you need to do is loosen the lock nut (it's just hand tight) on the sink drain basket and the whole board simply lifts out. Installing and maintaining wiring, plumbing, water heater, FW pump and filter, even adding engine oil, it's made these tasks easy.

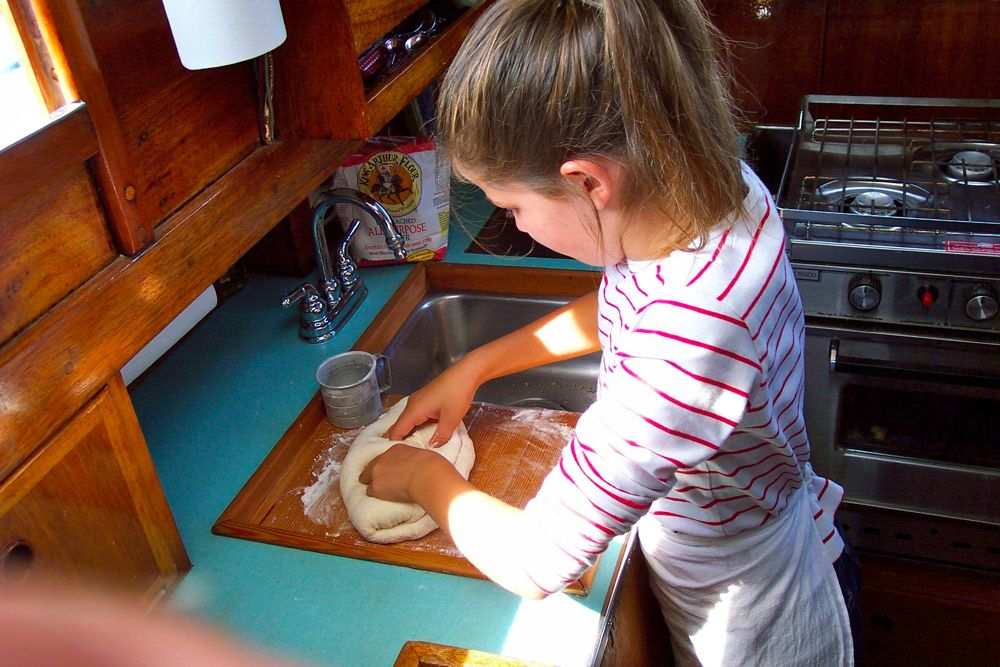
I wouldn't have believed it but 17 seasons later, the 'mock-up' is still in constant use. Here is my daughter this past season, chopping away on it. Just after, I washed all the dishes on this same stiff heel, with the drain board awash. No leaks.


MJ GOM pic cooking.jpg


I gave a face lift last spring which was a RO sanding with 80 grit. It looked so good I cleaned up the L trim, stained it a mahogany to match, applied several coats of varnish and oiled the fir flooring.

Sinkboard ladder-2.jpg

I sold an article on this to Good Old Boat back in 2004. I never heard of anyone building a sink board from that article. Maybe the idea is too crazy?
Sinkboard ladder.jpg
 
Last edited:

DArcy

.
Feb 11, 2017
1,702
Islander Freeport 36 Ottawa
Tom, I remember you writing about this one many years ago. I thought it was a clever way to gain access to your engine but it seems it was more than that as well. Christmas is an extremely well cared for boat with many great upgrades, and I love the pictures, years apart :)
 
Oct 22, 2014
21,085
CAL 35 Cruiser #21 moored EVERETT WA
@TomY Your a wood working savant. I love the work you do. I thought your daughter was in New York in Finance. She is looking awful young. Guess she is carrying Dad'wood working skills into finance at a very young age.:stir:
 

TomY

Alden Forum Moderator
Jun 22, 2004
2,759
Alden 38' Challenger yawl Rockport Harbor
@TomY Your a wood working savant. I love the work you do. I thought your daughter was in New York in Finance. She is looking awful young. Guess she is carrying Dad'wood working skills into finance at a very young age.:stir:
Sort of,... she's in NY but in the commercial interior high rise orbit. A nearly all male world, she is a feared project manager (so we're told).
MJ pulls finished loaves.jpg

They grow up.
MJ at the helm (1 of 1).jpg
 
Mar 1, 2012
2,182
1961 Rhodes Meridian 25 Texas coast
That's a modification, Charlie. Did it work? Post it, before after photos are inspiring.
LOL OK- you asked for it

Three quick pics- first- as salvaged in Rochester New York, after being abandoned for 15 years- Second and third- after being hauled to Texas and reworked- 18 month project. MANY more shots, because much was done.

She's now coming up on 12,000 cruising miles-- three round trips Texas to Florida, and one around to Annapolis, via the Bahamas. Now has damage from Hurricane Harvey that I HOPE to be fit enough to repair very soon :)


1018_whatamessaft - Copy.jpg
no-more-mess-2.jpg


table-setup.jpg
 

DArcy

.
Feb 11, 2017
1,702
Islander Freeport 36 Ottawa
Charlie... :wow3:Just WOW! What a vision to transform from a derelict to a beauty.
 

TomY

Alden Forum Moderator
Jun 22, 2004
2,759
Alden 38' Challenger yawl Rockport Harbor
Here's a simple trick on an HR Rasmus. A few may remember Braden Toan, a past poster on the old CSBB. He was in our neighborhood a few seasons back. He found this beautiful anchorage for MERIDIAN in Seal Bay.
MERIDIAN  (1 of 1).jpg

I got onboard and I was impressed with this little trick on his Broadwater stove in the galley. Just a simple block the gimbal is mounted on.

Like many gimballed cookers, his has to be high in the counter and stick out into the passageway in order for it to have clearance to swing. Here it is in the swinging position:

Braden stove gimballed.jpg

But most of the time, it's secured in this position; by pushing the stove back - which rolls the blocks over into another spot.

In this position, the stove is all the way back in the recess and lowered. It's beneath the countertop and he fits a filler piece above when the stove isn't in use.
Braden stove down.jpg

Clever modification.
 

TomY

Alden Forum Moderator
Jun 22, 2004
2,759
Alden 38' Challenger yawl Rockport Harbor
Beautiful work Charlie. A labor of love.
Yes, Charlie. The transformation is startling. That's a perfect small coastal cruiser, now. I especially love the bright finish below in the color choices.
 

TomY

Alden Forum Moderator
Jun 22, 2004
2,759
Alden 38' Challenger yawl Rockport Harbor
This is one of the more drastic modifications I've witnessed (and posted back then). The owner bought an Ohlsen 41, a 60's CCA design and brought it to the local boat builder. He (owner) wanted to remove a large chunk of the house and extend the cockpit from about 8' to 12' in length. This required some extensive work in the design office. The result - cut here:
Ohlsen 38 cut .jpg

Once the major surgery was complete, they launched the boat to see how it floated on it's lines. Gone were the galley, nav station, ice box, etc. Here you can see the hull area the house and bulkhead(s) were removed - relocated.

Ohlsen redesign beam - CUT .jpg

Back in the shop the project was completed and the boat launched in the spring.
GYRE starboard .jpg
Controversial with some, I thought it was very successful. Extensive modification, yet the revamp of an older boat was a small portion that a new build would have cost.
GYRE cockpit.jpg

The design is all about the cockpit that will seat a large group.
GYRE (1 of 1).jpg

GYRE is owned by one of Bobby Kennedy's sons and races and day sails out of Hyannis Port, Ma.

Entertains 12, by the count:
GYRE cozies..jpg
 
Apr 5, 2009
2,783
Catalina '88 C30 tr/bs Oak Harbor, WA
Not as drastic or beautiful as the previous but I removed the 3: internal outhaul that did not work at all and replaced the internal sheaves in all ball bearing sheave and added two cascades (one inside and one at the clew) which gave me a very smooth 12:1 outhaul. I then took the foot bolt-rope out of the boom slide to set the main loose footed.
It made a tremendous improvement to the sail shape and control.
 
May 6, 2010
472
1984 Oday 39 79 Milwaukee
On a more serious note, I posted this a while back and while surprisingly simple and obvious, it has been one of the best functional improvements we have done. There was a molded fiberglass step in the v-berth, near the area where the depth and speed through hulls as well as the holding tank reside. For years checking the tank level, cleaning the speed paddlewheel or removing transducers for winter storage required hanging upside down through one of the v-berth storage bin holes. I cut out the top of the fiberglass step and fabricated a new removable step of plywood with thin teak and white oak veneer strips. It matches the existing cabin sole very well.
 

Attachments

TomY

Alden Forum Moderator
Jun 22, 2004
2,759
Alden 38' Challenger yawl Rockport Harbor
I built a set of handrails some years ago. I thought I could improve on the off the shelf design available everywhere.

Combing the docks of old wooden boats I looked for ideas. This shapely set of hand rails on a 1930's boat caught my eye. After close inspection, design elements that appear gratuitous at first glance, turn out to be practical.

These rails tapered in profile from wide bases or feet to a hand friendly round at the top. The 'loops' are closely spaced as well.

Handrails Viking O crop.jpg

Handrails are notorious for deck leaks. The wider attachment point of the wide bases, closely spaced as well, would be more secure and a better seal. Simply, this was a better handrail design than off the shelf.

I wasn't willing to get as involved in the shaping but I'd go for the wider bases. After some thought with a pencil and paper,...

I bought easily available 3/4" Sipo from a local supply and went about building up 1 1/2" handrail stock.

With all my clamps I waited for an epoxy panini sandwich to cook:
Handrails clamping sized.jpg

Then using the simple fast handrail cutout method: Spaced hole saw cuts - cut out the center material, rip down the middle. Voila, a pair of rails out of the glued up stock (not my photo below).
newhandrails_b.jpg

I had an additional step as my rails were 1 1/2" thick. I cut a taper; 1/ 1/2" base to 1" top, on a table saw. The cut rails mounted on a scrap of 1 1/2" pine, it was easy to sand the faces flat and run a router with a 1/2" rounding bit to form a 1" round loop.
Handrails cutting shaping.jpg

The rails were protected by a build up of varnish, easy at this stage. No matter what sealant you use, sealing the attachment bases will give the best performance.
Handrails cutting shaping finishing_.jpg

The last part of the improvement is controversial: These rails would be fastened from below, with screws, not through bolted. This requires careful measuring and pre-drilling pilot holes. Plus my design had the screw threads in mind with the thicker bases and the epoxy line down the middle. First mounting with poly sulfide sealant:
Handrails installed 2013.jpg


But I was planning for this second mounting, about 6 years later when I recoated the house top. I went below and with a screw gun removed all the screws. The rails went back in the shop for a few easy coats of varnish(the old finish was fine so stripping wasn't needed).

To remount the rails, my daughter gave me a hand (here she is applying butyl tape - we do evolve). With her on deck feeding the screws into the holes in the bases, and me turning the SS screws from below, we had the rails re-installed in no time.

Handrails mounting 2nd time crop_.jpg


Compare this to through bolting; which is a near permanent (until the rails fail apart from lack of tedious maintenance). These rails have already saved me time and leaks just in less taping and they will never need to be stripped and refinished in place, a nightmare.

And they are more than up to the tasks of doing their simple job, keeping me safely on deck.

Handrails in use.jpg