Hunter Cherubini 36 - Fuel Tank Replacement

Jun 21, 2007
2,106
Hunter Cherubini 36_80-82 Sausalito / San Francisco Bay
Hello All:

Been awhile since I have posted anything here on the Cherubini forum. (But I do look at the forum quite frequently!)

This query is specific only to the Cherubini Hunter 36. Really no need to respond if you don't have a 36' model. I expect that the layout of other models will be different and the info isn't quite interchangeable.

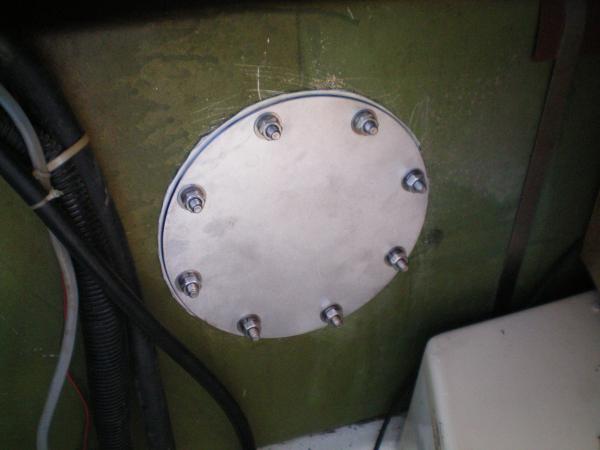
Before I get started on the project, has anyone actually replaced the OEM fuel tank yet? Mine is beginning to leak diesel into the bilge. Only a teaspoon a month. But will get worse. It's been hard to diagnose since the diesel is migrating in the void between the hull and the interior liner.

The aluminum OEM was obviously installed prior to the deck being affixed onto the hull. It will need to be cut to get out. Which will be done with shears (not a grinder) and with dry ice first dropped into the empty/washed tank to make the atmosphere inside less likely to explode.

A new tank will need to be much smaller to successfully contort back into the space. Also, I am thinking that installing a new tank on the port side (rather than the current tank's starboard side) might make the whole project much easier to accomplish.

Any insights will be welcome. Seems that replacement below deck tanks are dominated by Moeller.

rardi
 
Jun 8, 2004
1,004
C&C Frigate 36 St. Margarets Bay, Nova Scotia
Rardi,
I can't contribute much useful advice but I can offer condolences and wonder when my own old diesel tank will start to leak. However, after 35 years of working in oil & gas and being pretty familiar with the explosive properties of most hydrocarbon liquids and gasses, I can opine that you don't need to worry about cutting up a diesel tank. Even using a mini grinder to cut into the tank, the worst you can expect with diesel is a small, easily extinguished fire - definitely not an explosion. If you remove all the diesel you can and rinse with water, you can rest assured that your diesel tank represents a very minimal risk (but, by all means, do have a 10 BC extinguisher at hand). YMMV.
Jim
 
Jun 21, 2007
2,106
Hunter Cherubini 36_80-82 Sausalito / San Francisco Bay
Jim:

Thanks the input. Always valuable.

I put the shears and CO2 conditions into my opening post because of responses to a more general thread that I started on "Ask All" about four months ago. (Shows how long I stew on a project before actually getting out the tools to begin actual demolition! I was much more "just do it" when younger.)

Yes, it was always my thought (albeit I was a bit uneasy about it) as well that diesel vapor is pretty safe from igniting events.

Others on "Ask All" suggested differently.

Dry ice is readily available. Harbor Freight sells power metal shears at almost a "use and toss" price. Although I still think that a Sawsall set at low speed through aluminum shouldn't generate sparks. And if it did, the CO2 will have gone a long way to inert the tank.

Anyway, here is the link to that thread. Went on for quite a while ... https://forums.sailboatowners.com/index.php?threads/an-acceptable-repair-or-wimping-out.187821/
 
Jun 8, 2004
1,004
C&C Frigate 36 St. Margarets Bay, Nova Scotia
Rardi - by all means take all precautions that are practically available. No one ever died from being over-cautious (except possibly of old age). Diesel vapor is without doubt explosive...otherwise it could not be used as a fuel for your engine. However, the conditions required to yield flammable vapor from 'San Francisco winter temperature' liquid diesel are not likely to occur in the removal scenario you propose. I think any mechanical method employed to cut up the old tank, after it has been drained and washed, will be safe. The concern I have about using CO2 or N2 as blanket gas is that they may displace the oxygen from the confined space that you will doubtless be working in...asphyxia has killed more than a few workers in the oil/gas/refining industries. Anyway, do a hazard analysis before starting, put appropriate controls in place, and, before you know it, you will have the old tank removed.
 

tmjb

.
Mar 13, 2012
222
Hunter 36C Glen Cove
Sorry to hear your tank is leaking Rardi. I wonder how long I have until mine does also.

Sorry I have nothing constructive to offer since I have not faced this yet.

I am intrigued however that, if I understand you correctly,your current tank is on the starboard side. Mine is on the port side and looks original. I have to look next time I am at my boat but from memory I think there might just be room to get it out in one piece.

I’m happy to provide any further info re my installation if it is of use. Just let me know.
 
Jun 21, 2007
2,106
Hunter Cherubini 36_80-82 Sausalito / San Francisco Bay
tmjb:

You are absolutely right. The OEM installation has the tank on the port side. Hope I don't make the same mental mistake when out sailing someday and insist on remaining "Stand-On" when actually I'm on a port tack and another starboard tack boat is on a collision course with me!

I have looked at the OEM tank many times. Only way on my boat it could be removed in one piece to cut FRP. And the cuts would need to be fairly drastic. Would be great if I could get it out. I would be tempted then to really clean the inside. And then maybe pore in a 1/2" layer of epoxy to fully seal the bottom. Where the weeping most likely is coming from.

I have identified a couple of Moeller tanks that should fit. But the angles and restrictions of our space I think might limit whether the sizes can be contorted into the space. Hard to tell by just measuring. What I will have to do is cut/bend cardboard boxes into the exact measurements of the Moeller tanks. And do a "dry" installation. Just to verify the new tank will fit before ordering. Unfortunately I am almost certain that only a much smaller capacity tank can get through the lazerette hatch openings. Then be maneuvered into the space. This isn't a serious issue for me since all my sailing is the day-sail variety. But would be a problem for a cruising sailor.
 

RTB

.
Dec 2, 2009
152
Hunter 36_ 80-82 Kemah, Texas

I installed an access plate http://www.downwindmarine.com/SeaBuilt-Tank-Access-Plates-p-91002326.html to allow internal access to my tank. I just drained the diesel, and cut the hole to the appropriate size. There is a vertical baffle dividing the tank fore and aft, midway in the tank. Most likely, a leak will develop at the lowest point in the tank. In my case, forward in a corner. If you can figure out (by internal examination) where the leak is occurring, it can be repaired using Splash Zone - https://www.go2marine.com/product/7...-788-kit-underwater-two-part-epoxy-putty.html
You could pull the engine to get the old tank out and re-install a new one through the cockpit floor hatch....that's the only way I can see if you intend to replace the 30 gallon tank. We are a Hunter 36, 1982 year.

Ralph
 
Last edited:
Jun 21, 2007
2,106
Hunter Cherubini 36_80-82 Sausalito / San Francisco Bay
RTB:

Many thanks for posting your information and pictures. Your solution to the leaking tank is what I was originally contemplating ... but I wasn't able to find the information.

For now, I have already started to go down an alternate route.

But after that, I will contemplate repairing the OEM tank with your method of install access port, clean inside, then epoxy fill from the inside solution.

I believe that one difference (of which there are probably more) between our 1980 and 1982 models is that the later Cherubini 36 models had a quarter berth of sorts on the port side. My 1980 boat doesn't. On the port side under the primary winch area is roomy unused shelf. Much like the one on the starboard side. Except that through the port lazarette seat hatch, the shelf is totally accessible. I have just received a Moeller 13 gallon tank which eases in without protest. (Yes 13 gallons is normally too small for a cruising boat. But I do only day-sailing with the just the occasional nearby destination overnights.) I need to design a way to make the new tank secure. Also install a new deck fill and vent on the port side. Then will I re-route the fuel hose to Racor filter. Leave in place the line from filter to the engine.

I have studied many times the OEM aluminum tank on the starboard side. I really don't think there is a way to remove it, engine in place or not. It fits snug in its spot. With the cockpit coming restricting maneuvering room at the aft end, and it being tucked between the ice box and hull on the forward end, I am pretty sure the tank can't be angled out. Unless fiberglass is cut. I certainly believe that the tank was installed by Hunter prior to the cockpit/deck molding being dropped in place. Removing it probably will require it being cut into three pieces.

An situ repair would be great!
 
Last edited:
  • Like
Likes: Jim Legere
Jul 29, 2012
80
hunter 37 cherubini Apollo Beach
I suspect I have a leak in my 80 H37C. Sounds like we have a similar problem. There is no way that tank is coming out and/or replaced in one piece.

There is a solution worth looking at. They make fuel bladders, cut an access port in the top of the old tank, I think it was like a 14"x14" access hole. Remove the old baffles, add some sort of padding (prevent sharp edges from puncturing new bladder) insert bladder, new baffles and make connections
 
Jun 21, 2007
2,106
Hunter Cherubini 36_80-82 Sausalito / San Francisco Bay
I suspect I have a leak in my 80 H37C. Sounds like we have a similar problem. There is no way that tank is coming out and/or replaced in one piece.

There is a solution worth looking at. They make fuel bladders, cut an access port in the top of the old tank, I think it was like a 14"x14" access hole. Remove the old baffles, add some sort of padding (prevent sharp edges from puncturing new bladder) insert bladder, new baffles and make connections
mjmercer:

Many thanks for posting your 37' oberervations. Please post updates.

I suspect more of us 1978-1982 Cherubini Hunter owners will begin to discover very subtle indications that the 40 year old OEM aluminum tanks are suspect.

In my case, the initial leak rate was so small that I first looked elsewhere for many months. The first warning was a couple of years ago and after heavy winter rains driven almost horizontally by wind. 1/2 gallon of water got into the bilge from somewhere. (Normally when I am in berth and the engine is sleeping, none gets in through the prop shaft seal.)

Somehow, the water just didn't look right. And had an odd feel when the fingers went in.

I eventually surmized that because the initial rate of leakage from the diesel tank is so slow, by the time the diesel gets to the bilge, most of the volatile component has evaporated. Just sort of a strange oil residue makes it. A paper towel takes two months to absorb the leak rate. Turns a oily yellow in color. I even once sponged out my bilge. Squeezed it into a clear jar. After several days of the liquid remaining undisturbed, there still was no separation of water and oil that I could see.

Only by removing the set of drawers and the framing around my OEM icebox could I even reach my fingers to feel around the backside of my OEM aluminum diesel tank. When I did that, yes oily stains got under my fingernails.

Hope that the bladder insert solution works for you. For us 36's, the access is too tight to cut a hole in the tank's top. But we can do from the side.

rardi
 
Aug 10, 2010
105
Hunter 36, Quarter Berth Model Placid Harbor, Cuckold Crk, Patuxent River
Rardi,
I own a '82 H36 so this got me thinking when I'm next for this repair. You may have touched on this already...any thoughts to installing 2 smaller tanks in the same space as the older metal tank and plumbing them together or installing a transfer line (maybe with a pump)? You'd get a longer range perhaps? Still would need to chop up the old tank to remove it though...
Marc
 

tmjb

.
Mar 13, 2012
222
Hunter 36C Glen Cove
Rardi,
I own a '82 H36 so this got me thinking when I'm next for this repair. You may have touched on this already...any thoughts to installing 2 smaller tanks in the same space as the older metal tank and plumbing them together or installing a transfer line (maybe with a pump)? You'd get a longer range perhaps? Still would need to chop up the old tank to remove it though...
Marc
As a fellow H36 owner ('81) I have been following this with interest and was thinking exactly the same thing. Two tanks has the added advantage that when traveling locally you can go with a fuller smaller tank (less likelihood of water etc in it and less weight) plus gives you a 'reserve' tank like the old cars used to have which helps gauge consumption and avoid running out of fuel unexpectedly.
 
Jun 21, 2007
2,106
Hunter Cherubini 36_80-82 Sausalito / San Francisco Bay
Thanks the replies today.

I read them on my mobile this afternoon while at my boat ... while still futzing around with my just installed new tank connections. I have included a few photos. And further below some description of the new tank installation experience.

I looked again today at the OEM tank on the port side. Possibly it could be removed if the bulkhead just forward is cut out. And the storage area with the sliding smoke plastic doors above the oven space is dismantled. Maybe?...Possibly?

As for removing the OEM tank without any destruction to the FRP, I think it would need to be cut into three pieces. When the middle cut section is removed, then the fore and aft can be slid into the resulting opening and extracted out and up through the open lazerette seat.

Yes, two smaller Moeller tanks probably could go in. But to be sure about the size(s) to order, the green OEM aluminum tank first must be removed. I think the only way the be sure about the replacement size is to make some "templates" out of cardboard that are the exact 3D dimensions of the contemplated replacement tanks. Be sure the templates will go in. And also there is enough access to strap them adequately. And there is enough access to install the 1.5" fill hose.

One of the attached photos is of a couple of cardboard boxes, taped together with spacers. It matches within .5 inch in all axis the dimensions of 13 gallon Moeller tank I was considering. Only after confirming that this mock tank fit into the lazertette opening and then onto the starboard side shelf, did I actually make the purchase.

The other two photos are of my installation.

My main issue now is getting out 100% of the OEM tank's contents. So it won't continue to leak for many more months. I was able to use my boat's electric fuel pump to remove about 18 gallons of good fuel before it began to suck air.

One pleasant surprise about the Moeller plastic tank... it is quasi opaque. I can see the fuel level through it just by opening the lazarette seat. No need for a fuel guage!
 

Attachments

Last edited:
Aug 10, 2010
105
Hunter 36, Quarter Berth Model Placid Harbor, Cuckold Crk, Patuxent River
Thank you for the info Rardi. Glad to know you can see the fuel level through the tank. I was poking around on Moeller's website and was hoping that was the case. Keeping fingers crossed I won't have to deal with this for some time.
 
Aug 10, 2010
105
Hunter 36, Quarter Berth Model Placid Harbor, Cuckold Crk, Patuxent River
Ahhh - forgot all about this post, looks like my time has come to join this club as well. Compression post replacement, check! Fuel tank replacement, in progress...