Cunningham on a 26S

walt

.
Jun 1, 2007
3,511
Macgregor 26S Hobie TI Ridgway Colorado
There was a recent thread where the use of a cunningham was mentioned for controlling the position of the draft in the main sail. I currently rig my main at the mast and usually set the halyard fairly tight. The video below talks about the draft and cunningham and I decided that I want to mess with this and see just what it does.

I wont visit the boat for a couple months so cant install this yet but have the plan in place. My main sail fortunately already had the cringle (hole) for the cunningham. What I have shown below should be set up for 8:1 leverage and Im thinking it will all be 5/16 line. The blocks I plan to use are all Harken 40mm (available on this web site). The first two pictures show about what Im thinking. In the first picture "A" is the cringle and you can see the corresponding spot A in the second picture (just the line running through the cringle on the sail - no block). The point "B" is on the mast and I will drill a 1/4 inch hole through the mast at this point and install the bolt "B" shown in the second picture. "C" is at the base to hold a block that will route the line back to the cockpit.

cunningham_1_mod1.jpg
cunningham5.jpg


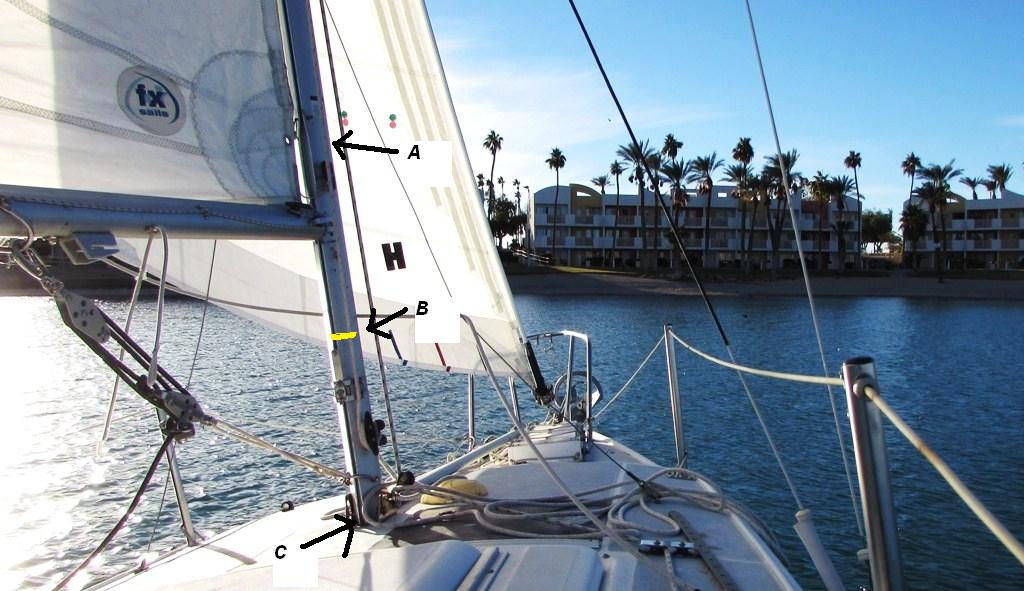
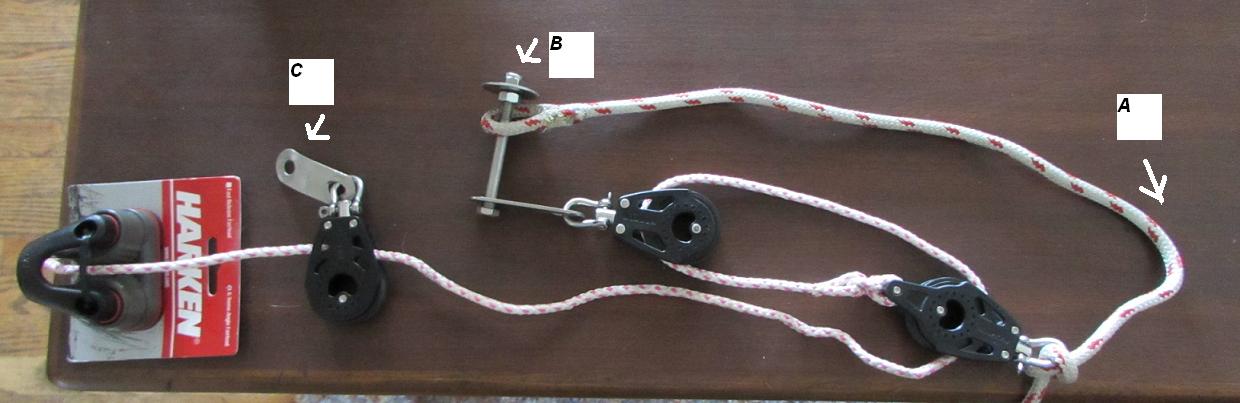
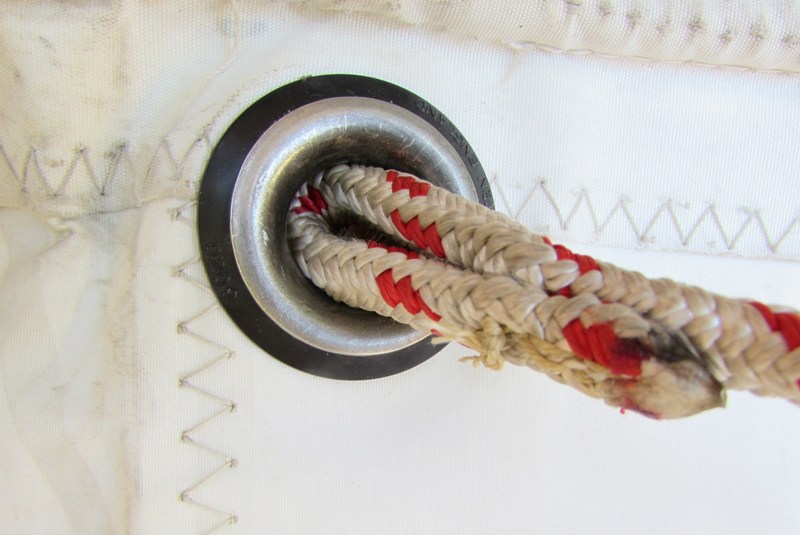
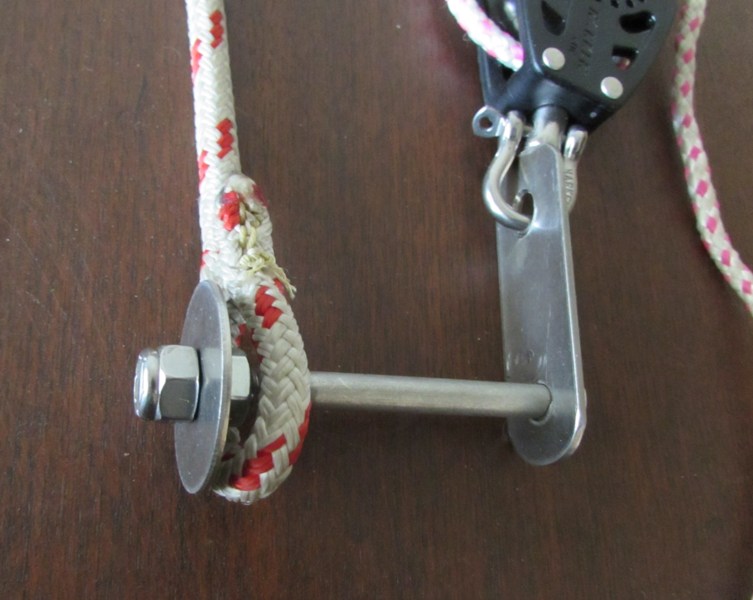
Since this boat is used as a trailer sailor, I always try for fast setup. When trailered, the boom/main sail is removed from the mast so I will have to install the cunningham each time I rig. In the picture below is a loop sewn on the end of the line that goes through the cringle and once through, the loop simply fits over the fender washer on the area "B" shown on the mast. There will be a spacer between the fender washer and the mast to allow for the loop. The loop is sewn so that its real snug going over the washer so I think it will both stay in place plus be fast to assemble.

cunningham4.JPG
cunningham3.JPG
 

Joe

.
Jun 1, 2004
8,004
Catalina 27 Mission Bay, San Diego
I don't see the 8:1 purchase. But that's okay, because you don't need that much... unless you're trying to bend the mast also, which is a common function on beach cats or racing dinghies with no backstay.

Okay.,.. here's my suggestion. NO through bolt. Overkill. A small horn cleat on port side will anchor the cascade line.
Next... replace the cascade line with 3/16 dyneema.... splice an eye in one end only... whip the straight end... The dyneema is super strong and will glide through the cringle easily.

Keep the top block.. single with becket .. replace the two singles with a double and attach to the deck at the "C" location. You can increase purchase if you want... but you really shouldn't need any thing more than 3:1 .or 4:1

You can also add a small bullet lead or eyestrap to the mast on starboard side, opposite the horn cleat, to bring the cascade line forward, if you like. But I'd wait to see how the system works first. You don't want the blocks rubbing or banging on the mast.

So the entire assemble can stay on deck when the mast is down... or simply unclipped at the bottom block to remove. When you set up... you clip the lower double to deck.. the tackle should stay below the boom... then run the dyneema up through the cringle and tie off to the horn cleat on port side.

Finally, use the smallest blocks you can find that are rated for 5/16.

Additional comment: if you choose, you can use this line to secure tack for reefing. That's what I do on my 27 footer. Rather than a cascade through the cringle... there is a metal reefing hook on a pendant.. attached to the purchase tackle the same as the cascade pendant.
 
Last edited:

walt

.
Jun 1, 2007
3,511
Macgregor 26S Hobie TI Ridgway Colorado
Joe, many thanks for the response. Yep.. I didnt know how much pull I will need so I picked the setup I used from a picture I found doing an internet search. Lots of good ideas there, I will also look into that 3/16 Dynema.

So the entire assemble can stay on deck when the mast is down... or simply unclipped at the bottom block to remove
I really like this idea!

One time I did a long down winder with the main halyard "accidentally" very loose. The sail looked bad but I also remember thinking the sail was working fairly nicely. I also am wondering if the way Im normally rigging the main and getting the halyard real tight is bringing the draft forward a little too much and I would get some benefit by loosening the cunningham.

When I rig in the future, I will set the main halyard a lot looser than I have in the past so that with the cunningham all the way out, the luff is loose but I can still tighten it more than I currently am doing on setup. At least this sounds good at the moment without ever seeing how this works.

Interesting also the idea to use cunningham also as a reefing hook. I made the pulley and hook in the picture below from looking at another picture off the internet thinking this would solve the easy setup for trailering but decided not to use it. But this hook and pulley could also work like you mentioned for the reefing and I could get rid of some other hardware.

cunningham6.JPG
 
Last edited:
  • Like
Likes: My Mistress

walt

.
Jun 1, 2007
3,511
Macgregor 26S Hobie TI Ridgway Colorado
Curious also how others would rate the main sail controls for usefulness. This is influenced by my single hand sailing this boat almost all of the time (which I actually prefer) plus the near mid boom sheeting arrangement on the 26S. What I think I am going to find with the cunningham (and have never used one before so could be wrong).

1. Sheet
2. Traveler
3. Cunningham
4. Outhaul
5. Vang
6. Backstay

Vang and backstay might come in about the same place.. I dont mess with either of these often. Part of the reason I dont use the vang much is because Im single handing and its not convenient.
 

walt

.
Jun 1, 2007
3,511
Macgregor 26S Hobie TI Ridgway Colorado
From a Flying Scott.. another idea for quick setup for trailering. The cascade line looks to have a permanent connect to the mast and the loop fits through the sail cringle.
 

Attachments

walt

.
Jun 1, 2007
3,511
Macgregor 26S Hobie TI Ridgway Colorado
Joe, thanks again for your post, I think it should be very useful for anyone thinking about doing this, its been useful to me.

Well.. its probably a good thing Im not at the boat as Id probably have about an extra 100 or so holes in the mast already. The pictures below show what I will probably try incorporating. The first picture is just a link to the picture in the first post of this thread showing the points A, B and C.


This is probably what I will try first (different line but it shows the idea). The benifit to this new setup is that most of the setup is just left in place for trailering so rigging should be very fast. The point A is the line going through the sail cringle. B is the end of the line going through the cringle and this line is permanently attached at the mast and has a loop on the other end that fits through the cringle. I am calling this 4:1 since a 4 inch pull of the line through the cleat results in the cringle moving 1 inch (the loop through the cringle results in 2:1 by itself). This implementation will be fairly simple with what I already have on the boat.

cunningham7.JPG

If I find the 4:1 isnt enough leverage, I would have the option to go the setup below. Now the line through the cleat moves 8 inches for each inch the cringle on the sail moves. However, at the moment unless I bought a new dual block (like one of Joe's suggestions), I would need to install something like the link below to accommodate all the blocks at the base https://www.dwyermast.com/items.asp...milyID=19&familyName=Halyard+Organizer+Plates at the mast.. which I might do. Unfortunately I dont know the correct size to order as I am a long way from the boat.. If anyone is still reading this and has a Mac 26 classic, do you know the width of the mast base plate that is attached to the deck? Also, can you buy a "halyard organizer plate" on SBO - I couldn't find anything..

cunningham8.JPG
 
Last edited:
  • Like
Likes: My Mistress

chp

.
Sep 13, 2010
418
Hunter 280 hamilton
Let us know how the rig works. So far I've found the best controls I've added have been the traveller and the line reefing. The traveller being the number 1 best control for keeping the boat upright and keeping up the speed. I used to reef a lot in strong gusty winds, but now I maintain a full sail, can keep it tight and flat and just adjust the traveller for the gusts. I also started playing around with the backstay and that helps as well. Its amazing with a few sail controls how well this boat can actually be sailed and kept on her feet in high winds.
 

walt

.
Jun 1, 2007
3,511
Macgregor 26S Hobie TI Ridgway Colorado
Completely agree on the traveler for this boat. Im not counting on it being anywhere near as useful as the traveler but I am pretty sure I will have lots of fun seeing what it does even if I only use it to determine a single best setting for the luff tension. Wont be until late fall until I find out..

Any one have the lateral length dimension for the mast base holder on the 26 Classic? I would like to buy one of these https://www.dwyermast.com/items.asp...milyID=19&familyName=Halyard+Organizer+Plates and need to find out the "W1" dimension.
 
Last edited:
Nov 8, 2010
11,386
Beneteau First 36.7 & 260 Minneapolis MN & Bayfield WI
For small boat there is no need for 8:1 or even 4:1 on a Cunningham. A very simple 2:1 can be made (a variation of Walt's post) like this: loop the line though the Cunningham eye and back down to the tack cringle. Push it through and put a stopper knot in it. Easy 2:1 with minimal hardware. A bonus; it never falls out!

On BlueJ this comes back to a clutch in the cockpit.
 

walt

.
Jun 1, 2007
3,511
Macgregor 26S Hobie TI Ridgway Colorado
Cruiser, thank you very much for taking the time on that!!!!

Jackday, appreciate your input. If just a 2:1 works for a boat this size, am I wrong to assume that you never really put a lot of tension on the main sail luff? More tension is supposed to move the draft forward and I gather from that video this makes the sail generate a little less lift but more tolerant of angle of attack. Ie, if the water gets rough, tighten the cunningham (move the draft forward) so that main sail still works overall well even with all the movement of the boat. But.. you just dont want to move the draft very far forward or at least you get diminishing results by trying to do this with the luff tension.

When I set the main halyard tension now I have a horn cleat at the bottom of the mast that I pull the main halyard tight into (not cleated yet, just using it as a post) , then I grab the halyard above the cleat and pull it towards me then take up the slack in the cleat, repeat several times. I get the halyard fairly tight doing this. If a 2:1 cunningham is all I need, Im wondering again if I am setting the harlyard too tight in the first place. The cunningham will be good for experimenting with this.

Ok... Im back to trying this (link to picture above) since I already have all the parts..

 
Nov 8, 2010
11,386
Beneteau First 36.7 & 260 Minneapolis MN & Bayfield WI
Walt, the effort to used set a cunningham is much less that the halyard. Even on BlueJ with a 230 sqr foot main, with the 2:1 we can can dramatically effect the draft position by pulling (hard sometimes) on the line in the cockpit. The run of the line makes it easy for me to get at least 50 lbs of pull on it; so say 100 lbs at the eye. That's a fair amount. If I did need more, I'd put it on the nearby winch! ;^)
 
  • Like
Likes: My Mistress

walt

.
Jun 1, 2007
3,511
Macgregor 26S Hobie TI Ridgway Colorado
with the 2:1 we can can dramatically effect the draft position
Awesome!! Im looking forward to trying this out!
 

walt

.
Jun 1, 2007
3,511
Macgregor 26S Hobie TI Ridgway Colorado
I visited the boat this last week and implemented the 4:1 version of the cunningham shown in post #11 which at least in the back yard seems like it will work well. Still have not tried it out. I like those wide angle fairleads because I often single hand sail this boat so generally need to run the controls from either side of the boat. Most of the setup remains on the boat for trailering. Setup is very quick, just feed a line with a loop on the end through the cringle on the sail and clip to the cunningham pulley assy.

Thanks again to SBO as this site is the best forum I am aware of for posting pictures

Picture below - the new cunningham cleat is on the left. The upper cleat on the right is for the jib inside sheet and under the jib cleat is the centerboard cleat.

cunningham1.JPG
cunningham2.JPG
cunningham3.JPG
 
Sep 20, 2011
29
MacGregor 26 Lake Waccamaw, NC
Thanks. I will set up a Cunningham on my boat using those plans. I appreciate the attention to details (and pictures) in the posts which shows the knowledge and experience accessible in the forum. Thanks again for everyone sharing.