Sliding hatch "lips" cracking

Sep 30, 2013
3,541
1988 Catalina 22 North Florida
Primarily at the forward end, on both sides. Both the C22's I've owned had this problem. My current one has recently gotten worse. Time to fix it!

I hope to remove the hatch this weekend and get started on it. My general plan is to lay strips of mat down the length of both sides, on top of the lips as well as under them, until they are thick enough to juuust fit in the groove and slide fore and aft. Since the existing lips - particularly the port side - are essentially broken off and provide no structural support, I thought I would lay one layer of glass and then grind the old lip off, rather than just glass it in, if that makes sense. (You can see where about 1 1/2" of the port side lip was actually broken off entirely some time in the past. The owner apparently dabbed some marine-tex or something on it, and just left it that way).

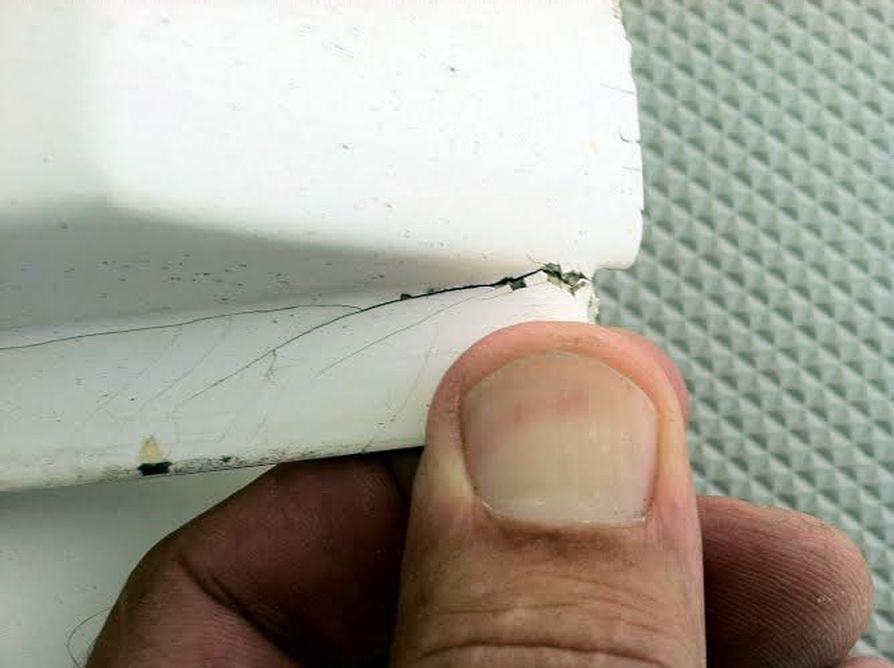
Also, the leading (forward) edge of the hatch has some dings in it. The edge is quite sharp, and therefor easily broken, so I thought I'd round it off somewhat with a grinder or sander.

Lastly, I thought I'd buy a couple Preval sprayers and some "Evercoat One Step" gelcoat, and spray the repairs up to the edge of the non skid so any color difference will not be very noticeable.

But before I begin, please critique my plans, thanks!!
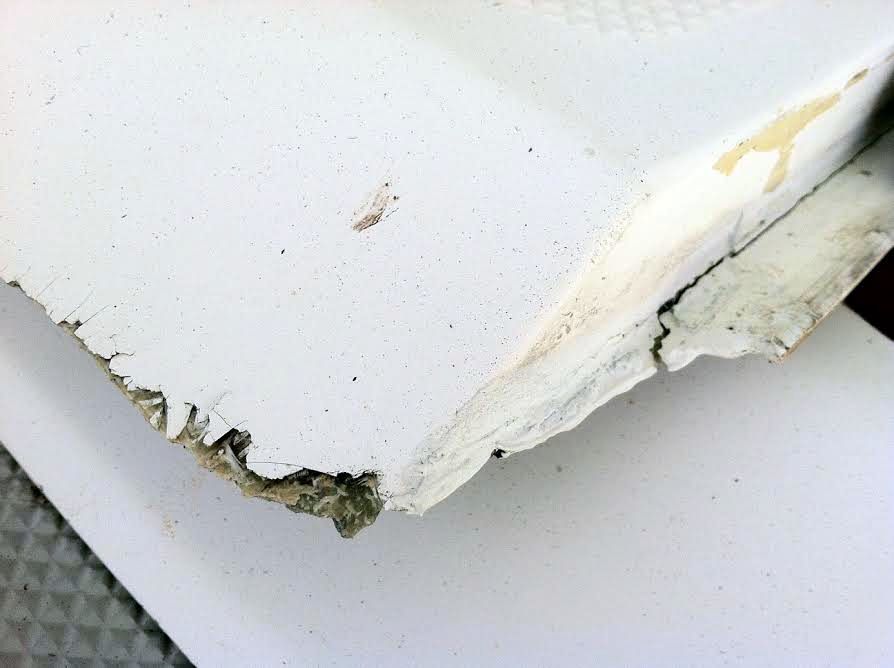
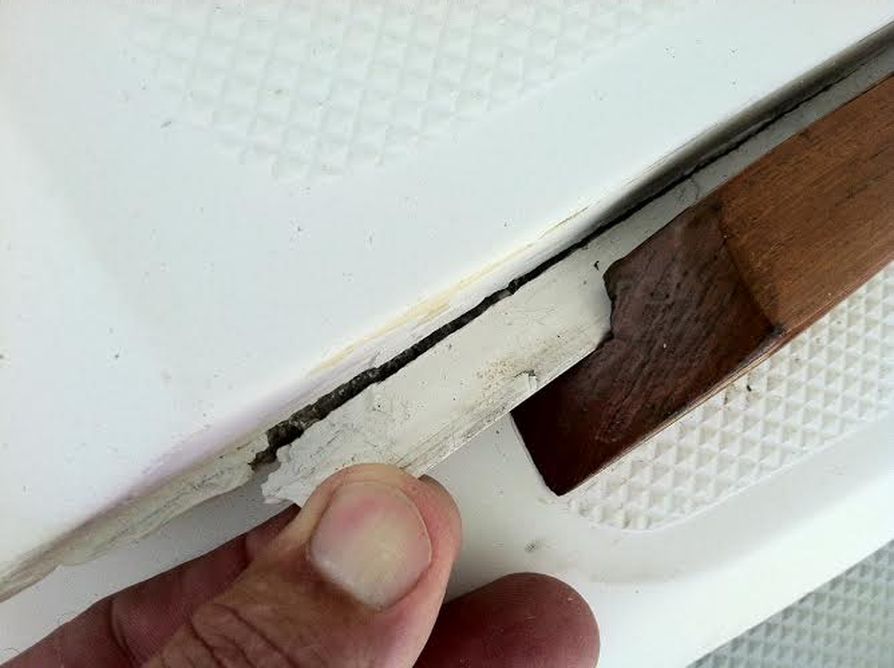
1.jpg


2.jpg


4.jpg
 
Last edited:
Apr 1, 2010
398
Cal 33 and Sea Pearl 21 . Crystal River, FL
oh that's horrible, un-repairable in fact!! boat is totaled!! I know a guy that will haul it off cheap!!! ;)
 
Apr 1, 2010
398
Cal 33 and Sea Pearl 21 . Crystal River, FL
I am a big vinylester fan. stronger and better mechanical adhesion than polyester but none of the finishing requirements of an epoxy. also a longer pot life than poly (but not as long as epoxy). honestly, for what you are doing it probably does not matter either way.

I will say that speedboats are rebuilt all over the country, with way more weight and HP than originally designed, with poly and vinyl esters and there is no problem with the mechanical bond there. its one of those things, epoxy is technically stronger, but is the added cost and topcoat compatibility problems worth it??

west marine may or may not be on to something with that link. that is the first time I have EVER heard of a poly gel being used over epoxy... idk... I remain skeptical, they are trying to sell something after all.

has anyone else here used poly gel over epoxy with any success?? I may learn something!!
 
Apr 1, 2010
398
Cal 33 and Sea Pearl 21 . Crystal River, FL
nobody? I was interested to hear other opinions!
 
Jul 23, 2013
487
1981 Catalina 22 #10330 Bayview, ID
I think you're going overboard a bit and will spend more time and money on the fix than you need to. Mine wasn't cracked up quite as bad as yours, but the edges were as sharp as knives.


The epoxy mold technique worked great for me and only took a couple hours, total. No gel coat, no paint, you have to look hard to see the repair, and it's held up to me standing on it so far. Just build the bottom material back up and go sailing.

Permanent companionway hatch repair

My .02, FWIW.
 
Sep 30, 2013
3,541
1988 Catalina 22 North Florida
I'm afraid mine is in a lot worse shape than yours was, Stingy. On the port side, there are almost two inches of lip that are missing entirely, and at least another 8" that have separated from the hatch, and have no structural support at all. I could build the material up the way you did, but it would still be just as broken. (Unless I'm missing something, of course!)

The starboard side is not nearly as bad, but if I'm doing one side, I figure I might as well do both. I don't ever want to do it again, and I want it strong enough for a small elephant to dance on.

On another note ... Oh dear Lord, I think these teak rails may have been set with 5200.
 
Jul 23, 2013
487
1981 Catalina 22 #10330 Bayview, ID
I hear ya. It's probably a good idea to get some fibers in there to reinforce it, then. You've got it in front of you and I don't.

Good luck with the rails. Take a deep breath before you start and plan on a dog fight :)
 
Apr 1, 2010
398
Cal 33 and Sea Pearl 21 . Crystal River, FL
and I want it strong enough for a small elephant to dance on.
\
what are you trying to say?!?!?!? despite what you may think, I am in perfect shape!! I just wouldn't want to damage my beautiful 6 pack so I keep them covered with a soft cushy layer that most people would think of as fat!!
 
  • Like
Likes: pateco
Sep 30, 2013
3,541
1988 Catalina 22 North Florida
Don't be silly ... you can't dance!

Well I got one of those rails off, which is enough to remove the hatch and get started. The rails are indeed set with 5200, but at least the *#@!! Devil's Glue was mostly just around the screw holes, so it wasn't TOO bad a job. I expected worse. I'll try to get my hands on some Debond Marine Formula for the mess, I hear it works well.

At any rate, the repair is underway! Don't ask me how I'm going about it, I'm figuring it out as I go along. It's just plastic, right?? I did decide to just go with West epoxy, simply because I'm somewhat familiar with it, it's really strong, and it's what I have on hand.
 
Last edited:
Sep 30, 2013
3,541
1988 Catalina 22 North Florida
Here is the underside of the forward port corner, the worst part of the job. You can see the missing piece of lip, and the long crack ....

I've already sanded this area so the abomination is not nearly as obvious, but you can also see where some PO smeared Marine-tex (or something) on the area, thinking that would fix it. Probably right before rebedding the rails in 5200.

3.jpg


Anyhoo, I sanded down the length of the underside, made a skirt with blue masking tape, and built back the missing area. I ground out the crack and filled it with thickened epoxy, then started laying strips of cloth down the length of the lip. I think I did eight layers, but it might have been nine. The surface is getting wavy now, so I've moved on to the other side. I'll do eight layers down that side (done four so far), clean it all up, sand it smooth, and have a look at it. This is the view from underneath:

6.jpg
 
Last edited:
Sep 30, 2013
3,541
1988 Catalina 22 North Florida
This is looking really good so far. Bottom of the port side:

9.jpg


And here is that forward port corner, with a light under it so you can see where the missing piece was:


8.jpg


I'm waiting for the other side to cure enough I can trim the edge, flip it over, and make a determination what to do next. But I think I'll sand the upper side of the lips, lay a tiny fillet in the inside corner, and apply a couple more layers of cloth. Then sand that all down, mask it, and try shooting some gelcoat over the repair.

Just on top though, for the gelcoat. Unless I'm mistaken, the repair will be invisible from inside the cabin, so why mess with it.
 
Last edited:

DJN51

.
Oct 26, 2009
377
Hunter 23.5 East Chicago In
Did same on my Chysler 20 yrs ago.After repair I put plastic edging on from Home depot to protect edge and on boat where it slides on put the fuzzy side of velcro down .No friction.Do that on all my sliding hatches.No binding
 
Sep 30, 2013
3,541
1988 Catalina 22 North Florida
Did same on my Chysler 20 yrs ago.After repair I put plastic edging on from Home depot to protect edge and on boat where it slides on put the fuzzy side of velcro down .No friction.Do that on all my sliding hatches.No binding

I was wondering about something along those lines, as long as I have the hatch off. I'd been eyeballing this stuff from CD. Not too much more expensive than Velcro ... except for the shipping of course.

http://www.catalinadirect.com/index.cfm?fuseaction=product.display&Product_ID=1312
 
Jul 23, 2013
487
1981 Catalina 22 #10330 Bayview, ID
Might be a good idea. Since fixing mine it didn't have much friction at first but now that it's worn in a little, the friction has increased to where I'm thinking of doing something like that.
 
Sep 30, 2013
3,541
1988 Catalina 22 North Florida
Here's the last of three more layers of cloth, freshly laid on the upper side. This makes thirteen layers - 12 layers of cloth, and one layer of mat just for good luck. Hopefully it's enough!

Hopefully tomorrow I'll get home in time to trim this up, sand it and get ready to spray it. But sadly, the gelcoat and the Preval sprayer(s) won't be here until Thursday.

7.jpg
 
Last edited:
Jul 23, 2013
487
1981 Catalina 22 #10330 Bayview, ID
Remember to check the fit and function in your rails before you get it built up too much. It'd be a drag to have to grind some off.
 
Sep 30, 2013
3,541
1988 Catalina 22 North Florida
Oh, definitely.

I measured the slot in the rail before I mixed the first bowl of resin. I don't recall the measurement offhand, but I miked the lips after completing all the glass on the bottom side, and there was still a ton of room left.

But I'll take your excellent suggestion, and actually put the rail and the hatch in place, and make sure the hatch slides freely before shooting the gelcoat. VERY good idea.